• This Forum is for adults 18 years of age or over. By continuing to use this Forum you are confirming that you are 18 or older. No content shall be viewed by any person under 18 in California.

20 Practical forming questions

I'm starting to play around with some scrap 223/5.56 brass to figure out exactly what process I want to use to form my 20 practical brass. My upper should be done at the end of the month (can't wait!).

Here's what I KNOW I'm going to do. Start with an RCBS 223 SB die, then my Redding S die with a .235 bushing, then the Redding S die with a .225 bushing and .204 expander. Once I have loaded ammo, I MAY buy a bushing that gives me my desired OD, but for now I'm undersizing slightly and then using the 204 expander to get the final ID. I'll be doing most, or maybe all of this on my Dillon 650. The goal is to run it through the press no more than twice. First pass will be the RCBS die and Redding with the .235 bushing. Second will be the Redding only with the .225 bushing and .204 expander. 2nd pass, I plan on seating primers.

My questions -
First, when should I de-prime? I can't find a 20 or 17 cal stem or sizing button for my RCBS die so de-priming on the first trip through the 650 doesn't seem like it would be an option. Seems like I should be fine de-priming on the last pass since the Redding die will have the 204 expander installed. No reason I couldn't also have the de-capping pin installed. The next station on the 650 can then seat the new primer and it will be ready to load. Does that seem like an acceptable sequence?

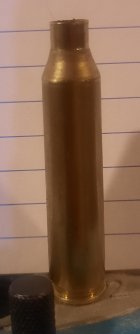
Second, while playing around with some scrap range brass, I noticed that after going through the .235 and .225 bushing, the junction between the neck and shoulder doesn't look quite right. It's like the new portion of the shoulder is at a slightly different angle. It almost looks like I didn't run the die down far enough. I can see where the case head has been sized so I'm pretty sure the press allowed me to run the brass all the way into the die body. This kind of makes sense because that portion of the brass is unsupported in the 223 die body. My concern is that this could cause an issue with brass being able to fully chamber. Seems like this could be an even bigger problem on an AR upper. At least with a bolt gun, it would be obvious that I couldn't close the bolt. I don't have my upper yet, so I don't have a good way to check and see if this is an actual issue. Has anyone seen this before? .
I haven't pulled the 204 button through anything yet, so maybe that will "fix" things. I'll try to take a few pics of some brass tonight (ran out of time this morning).

Thanks,
Mark
 
get a Redding universal decapper set. I got it for 17/20 then later I ordered a mighty armory one when they came back in stock. I run it through my 750 with case feeder then just deprime away
As far as the loading goes I can’t offer advice on that but I have deprimed countless 223/556 brass this way as well as my 204 ruger brass
 
Second on the Mighty Armory de cap die and 20 cal pin. I would de-cap 1st, the MA one does nothing but punch out the primer.

It sounds like you are starting to get the donuts at the neck/shoulder junction based on your comment. Try annealing the test brass as it will help.

Google on how to make 20P brass, and you will get a couple days worth of reading. There are some good descriptions/instructions on this website, just use the search function for lots of reading material.
 
When you size down the brass it will look like that. After you load and fire it will blow the shoulder out to your chamber. I have one in a bolt rifle and love it. Dont know what the reamer print will be on urs but with mine its a tight chamber by design. Hell on a fired brass i can not even seat a bullet with out a die. From what i read the original design was to be tight but not needing necks turned. On virgin brass my bolt has resistance due to false shoulder. After firing and resized its all good. Dont know how a AR will be. You will love this rounds. No recoil!!
 
1. I would universal decap
2. 223 full length size(standard die gutted) or a full length bushing die with a 0.241-2 bushing.
3. Check case in 223 ammo checker, if it doesn't drop in clean to lower step-- toss the case. Its not worth the hassle.
4. A couple bushing steps to 0.224-0.225-0.226 depending on brass thickness/and required neck tension for your AR.
Ammo checker is your time and aggravation saver both at the bench and the range/field.
 
I'm curious what the advantage is of buying and using a dedicated decapping die instead of what I already have. I'm open to the idea. Just curious what the benefit is over using the tools I already have. The S die came with a collar for the decapping pin (that doesn't size). I'm not sure if its small enough to not rub on a 20cal neck, but I'll check and see.

As JB10 noted the nk-shoulder junction is normal after necking down. When you say .204 mandrel are you meaning 20 cal?
I would be using a .202 mandrel to size with.
I was hoping that's what I was seeing, but wanted to double check before I started working on the 1,000 pcs I have set aside for 20 Practical.

I didn't actually measure the button. It's Redding's Standard 20 cal expander button.

For reference, this is what the neck and shoulder look like coming out of the .225 bushing. I don't think its a donut. Part of the folder just hasn't been formed yet. Fire forming would definitely fix it, but I was concerned that it could cause a problem with chambering the loaded round.


223 brass necked with 225 bushing.jpg
 
Eventually, I'd love to get an annealer. If I were forming something like 20 or 22BR brass, or even if I were running the 20P in a good bolt action with a relatively tight chamber, an annealer would be high on my priority list. Since I'm running this in an AR, this is currently $300 that I'm not going to spend but that is subject to change depending on budget constraints and experience gained...
 
Eventually, I'd love to get an annealer. If I were forming something like 20 or 22BR brass, or even if I were running the 20P in a good bolt action with a relatively tight chamber, an annealer would be high on my priority list. Since I'm running this in an AR, this is currently $300 that I'm not going to spend but that is subject to change depending on budget constraints and experience gained...
You would benefit from an annealer -
From all your cartridge adventures-

Should be at top of your list, by now… since you can use it in every single piece of brass you own..,
 
On the home page below the header is a cartridge page . A whole article devoted to the 20 Practical by Fireball.
Good tip redrockranger.
https://www.6mmbr.com/gunweek061.html

I decap using either a Lee APP with a case feeder, but I made those decap pins out of regular 223 versions...
Or, I can also decap using the 650/750 in a dedicated run.

I decap and tumble, then anneal before necking down. I am not doing 20P since 204R brass came back around, but when I did make 20P I also started with new brass so that first run didn't need to be decapped.

ETA: I would hold off doing any batch runs till I had that chamber in my hands.
First thing I would do is a chamber inspection to verify the shoulder datum length using a GoGage and tape.

Armed with knowing the shoulder datum length, I would only bump a shoulder versus the datum length. The main point of saying it that way, is to avoid using excess shoulder bump to correct a neck-shoulder radius problem.

By starting with virgin brass, and annealing, I ran in two passes. I also was careful that the bushing chamfer was run with the sharp chamfer down on that last pass.

I worked out the entire recipe in small batch fashion on a single stage press, then moved it to the progressive.

On the progressive, the subsequent fire-cycles were optionally run through a Dillon trimmer on a dedicated run, which came after decap, tumble, anneal. This type of trimmer used a trim-die that was the sizer, so a follow-up comes from the mandrel, then flare. The flare negates the need to chamfer. (I was making working 2000 pieces per batch, and never had a problem in the field.)

Annealing gave me nice crisp shoulders and no issues with necks. 20P is not difficult or complicated unless you stray.
 
Last edited:
I don't know if I just got lucky or what, but the decapping pin on my Lee Universal Decapper is the perfect diameter for my final neck size. Soooo- I use it as a neck sizing mandrill and deprimer after I've done my bushing sizer die. jd
 
You need to set the shoulder(minimum SAAMI 223 for AR) and down size the neck, that's really all there is to it. Use what tools you have to accomplish it with the least work harding. Likely to have shoulder problems if you don't use a couple bushings to tighten the neck dia. Annealing , even with a propane torch and socket/drill, will help keep shoulders from folding/distortion during the neck sizing. A good 223 ammo checker is your friend, with AR sizing, body/shoulder must be correct, range brass will be the "hardest" to get sized correctly. New brass is EASY.
 
I"m playing around with range brass at the moment just because I have it available and I don't care if it gets ruined. I have 1k of once fired lake city 223 brass that's already been washed and I'll be using it for my 20P needs.

Looking at my bushings, there's a taper on both sides but it does look like the taper is bigger on one side than it is the other. I'll take a closer look at that tonight. Flipping the bushing over might be just what the dr ordered.

I'm still a little confused on some of the comments. If I have a chamber that's head spaced correctly, and I'm sizing with a 223 small base FL bushing die, why wouldn't everything fit? At this point, I'll likely hold off until the upper arrives and then use the range brass to make several dummy rounds and ensure that they feed and the bolt closes completely.
 
long before I had an annealer, I used the hand held torch method and a cookie pan of water. turns out, the pan of water is not as important as I was taught, but it cooled the brass and I could keep track of what was annealed. I do it in the dark and when the brass it's a dull red, done, knock it over. bright red, too much. very simple. any time brass is worked, it hardens. if interested, google it for better directions. I'm sure someone has made a video.
 
Last edited:
I shoot range brass , occasionally a couple just won't size to drop in/out fit the ammo checker. It fits but won't fall out on its own, those will be harder to extract. I scrap them, not worth a failure to extract or need forward assist to chamber. I want to find them before I load the brass.
 
I wrote myself a Word doc on how to convert the brass, as I "think" I'll remember this stuff, but as I get older, I know I probably won't! :cool:

Here's my instructions to myself, hopefully it will be of help:

How to Form 20 Practical Cases for first conversion

Prepare cases by de-capping, primer pocked uniforming, and flash-hole deburring and cleaning the cases, BEFORE you do any sizing down. Clean with ultrasonic cleaner.

1. First size once shot cases in a Full-Length Small Base sizing die, with the Expander Rod removed. With my RCBS FL SB die it takes the neck diameter from outside diameter of .2520” to .2375”, and I only let the shoulder get pushed back to 1.575” or less approximately, not below 1.573” base to shoulder datum, with Hornady G240 case comparator. The concentricity from a Full-Length die should be about 0-1 thousandth.

2. Next, with Redding S Die put in 233 bushing with the lock-nut from the expander rod on top as a spacer. Set die to NOT “bump” or set back the shoulder for this first bushing sizing, or at least not to the final shoulder bump you want for the final dimension. The concentricity might not be very good, from .002” to .008” runout.

3. In Redding die, install 225 or desired final bushing size stamping facing down, and then set the die to bump the shoulder back to 1.569” base to shoulder with AR barrel (final bump .002 - .004 from shot case length for AR, .0015 to .002 for bolt action). With the bushing and the bump together in the final sizing, this should bring the concentricity to .001 to .004 on average. The shoulder bump and bushing sizing both together on final sizing seems to really help to bring the neck into concentricity with the case on the final sizing. I even had the .008 runout necks go back to about .002 to .004 using this method.

4. After it’s sized, then trim necks to OAL of minimum 1.760" maximum 1.775” for case, and chamfer & deburr the necks. Clean sizing lube off exterior, run a brush through the necks, and you’re ready to load.

Annealing It is a good idea to anneal after your cases are freshly converted, or at least after fired 2 or 3 times.

Neck Turning:
Necks can be turned after first forming them, or after first firing. Hornady mandrel will fit inside the neck of a 0 fired LC case (unfired after conversion) that was necked with a 225 bushing.

After the brass is shot and fire-formed to your chamber, it will be more concentric. This would be a better time to turn the necks. The sizing down of the neck from 223 to 20P tends to make the final thickness of the neck uneven, and a skim turn to bring it to uniform thickness will help in accuracy. First turning try .013” neck thickness, a skim turning.

For a more even neck thickness, turn to .012” & then use 224, 223 or 222 bushing for preferred neck tension.

Keep in mind, if you turn the necks, it will make change the outside diameter of the neck, and lessen how much your bushing ends up sizing your necks, and neck tension will be less. If you use a bolt action rifle the neck tension can be as low as one to two thousandths. If you are using an AR upper you will need more neck tension to keep the bullets from sliding forward when they chamber, so you might need a smaller bushing. In an AR four thousandths or more neck tension might be minimal to be safe. So, a final bushing might be 224, or what you determine is correct for your application.

-------------------//-------------------​

A few extra notes, first is to deprime original cases while the necks are 22 caliber, but later you'll need a 20 caliber decapper, so the Redding small diameter one is excellent.

Next, for annealing I find a simple 3/8" nut driver in a drill motor over a propane torch is fine. You can get really consistent results, but it's time consuming. It's cheap, but I like the results.

In an AR, I initially used a .226 final bushing for neck sizing on LC unturned neck brass. I had no idea that the bullets didn't have enough neck tension, and they were ALWAYS sliding into the lands every time a new round was being chambered.
I was trying seating depth tests, and saw no difference in my results. Someone on the forum suggested I chamber a round, then eject it, to make sure the bullet was still in place... it wasn't, the bullet was stuck in the chamber - in the lands, dang! On my brass I needed to use a .224 bushing to get enough neck tension on my AR to keep the bullets in place.

I now have a bolt rifle, and that's not an issue, so I use a larger bushing.
 
Last edited:
I'm still a little confused on some of the comments. If I have a chamber that's head spaced correctly, and I'm sizing with a 223 small base FL bushing die, why wouldn't everything fit?
Folks who try a necked-down case, sometimes make a mistake where they misread difficulty with chambering as being caused by headspace when it is really due to an incorrect neck-shoulder radius.

If they then turn down the die, the case may chamber easy, however it comes at the cost of shorter case life. For this reason, it is important to nail the headspace with confidence so that you can tell the difference if other reasons cause problems.

20P is about as easy as it gets, so try not to over-think it, but at the same time you must learn to understand your chamber and cartridge dimensions.

If you don't have much wildcat experience, the 20P is a good place to start. I'm never going to say don't use mixed range brass but I am going to recommend you consider including virgin brass to begin and running only small tests till you gain functional reliability.
 

Upgrades & Donations

This Forum's expenses are primarily paid by member contributions. You can upgrade your Forum membership in seconds. Gold and Silver members get unlimited FREE classifieds for one year. Gold members can upload custom avatars.


Click Upgrade Membership Button ABOVE to get Gold or Silver Status.

You can also donate any amount, large or small, with the button below. Include your Forum Name in the PayPal Notes field.


To DONATE by CHECK, or make a recurring donation, CLICK HERE to learn how.

Forum statistics

Threads
166,237
Messages
2,215,141
Members
79,506
Latest member
Hunt99elk
Back
Top