Follow along with the video below to see how to install our site as a web app on your home screen.
Note: This feature may not be available in some browsers.
This Forum is for adults 18 years of age or over. By continuing to use this Forum you are confirming that you are 18 or older. No content shall be viewed by any person under 18 in California.
Doing a P14 build. No old barrel, just the action. Would anyone have dimensions or pictures of the breech end of the barrel? I have major dimension drawing, but would like cut-outs a little better than what I have.
I am going to be making a relief cut and removing the barrel off of a P14 action as I am also starting a couple of these projects. But here is a very good resource that I have "BookMarked" and I often refer to it. The P14 dimensions are not too many pages down. I tried to print this resource but the print was too small to read. Use the zoom feature at the top to make it bigger. The Gunsmith who took the time to make this did a nice job and measured and drew out a bunch of different rifles.
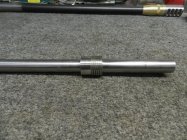
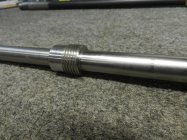
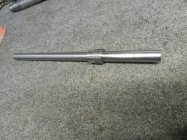
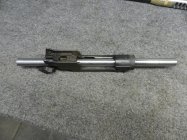
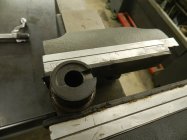
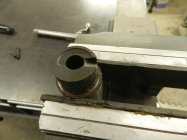
Ok, I was able to get the barrel off without making a relief cut, But I busted off 2 grade 8 bolts that I have reefed on for years, Today they reached their limit, Trying to keep this barrel tight. Anyway here are some pics of what the Tenon looks like, If you aren't happy with the drawings, I can measure out everything for you. The P14 does not have the Cone Breech like the P17 has and has a recess for the extractor and an extractor cut similar to the cut on an SMLE.
I have not cut anything yet, I have just removed the old barrel. I have a few things in mind when it comes to cutting that, One would be to use a right angle attachment on the Bridgeport, The other would be to use the Mini router on a tool post setup on the lathe. But I still haven't settled on the caliber for this one yet.
Ahh, 10TPI square should not to bad,my advise is cut a practice thread, a square thread has a lot of surface area to cut. Make certain your set up is very very ridged & take very light cuts.
cut buttress threads?
Same as an '03A3. I was told to grind the tool .052" wide and cut the threads .052" deep. Straight in feed of course. Worked out on the one I did years ago.
Same as an '03A3. I was told to grind the tool .052" wide and cut the threads .052" deep. Straight in feed of course. Worked out on the one I did years ago.
I just grind the tool at .050". Then, I offset it .001" for clearance at the last cut. For the single shot match rifle, I didn't cut the "worm" recess but simply turned the recess all around; leaving a ridge all around for headspace. It worked well enough that I did the same thing for the repeater and it worked too.
When you grind your tool, make sure to grind adequate clearance. Also, you don't need to make the tool too long; about .150 is fine. This gives you room to see and to clear the chip. Make the cutter at the leading edge of the tool. WH
I've done several 03's and P17's. Be sure to have clearance on the sides and bottom of the threading tool if grinding it by hand. Clearance mostly takes care of itself with a V bit, but not for a bit for a square thread. If you use a carbide bit cut with wire EDM, you don't have to worry about side clearance, as the sides will be perfectly parallel. Running the barrel backwards and the bit upside down (threading toward the breech and not the shoulder) is the safest method for this coarse thread unless you have an automatic thread shutoff.
I just did one of these a few months ago. I did it in a lathe. Mill in the chuck, and the steady rest up close for the off set. Rotary head mounted on a bracket mounted to the lathe bed. Have to adjust the steady to move the barrel in. Kinda sketchy, but worked fairly well.
I usually just cut them like a 1917 with the cone. You can still use the 14 extractor cut. You just need to modify the front of the left bolt lug to match the 1917 profile. I'll have to pull a barrel to show what that looks like. You end up cutting a 1917 extractor cut, then a 14 extractor cut on top of that.
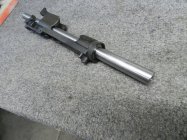
Here is a stock 1917 bolt and a 14 bolt with a modified left lug nose to match the cone contour.
This Forum's expenses are primarily paid by member contributions. You can upgrade your Forum membership in seconds. Gold and Silver members get unlimited FREE classifieds for one year. Gold members can upload custom avatars.
This site uses cookies to help personalise content, tailor your experience and to keep you logged in if you register.
By continuing to use this site, you are consenting to our use of cookies.


.JPG")
.JPG")