• This Forum is for adults 18 years of age or over. By continuing to use this Forum you are confirming that you are 18 or older. No content shall be viewed by any person under 18 in California.

Inletting a flat top....

LVLAaron

Gold $$ Contributor
I've come to the conclusion that there is no quality content on inletting stocks. Lots of bedding info... lots of inletting a stock that's already got a "basic inlet"

I have two stocks I want to inlet. Wood. Rem 700 footprint.

Talk me through it... I'm comfortable with the lug, and cutouts for the bolt release, port, handle, etc.

Locate and inlet trigger guard - this also locates the rear action screw.

Then... go at it with a 1.375 box cutter in the mill....

Then... pillar bed with devcon, and success?
 
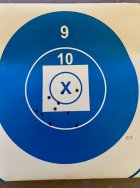
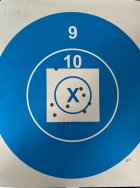
I have done all of one flat top inlet. Although that stock shot three 1000 yd heavy gun screamer groups at 1000 yds the three matches where I used it. A 4.3 100-5x, a 3.55 100-3x, and IIRC, a 4.9 99-1x.

What I learned.

1. Use a cutter designed for wood. I think I killed my 1.5" HSS ball cutter on this stock. Though maybe I killed the cutter earlier on the semi-inlet fiberglass stock I did first.

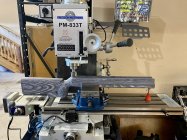
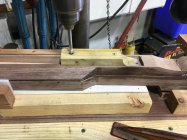
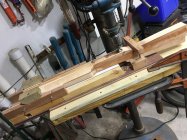
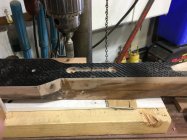
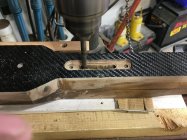
2. How you hold the stock is critical. See my pic. Not sure I had the best setup, but it seemed to work after I added the jack.

3. I aligned the stock centerline by using a machinist rule and a caliper to mark centerline. I then put a center punch in the spindle and used that to see how well the stock tracked on the X-Axis. I think the DRO has a centering function, and that with an edge finder is a better way.

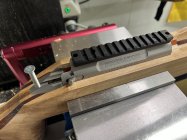
4. I made a screw stub with a pointy end to put in the front action screw hole. After I drilled the rear guard screw hole, I put an screw without a head in the rear screw hole and the stub in the front to mark where the front screw went. Again, I think the DRO may have a better way.

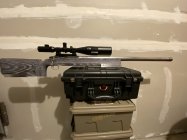
I got this stock to the point where I could finish it with a Dremel and then had to pack up the mill for moving. The stock looks awful but tracks well. I finished it in my apartment garage with a Dremel while our house was being built last year.

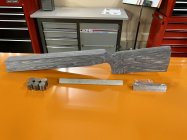
C38EC1F4-4582-47A9-83D4-FCD26EE9CB8C.jpeg9EE44681-ADAA-49E1-90FE-D21001642743.jpegE29129C9-1FE3-496C-8E95-822A0F02632C.jpeg
 
Last edited:
I would use standard router bits for it. It's relatively simple but a bit nerve wracking at first.
Find the center line, and drill the action screw holes. Then make the action inlet and barrel channel. Then cut the lug. If you look at joshb's thread, he does the same thing but with a router and jigs instead of a mill.
I don't make benchrest/f-class stocks but I would imagine finding the center line may require factoring in the center line of the parts of the stock that track on the rest and bags.
If you don't blast through the side or bottom, you will be fine and any little errors can be fixed. A magazine makes it a little more work but a single shot is a piece of cake.
 
So far so good. The action is sitting with the bottom 50 percent in the stock. Should I inlet another 20,30,50 thou to make room for mud?

(Yes, not the ideal stock for this action. Open stock, 700 footprint action. Don't care. This is the stock that cracked at the wrist and I glued back together. It's a classroom piece for me.)


22-11-15 20-00-51 9021.jpg
 
So far so good. The action is sitting with the bottom 50 percent in the stock. Should I inlet another 20,30,50 thou to make room for mud?

(Yes, not the ideal stock for this action. Open stock, 700 footprint action. Don't care. This is the stock that cracked at the wrist and I glued back together. It's a classroom piece for me.)


View attachment 1384608
Make it sit right there once its bedded
 
Never inletted a stock from "scratch" other than a blank on the duplicator and that's cheatin'.

I've never been shy about ripping out material for a bedding job and just jump in and mill it till my eyeballs say it's enough. Far as I'm concerned, there's no downside to a thick bedding job, and no upside to removing minimal material (and risking not removing enough and ending up with too thin in spots).

Fair... Every action taken on a bright wood stock like this will be wildly visible when it's done... that's the only concern. However, I'm sure it's gonna get a coat of hot pink krylon by the time I'm done with it.
 
I am contemplating this job shortly. I wonder whether the stock would be better held in "box frame" ie four sides that are level and sit on the bed, the stock held (bolted, screwed?) on the inside. This would enable the stock and frame to the moved or inverted without having to clock the top surface again. Built with enough precision, DRO measurements could be taken from the frame, rather than a sometimes ambiguous centreline. Dont shout at me - I'm a complete amateur when it comes to machining!
 
I am contemplating this job shortly. I wonder whether the stock would be better held in "box frame" ie four sides that are level and sit on the bed, the stock held (bolted, screwed?) on the inside. This would enable the stock and frame to the moved or inverted without having to clock the top surface again.

Probably depends how the stock is shaped. This one is square and parallel so it's easy to just hold in the vice. No need to worry about its position.


(over) thinking through this.. I've never liked the idea of aligning things with a barrel. The barrel could be misalinged by god knows what on the OD, yet we bed the actions to that? I'm sure I can get the action to float "pretty straight" by holding the barrel in the stock and letting the glue dry.

But is that straight? It might not matter much on a 223 with minimal recoil... but if it's a 300wsm, how much does a crooked action matter?

Barrel aligned in the ugly stock I posted earlier. 300 WSM at a1000yd match. And like I mentioned, this stock tracks exceptionally well.......


5294FCA7-B70A-4A43-97B5-628FC40728F4.jpeg
1B4C61F2-6D2D-4733-9CEA-CF97D86C4AF3.jpeg
 
So far so good. The action is sitting with the bottom 50 percent in the stock. Should I inlet another 20,30,50 thou to make room for mud?

(Yes, not the ideal stock for this action. Open stock, 700 footprint action. Don't care. This is the stock that cracked at the wrist and I glued back together. It's a classroom piece for me.)


View attachment 1384608
Looking good!
I usually use pieces of cardboard or leather in between the jaws and bottom side of the stock to keep from making any marks when you crank it down tight. If the contour of the stock has a taper to it then I will slip wood framing shims in between the stock and jaws to tweak left or right and get it tracking straight on the table.

I would hog out extra for bedding as you suggested. If using pillars then now is a good time to set their depth but don’t glue them in. Then remove them before taking out extra material for bedding. Can periodically pop a pillar back in as a reference showing where the action will be sitting to check how much extra material you’ve taken out
 
Last edited:
^^^^^^^
good point.

It has been a while since I had to do everything to a blank, but like Dave Tooley said, I located and drilled the holes first, then located the trigger assy in relation to the holes. Everything else works from there.

I located the action by figuring out where the tang needed to be in relation to the tang/sloped part of the stock. It's probably 1/4 inch further back than I'd like it... but if I moved it forward the action tang would be buried in the stock. Not sure which is the right answer, but I know I'll have to address it on the next stock I'm putting together.
 
This is how I do it. I make a dummy action blank out of wood.

Steps, 17B, Drill Action Screw Holes, 9-1-20.JPG


I then locate the screw holes, then drill them through the action blank, this is now my drill fixture. I mark a line on the fixture for where the trigger should be in relation to the tang. I draw another line on the stock measuring from the butt to get my length of pull. Line up the lines and pencil in the ends of the action.

Steps, 17A, Action Inlet, 8-31-20.JPG

First the barrel channel is cut to the approximate depth. Using a 1" carbide burr I hog out the inlet area. The bottom of the action should be about 1.400 from the bottom of the stock to get the trigger to fit the trigger guard right, at least on actions that use a trigger hanger. To check the measurement I drop a 1" dowel into the channel and measure over it to the bottom of the stock. I aim for .040 to .060" deeper to allow for bedding. Now is a good time to establish the final contour of the barrel channel. Like I said earlier the dummy action is also my drill fixture. I drill the first 1/4" hole and then use a 1/4" rod through that drilled hole to locate the fixture and drill my second hole.


Steps, 18, Inlet Trigger Guard, 9-12-20 (2).JPG

I turn the action over and outline the trigger guard using the rear hole for location. I then use a 5/8" counterbore with 1/4" pilot to establish the depth of the trigger guard and the 5/8" button for the front screw. Using a carbide burr I inlet for the trigger guard.

Steps, 18A, Cut Lower Trigger Well, 9-1-20.JPG

Again using the trigger guard, I outline the trigger well and cut it out.

Steps, 19A, Trim to Action Tang, 9-9-20.JPG

I trim the action to the tang next. Then using a 5/8" counter bore with a 1/4" pilot I counterbore for the pillars to within about 1/2" of the bottom of the action. I then turn the action over and using a 1/2" counterbore with a 1/4 " pilot drill through to the 5/8 pillar hole. I counterbore the front trigger guard screw with a 3/8" inch counterbore and 1/4" pilot to about 3/4" deep, this will be for a 3/8" O.D. insert with a 10-32 threaded hole for the front guard screw. The 1/2" counterbores for the action screws will get 1/2" O. D. x 1/4" I.D. inserts glued in. I make them long enough so are stinkinc out of both sides of the 5/8" counterbores, then using the 5/8" counterbore I trim them flush and square. So now I can make my pillars, I measure and make the lengths long so I can put them into the holes and measure with my 1" test bar. I mount the pillars into a v-block and using a counterbore trim them to length. The rear measurement should be about 1.400 from the bottom of the 1" test bar to the bottom of the action, so measuring over the test bar the dimension is 2.400. I trim the front pillar so either the barreled action or a straightedge looks parrellel to the barrel channel. I glue the pillars against the inserts using West System Epoxy and milled fiberglass to thicken it up. Using a 1/4" screw with washers and a nut I clamp the pillers into place and let the bedding set up.

I have probably forgotten some things but that is pretty much how I do it.

John
 
I have done all of one flat top inlet. Although that stock shot three 1000 yd heavy gun screamer groups at 1000 yds the three matches where I used it. A 4.3 100-5x, a 3.55 100-3x, and IIRC, a 4.9 99-1x.

What I learned.

1. Use a cutter designed for wood. I think I killed my 1.5" HSS ball cutter on this stock. Though maybe I killed the cutter earlier on the semi-inlet fiberglass stock I did first.

2. How you hold the stock is critical. See my pic. Not sure I had the best setup, but it seemed to work after I added the jack.

3. I aligned the stock centerline by using a machinist rule and a caliper to mark centerline. I then put a center punch in the spindle and used that to see how well the stock tracked on the X-Axis. I think the DRO has a centering function, and that with an edge finder is a better way.

4. I made a screw stub with a pointy end to put in the front action screw hole. After I drilled the rear guard screw hole, I put an screw without a head in the rear screw hole and the stub in the front to mark where the front screw went. Again, I think the DRO may have a better way.

I got this stock to the point where I could finish it with a Dremel and then had to pack up the mill for moving. The stock looks awful but tracks well. I finished it in my apartment garage with a Dremel while our house was being built last year.

View attachment 1384236View attachment 1384237View attachment 1384238
Clearly well done Sir. Nice mill.
 
I've never liked the idea of aligning things with a barrel. The barrel could be misalinged by god knows what on the OD, yet we bed the actions to that? I'm sure I can get the action to float "pretty straight" by holding the barrel in the stock and letting the glue dry.

But is that straight? It might not matter much on a 223 with minimal recoil... but if it's a 300wsm, how much does a crooked action matter?
A couple of thoughts on your project from how I approach bedding:

I don't ever let the pillars directly contact the action. With a quality bedding material, .050-.060 is what I want over the pillars. Since the top of the pillars are 'recessed', you need to have a way to positively support the action/barrel while still allowing the action to 'float' in the bedding stress free while the bedding material cures. In this picture below, you can see how the new pillars are recessed below the surface. In this one, the previous bedding was then removed and rebedded.

5zD1pNel.jpg


I want the barrel the action is going to have on, when I do the bedding. How that barrel is balanced/supported can add significant stress to the bedding if it's done incorrectly. There's some hints in this pic regarding that.

fqszUCjl.jpg


There are several ways to positively locate the action to allow for the .050-.060 bedding over the pillars. Here's one way that works very well (provided the balance issue is addressed prior). Obviously, different actions require different approaches but the concept remains the same. There's other ways, too. ;)

G8NORpBl.jpg


Inh538Zl.jpg


u8O3NYUl.jpg


Finally, there's a lot of stress that can be transferred into the bedding by how the barrelled action is removed once the bedding is cured.

For what it's worth............ -Al
 
@AlNyhus Great timing. I'm standing out in the shop scratching my head about what to do next and how to keep the action where I want it after removing 50 thou of all its supporting surfaces.

I do like the idea of having the pillars covered. I took apart a rifle that Alex Sitman put together for me and was studying it. He does the same thing. Pillars are hidden.

I'm still a bit confused how to "locate" the action where I want it


22-11-16 11-25-21 9023.jpg
 

Upgrades & Donations

This Forum's expenses are primarily paid by member contributions. You can upgrade your Forum membership in seconds. Gold and Silver members get unlimited FREE classifieds for one year. Gold members can upload custom avatars.


Click Upgrade Membership Button ABOVE to get Gold or Silver Status.

You can also donate any amount, large or small, with the button below. Include your Forum Name in the PayPal Notes field.


To DONATE by CHECK, or make a recurring donation, CLICK HERE to learn how.

Forum statistics

Threads
165,804
Messages
2,203,630
Members
79,130
Latest member
Jsawyer09
Back
Top