dellet
Gold $$ Contributor
Had to fire form some brass today and had a round that sounded noticeably different and was well outside the group. It was obviously different enough, that I set that case aside.
I hate brass prep, new brass was annealed, formed and shot. Trim and primer pockets would be addressed after firing. No sense wasting time on brass that might not survive forming.
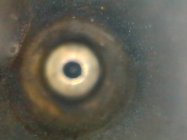
Back at the bench I could not remove the primer from the case in question, Could not get the decapping pin to find the hole. Looking in with a flashlight looked odd. Case badly carbon fouled, couldn’t really see anything. Hit it with Q-Tip grabbed the bore scope and this is what I found.

After correction

A quick look at some others, this was the norm.

Then there were a few like this.

The top one was probably about half way closed, or not completely punched at the factory, possible that the primer had just enough hole to ignite the powder.
I found two or three others like the last photo where you can clearly see an abnormal flash or ignition. Each of those were clearly not fully formed. It was a challenge to get the reamer on the flash hole uniforming tool center up and cut.
I’ve had plenty of flash holes that were garbage over the years, first time I ever took the time to get a look at what happens inside and why time spent on primer pockets and flash holes is well worth it.
I hate brass prep, new brass was annealed, formed and shot. Trim and primer pockets would be addressed after firing. No sense wasting time on brass that might not survive forming.
Back at the bench I could not remove the primer from the case in question, Could not get the decapping pin to find the hole. Looking in with a flashlight looked odd. Case badly carbon fouled, couldn’t really see anything. Hit it with Q-Tip grabbed the bore scope and this is what I found.
After correction
A quick look at some others, this was the norm.
Then there were a few like this.
The top one was probably about half way closed, or not completely punched at the factory, possible that the primer had just enough hole to ignite the powder.
I found two or three others like the last photo where you can clearly see an abnormal flash or ignition. Each of those were clearly not fully formed. It was a challenge to get the reamer on the flash hole uniforming tool center up and cut.
I’ve had plenty of flash holes that were garbage over the years, first time I ever took the time to get a look at what happens inside and why time spent on primer pockets and flash holes is well worth it.