I am unsure of what you mean by fish glue? Can you elaborate?Would fish glue work on oily wood like olive?
-
You are using an out of date browser. It may not display this or other websites correctly.
You should upgrade or use an alternative browser.
You should upgrade or use an alternative browser.
Italian Olive Wood Gunstock
- Thread starter CStuck
- Start date
Every now and then I peruse old Mauser Rifles on Gunbroker just to see some of the classic styles (stocks and engraving). On occasion there is a schnabel that makes me seriously consider buying the rifle... forget the caliber that's not important. I like the ones that are understated, not mushroom caps or whale tails. I have seen a few that the leading edges were forward sweeping angles, not typical rounded nose, and was carved as a Fleur de Lis. I think to pull this off, the stock has to have some tapering along the forearm... maybe not the crazy thin sporter stock stylings of the 1930's-1940's, but just enough to make that transition smoothly into the schnabel.
Have you every done a build with a CZ527 action... You do the stock and I'll supply the wood for the caps!!!
Have you every done a build with a CZ527 action... You do the stock and I'll supply the wood for the caps!!!
I haven't tried/bothered dying oily woods.... most oily woods are beautiful exotic tropical woods from rain forests and other areas with high moisture environments. The natural occurring oil in these wood species is an adaptation to prevent decay/rot from the constant exposure to water. I am guessing that this will impede the absorption of the die into the wood beyond the surface. Dyes dissolved in water get absorbed better and deeper into the wood, but the oil in this wood may interfere with this. Dissolving the dye in DNA may help but my experience is that the dye remains on the surface as the solvent evaporates off quickly... it is more like applying a thin layer of pigment on the surface.
Olive is one of those weird ones... it can be oily and yet it preferred environment is usually arid (dry, rocky, and poor soil) that is only good for olives, capers, and goats.
BC - How do you get around the oil content in these types of woods so that the dye is absorbed deep enough to give the depth/contrast of the grain? Or is this simply a matter of understanding the limitations and expecting a more surface-level dye job, or even simply a matter of selecting a color of Shellac to give an overall color shading while still maintaining the transparency to see underlying grain?
Every now and then I peruse old Mauser Rifles on Gunbroker just to see some of the classic styles (stocks and engraving). On occasion there is a schnabel that makes me seriously consider buying the rifle... forget the caliber that's not important. I like the ones that are understated, not mushroom caps or whale tails. I have seen a few that the leading edges were forward sweeping angles, not typical rounded nose, and was carved as a Fleur de Lis. I think to pull this off, the stock has to have some tapering along the forearm... maybe not the crazy thin sporter stock stylings of the 1930's-1940's, but just enough to make that transition smoothly into the schnabel.
Have you every done a build with a CZ527 action... You do the stock and I'll supply the wood for the caps!!!
Oso
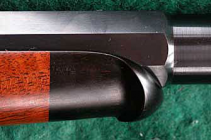
This is the sort of schnabel I was thinking, a long gentle taper to the tip of the stock with a piece of ebony or other dark wood. I have also thought of using walnut, since the center section of the laminate will be walnut, it may be cool to utilize that for a forend cap as well.

I have never messed with a CZ527, I wouldn't know where to start, and I dont own one to use for mock up and test fitment.
That's sexy!!! The one that I saw was similar but was a little more of a swept diamond/arrowhead shape with the forward-most point (nose) being the primary point of the flower. Where the lateral edges of the schnabel come in line with the top edge of the stock, this formed the left & right points of the flower. The middle of the rear edge of the schnable (bottom center of the stock) was actually swept rearward to form the base of the flower. So instead of a continuous raised rear edge on the schnabel, like in the picture above, this actually created two forward angled scalloped arches, like wings, from the rear base/point to the two side points.
Besides the CZ 527, a nice Sako L46/L461 would also be a fantastic action for this project. If you don't have a 222 Rem, 20 Vartarg, or some other wonder mini-cartridge then this should be on the bucket list. I got a wall of wood.
Besides the CZ 527, a nice Sako L46/L461 would also be a fantastic action for this project. If you don't have a 222 Rem, 20 Vartarg, or some other wonder mini-cartridge then this should be on the bucket list. I got a wall of wood.
I say go for it i like the color but im sucker for maple stocks and the color of that is awesome
I use color tone dyes from Stewmac, I dilute in 4oz jelly jars with bottled water.I haven't tried/bothered dying oily woods.... most oily woods are beautiful exotic tropical woods from rain forests and other areas with high moisture environments. The natural occurring oil in these wood species is an adaptation to prevent decay/rot from the constant exposure to water. I am guessing that this will impede the absorption of the die into the wood beyond the surface. Dyes dissolved in water get absorbed better and deeper into the wood, but the oil in this wood may interfere with this. Dissolving the dye in DNA may help but my experience is that the dye remains on the surface as the solvent evaporates off quickly... it is more like applying a thin layer of pigment on the surface.
Olive is one of those weird ones... it can be oily and yet it preferred environment is usually arid (dry, rocky, and poor soil) that is only good for olives, capers, and goats.
BC - How do you get around the oil content in these types of woods so that the dye is absorbed deep enough to give the depth/contrast of the grain? Or is this simply a matter of understanding the limitations and expecting a more surface-level dye job, or even simply a matter of selecting a color of Shellac to give an overall color shading while still maintaining the transparency to see underlying grain?
I would test a drop, the dye should penetrate through the pores of freshly sanded wood. I always clean with naphtha after initial sanding and after every subsequent coats of dye.
For sealing oily woods I use Simtech's Bondtech. It's a transparent polyester sealer that lays wet for a long period of time to absorb into the wood grain, this is followed up with thier easy sanding sealer "high build polyester primer" that I block out and prepare for clear.
For your utilitarian oiled finish which is beautiful by the way, I've thought of playing with some oil finishes and a pedestal buffer to see how much luster I can achieve, and the work involved.
Keep us posted on your progress, I always enjoy checking your work out.
Bc'z
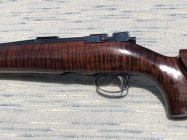
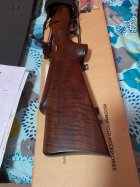
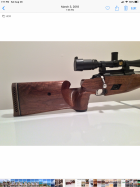
I have a vintage Sako with a oiled finish that unfortunately doesn't do the wood justice. If I were to contemplate refinishing/adding a topcoat what would you suggest? Pictures below are with fresh coat of oil to brighten it up for pictures, but normally it is a flat appearance so fiddleback doesn't pop nearly as much


I have a vintage Sako with a oiled finish that unfortunately doesn't do the wood justice. If I were to contemplate refinishing/adding a topcoat what would you suggest? Pictures below are with fresh coat of oil to brighten it up for pictures, but normally it is a flat appearance so fiddleback doesn't pop nearly as much


Beautiful rifle!Bc'z
I have a vintage Sako with a oiled finish that unfortunately doesn't do the wood justice. If I were to contemplate refinishing/adding a topcoat what would you suggest? Pictures below are with fresh coat of oil to brighten it up for pictures, but normally it is a flat appearance so fiddleback doesn't pop nearly as much
View attachment 1275917View attachment 1275921View attachment 1275922
I'd start by stripping/sanding of the oil finish then apply die and simtech coatings
I use color tone dyes from Stewmac, I dilute in 4oz jelly jars with bottled water.
I would test a drop, the dye should penetrate through the pores of freshly sanded wood. I always clean with naphtha after initial sanding and after every subsequent coats of dye.
For sealing oily woods I use Simtech's Bondtech. It's a transparent polyester sealer that lays wet for a long period of time to absorb into the wood grain, this is followed up with thier easy sanding sealer "high build polyester primer" that I block out and prepare for clear.
For your utilitarian oiled finish which is beautiful by the way, I've thought of playing with some oil finishes and a pedestal buffer to see how much luster I can achieve, and the work involved.
Keep us posted on your progress, I always enjoy checking your work out.
I'd like to think even it if is a more utilitarian style finish, it still shows the beauty in the wood. It's something I can do with no real special tools, or years of experience like you have with your finishing techniques. Sure is a lot of rubbing though.
I am a bit unsure of how the BLO will play with the natural oils in the olive, only one way to find out though.
I'll be sure to share some photos when I do make some progress. Thank you for the kind words, I appreciate it as always.
Probably not. Fish glue is for one water soluble so a protective finish would be necessary to seal the glued joint. Fish glue is traditional used for wood stringed instrument construction. It is now a days used for wood stringed instrument repair such gluing a broken off guitar head stock, or violin body joint but not wanting to damage the surrounding original finish with any excess glue that is squeezed out of the reattached point. Any left over glue on the finish can be clean off with a wetted cloth rag. Fish glue is best used to glue the string nut on guitars in that the string nut grooves can ware out over time and will need to be replaced and if originally glued on with fish glue, hot water steam can safely soften the glue and clean up of the old glue is still water soluble after many decades to provide a clean surface for the glue.Would fish glue work on oily wood like olive?
-
Titebond 2 and 3, and Gorilla Glue are good glues for oily wood. The best method for gluing oily woods is to remove as much of the woods natural oil from the wood surface with either denatured alcohol or acetone. Repeated soaking the wood with either of these two solvents and wiping off with highly absorbent paper towel will remove enough of the woods oil to allow the glue to penetrate the glued surface with the help of high pressure clamping. Acetone is best in that is highly volatile and will evaporate quickly so the woods oil doesn’t have enough time to migrate out to the de-oiled surface. Glue must be applied as soon as the solvent has evaporated.
Brians356
Silver $$ Contributor
Fair enough on all that. FWIW I set up and repair vintage guitars, using a half dozen different glues regularly.Fish glue is for one water soluble so a protective finish would be necessary to seal the glued joint.
But, isn't it typical practice to apply a protective finish to rifle stocks?
-
Are you sure that is an oil finish? The mottled luster of the finish screams varnish based finish to me. I would try and sand through the finish with 600 grit paper and see what you get.Bc'z
I have a vintage Sako with a oiled finish that unfortunately doesn't do the wood justice. If I were to contemplate refinishing/adding a topcoat what would you suggest? Pictures below are with fresh coat of oil to brighten it up for pictures, but normally it is a flat appearance so fiddleback doesn't pop nearly as much
View attachment 1275917View attachment 1275921View attachment 1275922
joshb
Gold $$ Contributor
Get some Arrowood oil. You can apply it over the existing oil and give you a highly polished look when finished. You should give it a light sanding with 600 first, tho. When I have the energy, I wet sand with the Arrowood and 1000 grit.Bc'z
I have a vintage Sako with a oiled finish that unfortunately doesn't do the wood justice. If I were to contemplate refinishing/adding a topcoat what would you suggest? Pictures below are with fresh coat of oil to brighten it up for pictures, but normally it is a flat appearance so fiddleback doesn't pop nearly as much
View attachment 1275917View attachment 1275921View attachment 1275922
Very nice looking gun!
I can see why you might think it is varnish, but most of the gloss/sheen is from a fresh coat of oil. Here are a couple of photos with the excess oil wiped off and dry (several months later). Someone had great taste when they built this 222 Rem Mag. The sculpted butt plate and skeletonized pistol grip cap are nice touches. The only improvement would be a shadow line around the cheek rest.


Last edited:
If you can find one, a “small ring” ‘98 Mauser like a 1910 or 1936 Mexican action might be just the ticket. Classic looks of a 1950s sportier from Sukalle or Buhmiller… the ‘small ring’ has a front barrel attach ring that is the same diameter as the action body (am out 1,1 inches). They can’t take the big magnums but they do just nicely for a 257Ackley or a 6.5 Creedmoor. The early Swedish Mausers and some of the Husqvarnas and Browning had them too.
Similar threads
Upgrades & Donations
This Forum's expenses are primarily paid by member contributions. You can upgrade your Forum membership in seconds. Gold and Silver members get unlimited FREE classifieds for one year. Gold members can upload custom avatars.

Click Upgrade Membership Button ABOVE to get Gold or Silver Status.
You can also donate any amount, large or small, with the button below. Include your Forum Name in the PayPal Notes field.
To DONATE by CHECK, or make a recurring donation, CLICK HERE to learn how.

Click Upgrade Membership Button ABOVE to get Gold or Silver Status.
You can also donate any amount, large or small, with the button below. Include your Forum Name in the PayPal Notes field.
To DONATE by CHECK, or make a recurring donation, CLICK HERE to learn how.


