• This Forum is for adults 18 years of age or over. By continuing to use this Forum you are confirming that you are 18 or older. No content shall be viewed by any person under 18 in California.

Sealed Primer Pocket 223 Rem

Hello,
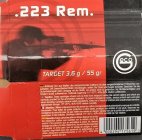
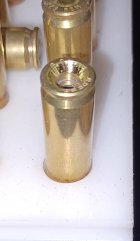
I am just starting to reload 223 Remington as I have a lot of factory ammo to use. Most of the ammo is made by GECO (German Mfg). I noticed that there is a seal around the primer. Will this be a problem cleaning the primer pocket and will the pocket still have the standard size after it is cleaned? Can anyone recommend a good tool for cleaning these primer pockets?
Reduced.jpgGeco Box 2.jpgGeco Box.jpg
 
That is called a "stab crimp".
There are several styles of crimp to help secure the primer to the pocket. You also have sealant showing.

The primer crimp can be either cut or swaged out. The difference is just a matter of taste if you are doing small quantities by touching each one, but if you are loading progressive then you are constrained to the tooling that works with your machines.

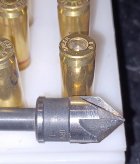
The simple method for starting out with smaller batches is to add the crimp deburr cutting tool to your motorized brass prep station, or to just use a handle to twist the tool.

Here is an example of just the cutting tool.
https://www.midwayusa.com/product/1165253550?pid=253550

Here is an example of a swage tool.
https://www.amazon.com/Dillon-Precision-Primer-Pocket-Military/dp/B00LAEVPZE

If you are just starting out and already have a manual tool handle or motorized brass prep station, the tool bit will get you up and running with little expense.

This is a very easy task to learn, so don't be afraid to try either style tool.

The sealant will also be very easy to clean up with your regular brass prep method and anything left over can be brushed out or cleaned up with a normal primer pocket cleaning tool.
 
@ RegionRat
Thank you for taking the time to explain. I am a novice when it comes to military style primers.

If I understand you correctly, I can decap the spent primer as usual and then use the cutting tool you described to remove the crimp of the primer? I assume that crimp is not present in commercial ammo?

Does this process only clean out the primer pocket or does it change the dimensions of it?
I am just curious if I can load new primers as usual after the deburr and cleaning process of the Geco shells is completed?

Thanks so much for your patience.
 
I assume that crimp is not present in commercial ammo?
It is in some.

I can decap the spent primer as usual
Probably not with yours, but some of the other style crimps make the primer difficult to remove and may break the depriming tool.

Just an observation. I scrounge brass at the range. So a good bit of what I recover has been loaded by someone that dealt with the crimp. For those that "cut" the crimp out, over 50% I find are done incorrectly. Don't be one of those guys.

I prefer to swage the crimp out. But I deal with a lot of brass so the cost of the Dillon tool is justified. This is what mine look like after swaging.
Swage Primer Pockets.jpg
 
@jepp2
Thank you for the input. I was about to order the Hornady Primer Pocket Reamer to address the crimp. I assume that tool is for cutting the crimp out? What did people do wrong when they cut out the crimp, so I can avoid making the same mistake? Thanks
 
What did people do wrong when they cut out the crimp, so I can avoid making the same mistake? Thanks
I'm not faulting anyone. But I often see folks say they use a drill bit, a knife, etc. And those may be doing a fine job. But the majority I see have cut about half way down the depth of the pocket when they cut with whatever they were using. Controlled cutting (proper angle and depth) should be fine. The bevel of what is cut, shouldn't be much different than what the swage reforms. That is why I included the pic of what the swaged pockets look like.
 
I'm not faulting anyone. But I often see folks say they use a drill bit, a knife, etc. And those may be doing a fine job. But the majority I see have cut about half way down the depth of the pocket when they cut with whatever they were using. Controlled cutting (proper angle and depth) should be fine. The bevel of what is cut, shouldn't be much different than what the swage reforms. That is why I included the pic of what the swaged pockets look like.
I am thinking of adding the RCBS Brass Boss, it will speed up a lot of the case prep and it either has a swaging tool attachement included or it can be added.


I am sure the RCBS swaging tool is not as good as the Dillon tool. If I am not satisfied with RCBS swaging tool I can always order the Dillon tool. In the meantime the RCBS case prep center will still speed up case prep.
Do you have any thoughts or experience with the RCBS prep center?
 
@jepp2
Thank you for the input. I was about to order the Hornady Primer Pocket Reamer to address the crimp. I assume that tool is for cutting the crimp out? What did people do wrong when they cut out the crimp, so I can avoid making the same mistake? Thanks
I agree with the above comments.

Not everyone can be trusted with tools, cutting, machines, fire, electricity, etc. The same goes for guns and ammo, so yes, reloading is a notch higher than entry level.

You may in fact scrap a few cases learning to do this, but even low skill folks will close the loop on this soon enough.

Don't worry, you will do fine with either method, but jepp2 is correct in that some folks shouldn't be trusted with any work.

To describe the deburr tool in terms of workmanship, you only cut (or swage) as much as it takes to remove the crimp. If you continue to push, you can remove material to the point where the primer pocket can look like a giant funnel.

I have seen rookies shorten a case neck with a chamfer tool, so the same folks are not to be trusted with a primer pocket.

I still think if you reload, you can probably learn to deal with crimped cases. So try not to over think this and go get busy. YMMV
 
Hello,
I am just starting to reload 223 Remington as I have a lot of factory ammo to use. Most of the ammo is made by GECO (German Mfg). I noticed that there is a seal around the primer. Will this be a problem cleaning the primer pocket and will the pocket still have the standard size after it is cleaned? Can anyone recommend a good tool for cleaning these primer pockets?
View attachment 1391839View attachment 1391843View attachment 1391844
I have swaged thousands in 5.56, 30-06 and 7.62 x 51
 
I agree with the above comments.

Not everyone can be trusted with tools, cutting, machines, fire, electricity, etc. The same goes for guns and ammo, so yes, reloading is a notch higher than entry level.

You may in fact scrap a few cases learning to do this, but even low skill folks will close the loop on this soon enough.

Don't worry, you will do fine with either method, but jepp2 is correct in that some folks shouldn't be trusted with any work.

To describe the deburr tool in terms of workmanship, you only cut (or swage) as much as it takes to remove the crimp. If you continue to push, you can remove material to the point where the primer pocket can look like a giant funnel.

I have seen rookies shorten a case neck with a chamfer tool, so the same folks are not to be trusted with a primer pocket.

I still think if you reload, you can probably learn to deal with crimped cases. So try not to over think this and go get busy. YMMV
I picked up the RCBS Brass Boss and a couple shell plates to go with the Hornady dies. I will go to work now and see how far I go. Thanks again for the advise.
 
To cut half way down the pocket means the person has no idea what he's doing. I use a counter sink bit and it doesn't take much to cut the crimp on .223 cases.

20221213_173047.jpg
This I what I use, the crimp was cut on this Speer case and it's hard to see but no more crimp and primers go in no problem. Just a quick quarter turn works for me to cut the crimp.

20221213_173326.jpg
This is what you get if you go half way down. I find it hard to believe some people will really crank down and remove this much material but it happens I suppose.

I have a lot of Win and Speer brass that I've prepped this way and cutting works for me. The best part is you only do it once.
 
I have the rcbs swage set and it’s too slow and my shoulder was sore after a weekend and 1k rounds.
I would do the Dillon as well but I took it a step further. I got the Lee app press and swage them now.
I have my Dillon case feeder feeding the press and goes by soo much faster.
I double check my setting with a primer pocket gauge after swaging and check about wet 20 pieces if I’m doing a lot.
 
Well, I started to remove the primers but was not able to do so with the Hornady decapping die. The primer sits too tight.
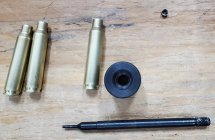
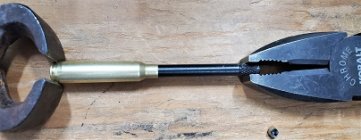
I have a manual decapping tool that is specifically made for the .223 shells. However, the tool is too short. By the time I hammer the primer out the tool is stuck in the .223 shell and flares the case mouth. I have to use pliers on both ends to separate the tool from the shell.
I think at this point I will sell my Geco brass (as once fired) to someone that wants to go through all that trouble.
Manual Decapping Tool for 223.jpgStuck in shell.jpg
 
@jepp2
Thank you for the input. I was about to order the Hornady Primer Pocket Reamer to address the crimp. I assume that tool is for cutting the crimp out? What did people do wrong when they cut out the crimp, so I can avoid making the same mistake? Thanks
The hornaday cutter is practically fool proof. You'd have to be pretty foolish to mess it up. Chuck in in a drill, and hold the brass fairly straight. The cut it limited by the pocket depth, so you can't over do it. I do this for thousands of cases per year. I ditched the Super Swager in favor of this because the swager just wasn't my thing.
 
The hornaday cutter is practically fool proof. You'd have to be pretty foolish to mess it up. Chuck in in a drill, and hold the brass fairly straight. The cut it limited by the pocket depth, so you can't over do it. I do this for thousands of cases per year. I ditched the Super Swager in favor of this because the swager just wasn't my thing.
Thanks, I will try that soon. I just got stuck on removing the primers for now. See next post.
 
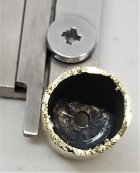
I was frustrated with my manual decapping tool getting stuck every time I drove the primer out. I thought the reason was the thickness of the decapping stem. That is actually not the problem. I cut a shell open to find that the problem is the decapping pin end getting stuck in the flash hole.
I was however impressed with the thickness of the Geco brass and the fact that the flash hole was perfectly centered and the flash hole wall looks very solid.
If I compare that to factory 22 Hornet brassDecapping Tool End.jpgOpen shell showing flash hole.jpg (especially Hornady) I find the flash hole off center on a regular basis and the brass is really thin.
I will continue working the Geco military 223 shells, it seems well worth it.
 
Out of curiosity, are you sizing these cases before de-priming? I have the same type of tool, and have not had that issue with mine.... and I also "tap" it only enough to get the primer out... I try to not smack it too hard, to avoid driving the "shoulder" of the pin into the flash hole.
 
Geco brass is very sturdy. You will need to back off any load data at least a full grain from what you read for LC or commercial brass loads. It is worth the efforts. Once you have it prepped the next time will be a lot easier.
 

Upgrades & Donations

This Forum's expenses are primarily paid by member contributions. You can upgrade your Forum membership in seconds. Gold and Silver members get unlimited FREE classifieds for one year. Gold members can upload custom avatars.


Click Upgrade Membership Button ABOVE to get Gold or Silver Status.

You can also donate any amount, large or small, with the button below. Include your Forum Name in the PayPal Notes field.


To DONATE by CHECK, or make a recurring donation, CLICK HERE to learn how.

Forum statistics

Threads
166,294
Messages
2,215,961
Members
79,519
Latest member
DW79
Back
Top