• This Forum is for adults 18 years of age or over. By continuing to use this Forum you are confirming that you are 18 or older. No content shall be viewed by any person under 18 in California.

Salt Water Etch on SS Looks Good

For more than 25 years I've been marking metals with a 12 Volt, 3 Amp regulated power supply which can supply either AC or DC to the contact pad. Over the years I've acquired many bottles of electrolyte solutions from several suppliers, ones for mild steels, tools steels, stainless steels, Stellite, Inconel, and more. I've had no trouble getting a dark mark on most materials but a deep etch...results have always been so-so.

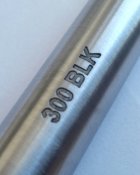
I needed to mark a barrel that's going to be Ceracoated so I needed a deep etch. I decided to try the salt solution that's getting all the talk. An ounce of tap water and a teaspoon of table salt. Very good results. A very deep mark, pretty clear and sharp, on 410 stainless. Looks like all those bottles are now just going to sit on the shelf.

edit; 416 stainless not 410
 
Last edited:
Well here it is...I can be technologically challenged at times.
Camera didn't focus on the "300" end well. The mark is sharp.

300_mark.jpg

That's with a photo stencil, polyester screen material, photo emulsion applied, exposed and washed out just like used for screen printing on fabrics and other materials
 
More details please? Needed equipment to do this

I use a thing called ”Personalizer Plus” from Electro-Chem Etch. It's powered by 120V AC and outputs 0 to 20 volts and 72 watts. My earlier post I said 12V, I misremembered. Had it for a long time.

You put an absorbent pad (supplied with the tool) on the contact piece, dampen it with electrolyte and hold it on the stencil which is on the item you're marking. I tape the stencil in place. It takes a few seconds to make black mark and a minute or a minute and a half to make deep etch. The mark in the picture took one minute, lifting the pad away every 10 or 15 seconds to let steam escape.

I've had stencils made by Electro-Chem Etch and more recently by Lectroetch which is a few miles from my home and also run by a friend of mine. I have also made my own stencils which is a process in itself with it's own learning curve. Making the stencil will add, I don't know maybe a half hour or an hour to the job. There are instructions on line for making stencils for screen printing on such things as t-shirts. The process is the same. For me it depends on the job. A one-off mark for my own stuff, I'll make the stencil. For a job I'm getting paid for and have to mark multiple items I'll have the stencils made. I'd say to start, buy the stencils and then maybe learn to make your own if you want to. But if you're going to make just one mark it's kind of expensive to buy... options in a paragraph or two.

Both companies also have what they call die impression stencils which is material you impress your characters into with a typewriter, stamp dies or even a custom die but I've never used that process. I did get some of the die impression material but after looking at it, I didn't expect great results. Supposedly you can use a stylus or even a ball point pen on it to create the characters.

Both companies also supply electrolyte solutions and I guess the beauty of them is they are non-corrosive. As I said earlier, those various solutions are good at making a very sharp, black mark on the different materials and do OK for a shallow etch but the salt water I used on this one really gave me a good deep etch. It did also discolor the steel where it seeped through the stencil and ran down around the barrel but quick re-polish with 320 grit took care of it. Next time I'll not saturate the pad.

Now, there are people doing a very similar thing using salt solution and a 9 volt battery. Check on the u-tubes. I'm not sure this method will work very well with the stencils I'm using but they are using vinyl stencil made by a vinyl cutter hooked up to their computer. It cuts a design on a sheet of vinyl, then they pick out the parts they want to appear as a mark, leaving the rest, and use transfer tape to place the stencil on the metal. Labor intensive.

Here's the other option for stencils; if using the 9 volt battery method you might try vinyl stencils from website called dogfightink. I bought a stencil from him, it was 14 bucks delivered IIRC. It was for markings on an NFA item and it was kind of complex. While the stencil looked good, I didn't want to sit there with a magnifier and a dental pick removing all the letters, leaving the centers of o's, p's and such. Wasn't feeling patient that day. So those types of stencils may or may not work well with the method I use, I don't know. Might be worth a try. Also some people make stencils with a label maker (Brother is one brand) and a special label tape. Kind of looks to me like it might be good for a shallow black mark but maybe not a deep mark. I'd like to try but don't want to spend the bucks on a label maker only to find it's not suitable.

I hope that points you in the right direction!
 
Thats a clean etch. The knife guys are pretty well versed in etching and home built etchers. If a person was interested in building one or buying one check some of the knife sites. I would like to be able to make one of a kind stencils.
 
I use a thing called ”Personalizer Plus” from Electro-Chem Etch. It's powered by 120V AC and outputs 0 to 20 volts and 72 watts. My earlier post I said 12V, I misremembered. Had it for a long time.

You put an absorbent pad (supplied with the tool) on the contact piece, dampen it with electrolyte and hold it on the stencil which is on the item you're marking. I tape the stencil in place. It takes a few seconds to make black mark and a minute or a minute and a half to make deep etch. The mark in the picture took one minute, lifting the pad away every 10 or 15 seconds to let steam escape.

I've had stencils made by Electro-Chem Etch and more recently by Lectroetch which is a few miles from my home and also run by a friend of mine. I have also made my own stencils which is a process in itself with it's own learning curve. Making the stencil will add, I don't know maybe a half hour or an hour to the job. There are instructions on line for making stencils for screen printing on such things as t-shirts. The process is the same. For me it depends on the job. A one-off mark for my own stuff, I'll make the stencil. For a job I'm getting paid for and have to mark multiple items I'll have the stencils made. I'd say to start, buy the stencils and then maybe learn to make your own if you want to. But if you're going to make just one mark it's kind of expensive to buy... options in a paragraph or two.

Both companies also have what they call die impression stencils which is material you impress your characters into with a typewriter, stamp dies or even a custom die but I've never used that process. I did get some of the die impression material but after looking at it, I didn't expect great results. Supposedly you can use a stylus or even a ball point pen on it to create the characters.

Both companies also supply electrolyte solutions and I guess the beauty of them is they are non-corrosive. As I said earlier, those various solutions are good at making a very sharp, black mark on the different materials and do OK for a shallow etch but the salt water I used on this one really gave me a good deep etch. It did also discolor the steel where it seeped through the stencil and ran down around the barrel but quick re-polish with 320 grit took care of it. Next time I'll not saturate the pad.

Now, there are people doing a very similar thing using salt solution and a 9 volt battery. Check on the u-tubes. I'm not sure this method will work very well with the stencils I'm using but they are using vinyl stencil made by a vinyl cutter hooked up to their computer. It cuts a design on a sheet of vinyl, then they pick out the parts they want to appear as a mark, leaving the rest, and use transfer tape to place the stencil on the metal. Labor intensive.

Here's the other option for stencils; if using the 9 volt battery method you might try vinyl stencils from website called dogfightink. I bought a stencil from him, it was 14 bucks delivered IIRC. It was for markings on an NFA item and it was kind of complex. While the stencil looked good, I didn't want to sit there with a magnifier and a dental pick removing all the letters, leaving the centers of o's, p's and such. Wasn't feeling patient that day. So those types of stencils may or may not work well with the method I use, I don't know. Might be worth a try. Also some people make stencils with a label maker (Brother is one brand) and a special label tape. Kind of looks to me like it might be good for a shallow black mark but maybe not a deep mark. I'd like to try but don't want to spend the bucks on a label maker only to find it's not suitable.

I hope that points you in the right direction!
Thanks For the Great write up. I'm definitely going in this direction.
 
I've done this before and I'll add a couple of comments.

Salt works OK, but some dilute hydrochloric (muriatic) acid works better in my experience. About 2 mL of the acid (available at hardware stores or pool chemical stores) diluted with 20 mL distilled water works great.

For the electrode, I've used metal (brass, steel, even HSS tool bits) but they all react with the electrolyte and leave unwanted salts behind. Q-tips are OK, but don't provide a very broad, even surface. I don't know what the pro electrodes are made of, but I have used graphite rods with a small patch of cloth or felt taped around the flat end as a home-made electrode and it works very well. They are available from ebay: https://www.ebay.com/sch/i.html?_nkw=graphite+rods

Power: any power supply that can supply sufficient current should work. I have a professional PS that can deliver 48V at up to 10 amps, but I run it at 12V and cap the amps at 1. A 12V battery charger should work fine. A 9-volt battery will work, but can't deliver much current and so will take a lot longer.

I've used stencils from Dog Fight Ink (http://www.dogfightink.com/stencils.html) and they work fine. They have the cover layer already applied so no weeding of the unwanted bits necessary. Just remove the backing, burnish on the stencil, then carefully peel back the cover layer (pull it back at nearly a 180° direction--more or less folded back on the stencil to prevent the smaller bits from lifting off). Ive tried a few methods for making my own with varying degrees of success (laser, Cri-Cut, etc.).

I've tried this with aluminum too. I've heard that you need to reverse the polarity, use different electrolytes, etc., but in the end, I got the best results with the same procedure as a steel barrel. Positive on the workpiece, negative to the electrode.


AM-JKLVnWwKzH98LEq60Q3ksN43EodfTa7H0Mqqp3e1aRcsVZGYsgNv6Or5wLvjyxe8gVDAGNjMZ-bKYeAfkB6f6OEpCGsoC5Q58_qDmCz05pC5h40CTVoZEgiDP7uyQD7c7K8My-dPgLcJgmdNE-5MP2I2kIQ=w1793-h1344-no


Here's a "prop" I made for my brother from an 80% AR lower using the DogFightInk stencil using the Q-Tip method:

AM-JKLWncFHmYrnc-73ybTOj1aYZ2PukJ3DYcpWOtEDpkeOhKWX40GbYE5EY-0zHueCkGquBcXRI5HpWUXqsXErxk1B1y35JIQO_i-blaODwv5txf2oHBo1EBQI2Yvk2dwZQRsphimIgD1R_47mSmRamztE3Bw=w1793-h1344-no
 
Using a Cricut machine does produce a usable stencil on permanent vinyl but there are some tricks. There is a video on youtube that addresses the problem if you can get past the annoying voice. The trick is to modify the text into a semi stencil font. You don't have to buy anything. I use Arial font and leave it at 72 point. Type into Design Space what you want on barrel and then for numbers or letters with a center that will remain when you pull up the tape, use her trick to modify those characters so that a piece tying them together remains. Once your finished, then I shrink them down to .125" tall, then cut it on vinyl using the Washi paper setting.

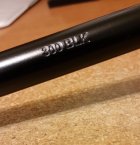
Stencil made with Cricut explore air 2, permanent vinyl, no backing tape.
stencil.jpeg

I took .0094" off of the diameter of this piece. So depth of etch is > .005".

image2.jpeg
 
The etch-o-matic sells a kit that includes a stencil maker, any of y’all use it? If so, is it any good?
 
The etch-o-matic sells a kit that includes a stencil maker, any of y’all use it? If so, is it any good?
Yes, I've never had a problem with mine and don't regret buying the kit. With more time than money you could build your own pretty easily. The stencils are screen printing mesh/photo emulsion.
 
You can buy commercial etch units, or variable power supplies.
Me, I use a 10 amp Craftsman battery charger I've had forever, and shop swabs (like Q-tips with wood).
I've seen no reason to "upgrade" to anything else.

You can etch as deep as you want, just takes more passes.
 

Upgrades & Donations

This Forum's expenses are primarily paid by member contributions. You can upgrade your Forum membership in seconds. Gold and Silver members get unlimited FREE classifieds for one year. Gold members can upload custom avatars.


Click Upgrade Membership Button ABOVE to get Gold or Silver Status.

You can also donate any amount, large or small, with the button below. Include your Forum Name in the PayPal Notes field.


To DONATE by CHECK, or make a recurring donation, CLICK HERE to learn how.

Forum statistics

Threads
165,057
Messages
2,189,094
Members
78,678
Latest member
Janusz
Back
Top