I purchased a 6ppc for my wife on Gunbroker. A firearms dealer had it for sale in their store for a customer, most likely on a commission basis. Information was difficult to obtain, so I don't know all of the details regarding brand of stock and whether or not the owner did the work, or a beginner gunsmith. Here is what I do know. My wife shot the rifle about 30 fireform loads so far. 3 shot groups at 100 yard were bullet holes touching. We thought decent for the amount of shooter experience and untuned fire forming loads. I noticed two problems with the laminate stock. 1. The bolt was hitting the stock when closed. 2. There was barely enough clearance at the bottom front of the barrel to slide paper between the barrel and stock. A .020" piece of mylar would not begin to fit between. When I removed the stock I discovered that the bolt stop also had no clearance to the point there was an indent from the stop pressed into the stock when the screws had been torqued. I resolved all of the clearance issues and reinstalled the barrel and action assembly. Being concerned that the bedding job was not going to be right because of no clearance between the bolt stop and stock, I set up a magnetic base and dial indicator. When I loosened the front screw, the stock moved .019". I retightened the front screw and loosened the back one. The stock did not move at all. I am thinking that I need to remove the old bedding material and start over. I am in need of professional advice as to the best way to proceed from here. The only rifle I have bedded so far was a Ruger Ranch, so I am certainly no expert. Thanks for reading this and any help or advice you can give me.
sleepygator said:
T
Thanks for the reply. I will watch it and have also watched a couple of Dan Holland videos. My stock is pillar bedded and the action is a trued 40X Rem. I am guessing that I have to remove the entire mess (all epoxy and pillars) in order to start over? I am confident that I will be able to do the job, just looking for any pieces of advice on correcting a totally messed up job. My wife really likes the stock or I may just junk it and start over fresh with a different one. I am stuck redoing what we have.
I think that the safer route would be to take out most of the old bedding and remove the two pillars. You might be able to use the pillars as is. But, if they were not installed correctly, they would not align with the action bottom when the barrel is properly positioned in the barrel channel. Richard's video it fairly complete and describes a process that worked for him many times.
Like Steve says this is probably the best informative video on bedding I've seen. The best take away that I got is to make sure that you have the rifled action resting on the tang and barrel at the end of the stock, the loading port is level and the action is stress free. That way the barrel can't dive and upset the stress free action.
Here is what this one looks like. Quite a stark difference.
-
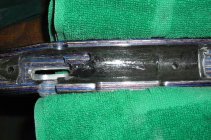
DSCN1006.JPG
113.5 KB
· Views: 288
sleepygator said:
I think that the safer route would be to take out most of the old bedding and remove the two pillars. You might be able to use the pillars as is. But, if they were not installed correctly, they would not align with the action bottom when the barrel is properly positioned in the barrel channel. Richard's video it fairly complete and describes a process that worked for him many times.
Why remove the pillars? Shorten the top of the pillar in a mill and float your new bedding material over them. Unless its a flat bottom action I don't let the pillars touch the bottom of the action. I bed over them for a perfect impression of the action surface.
superlight93 said:
Why remove the pillars? Shorten the top of the pillar in a mill and float your new bedding material over them. Unless its a flat bottom action I don't let the pillars touch the bottom of the action. I bed over them for a perfect impression of the action surface.
[br]
The point of pillar bedding is that the action is tightened against perfectly aligned pillars and not sandwiching bedding in between. Using material like Steel Devcon, it is probably not vital but that was the original intent. I screw the pillars to the action before it goes into the stock to be bedded.
I think that there is some misunderstanding of what constitutes the best pillar job. No less a person than George Kelbly told be that back in the day when pillar bedding was first starting to be used, that they soon figured out that for best accuracy there needed to be at least a thin layer of epoxy bedding compound between the tops of the pillars and the action, that metal to metal did not work as well, as far as accuracy was concerned. Some of you may not be aware that perfectly good pillar bedding can be done without any metal sleeves at all, casting the pillars in place using some sort of filled epoxy. In any case, it is not at all uncommon to have to use a compatible material of thinner consistency to skim bed (sometimes more than once) over the top of the initial job, to compensate for shrinkage or other problems. one more thing should be mentioned. One cannot tell if a bedding job is properly done by looking at a picture. While this will tell you about the cosmetic workmanship, it takes a dial indicator and magnetic base or suitable fixture to verify that bedding is stress free. It is quite possible for bedding to look beautiful and not be correct.
BoydAllen said:
I think that there is some misunderstanding of what constitutes the best pillar job. No less a person than George Kelbly told be that back in the day when pillar bedding was first starting to be used, that they soon figured out that for best accuracy there needed to be at least a thin layer of epoxy bedding compound between the tops of the pillars and the action, that metal to metal did not work as well, as far as accuracy was concerned. Some of you may not be aware that perfectly good pillar bedding can be done without any metal sleeves at all, casting the pillars in place using some sort of filled epoxy. In any case, it is not at all uncommon to have to use a compatible material of thinner consistency to skim bed (sometimes more than once) over the top of the initial job, to compensate for shrinkage or other problems. one more thing should be mentioned. One cannot tell if a bedding job is properly done by looking at a picture. While this will tell you about the cosmetic workmanship, it takes a dial indicator and magnetic base or suitable fixture to verify that bedding is stress free. It is quite possible for bedding to look beautiful and not be correct.
Thanks for the input. I am always receptive to learning. I have watched two videos and read another instructional article. Everyone has different ideas/opinions. Three gunsmith's, three different opinions on bedding material. One smith's favorite dubbed a "would never use" by another. I just have to sort it all out and use some judgement based on a lifetime of hands on mechanical experience and some machine shop experience. One thing for sure is that the dial indicator does not lie. The bedding job on this particular rifle was so lousy that a dial indicator did not really need to come into play. It also looked terrible. I have decided that even a beginner gunsmith did not do this job, just too many fundamental mistakes. This was definitely a DIY project. Thanks again to each of you that has replied to my thread. This is an awesome website! One side note, I had this to a smith to install a muzzle brake for my wife. He let this rifle come back to me with barely a mention of this bedding problem. This was so out of whack as to be unuseable (especially with the bolt stop being bottomed out and the bolt bottoming against the stock) that I certainly have X'd him off of my list.
This fellow has an impeccable reputation for the quality of his stock bedding. There are many others, but he is the one first came to mind.
http://www.tmss.net/
I have been side tracked for a few days on this project. I do not have a bridgeport or mill, so I removed the poorly bedded epoxy with a dremmel and carbide bit. There was never a pillar installed for the rear screw. The hole will need to be enlarged to accomodate a pillar, and since I do not have a mill, what is the best way to tackle this without messing up the alignment? I see that Brownell's sells a Forstner bit. They are out of stock and sell for a king's ransom. I will not be bedding rifles en mass, so hate to spend that much on one drill. If that is my only choice, guess I will buy one. If I indeed must go that route, does anyone currently have one in stock for sale? Thanks in advance for your help.
timeout said:
I have been side tracked for a few days on this project. I do not have a bridgeport or mill, so I removed the poorly bedded epoxy with a dremmel and carbide bit. There was never a pillar installed for the rear screw. The hole will need to be enlarged to accomodate a pillar, and since I do not have a mill, what is the best way to tackle this without messing up the alignment? I see that Brownell's sells a Forstner bit. They are out of stock and sell for a king's ransom. I will not be bedding rifles en mass, so hate to spend that much on one drill. If that is my only choice, guess I will buy one. If I indeed must go that route, does anyone currently have one in stock for sale? Thanks in advance for your help.
[br]
A Forstner bit cannot follow an existing hole like a twist drill. The best bet is to find someone with a vertical mill and have them plunge an end mill through after indicating to center.
I do it a little different...
I'm a simpleton, and I don't care much about what others think of my stock work. In my mind, it comes out good enough, and when measured with a dial indicator by a competent benchrest smith, it shows a good, solid, stress-free bedding.
I punch the action screw holes out really big. I mean so big that the bedding material has 1/8" thickness all the way around the pillars. Since I have so much slop in the setup to take care of the allignment problem, I can just drill them out by hand with a twist drill. The drill does follow the hole (roughly).
The result would probabaly make your friends snicker until they figured out that your rifle shoots just as well as one that had the holes CNC machined...
That said, it is important with Remington actions (and clones) to make certain not to let the hole exceed the footprint of the action, lest you get an ugly blob of bedding showing.
I also do mine like bus driver, I have been building custom rifles for 24 years and have not had any stress issues whatsoever. I use a jig and a bit that is 1/8 larger than the pillar, then screw the pillar to the action and set it in the holes and you can see that they do not touch. I fill the rest of the hole with bedding and when they set up I relieve stock material from around the action and the barrel channel until no parts of the stock touch the receiver and barrel except for the pillars. Then I bed the rest of the action by screwing it snug on the pillars. If you have a heavy barrel you can add support by wrapping tape around the barrel near the end of the stock, this will also help keep it straight in the barrel channel. One more thing, I make the screw hole on my pillars snug on the action screws when doing the bedding and then when all the bedding is done i open them up for clearance. It is crucial that the action screws doe not touch the pillars when finished. This is easy and it works. Any questions about this just ask. This info is free, please anyone, do not reply back telling me how this is wrong or not your way, this is how I do mine. Shep


