


falconpilot
Gold $$ Contributor
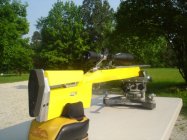
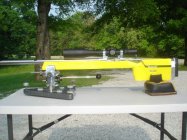
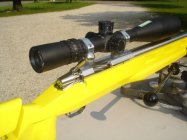
Just thought I'd share my new custom 1000 F-Class rig..
6 Dasher - Kiff Reamer .269neck,.104FB
Bat M Right Bolt, Left Port, Right Eject
Kreiger 28' 1.250' Straight tube 1-8'twist
Jewell Trigger - Bat Trigger Guard
SG&Y F-Class Stock
Nightforce NXS 12x42 CH-3, Bat Rings
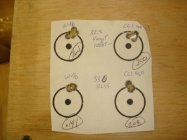
Special thanks to Howard Pitts at Pitts Precision for chambering another perfect chamber. A huge thanks to my shooting buddy and friend, Matt Owens of ARKCO Customs for helping me pillar bed the stock, and the use of his equipment. His gun is next, mine was the test subject for us, as neither one of us had ever pillar bedded a rifle. The result shown on the target show that we got it right!
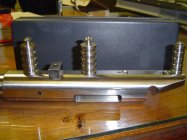
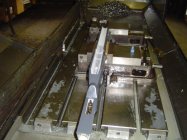
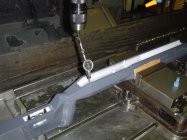
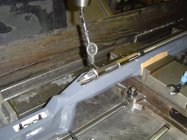
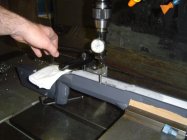
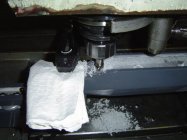
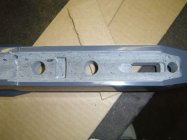
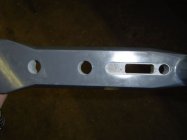
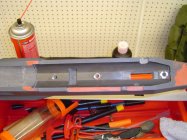
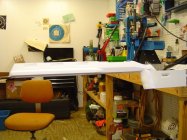
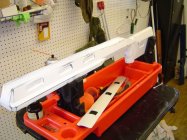
Matt built the pillars out of alumi in one of his CNC machines. Then we squared it up on the end mill..This was the hard part..we spent several hours getting it perfect, making sure that the stock was perfectly square before drilling on the holes for the pillars. After we finished this, next was trying to decide whether to screw the pillars on, and then bed it all at once, or whether to Devcon the pillars in first, then bed the action...So we, screwed the pillars to the action, applied the devcon onto the pillars, place the action with pillars installed into the stock and let it setup. The next day, we unscrewed the action screws, and the action came right out. The pillars were now perfectly square to the action and stock. I don't know if we where right, but this being our first time, we decided we'd be less likely of ending up with a glued in action if we installed the pillars first, then bedded the action. At this point we were very careful of not over tighening the action screws, just getting them snug, as I didn't want to induce any stress into the bedding. The end results came out very nice, and the action popped right out with use of Kwiki shoe polish as a release agent. After we cleaned everything up, next came sanding, final inletting for the bolt handle, action port and prepping the stock. The stock came in a basic dark gray and I wanted something that I couldn't lose on the firing line! The color turned out better than I hoped. I shot a base coat of white, then the Lemon Ice, then clear. The paint is PPG Lemon Ice Yellow, with PPG Clear.
Just wanted to share our experience, and our first build. Special thanks to those contributors who share they knowledge on this site. Without this site, I'd never had the nerve to go forward, and build my own gun...Now, the next time, Matt and I are going to tackle the chambering job as well...
The target,winds were 12-15 and gusting when these groups were fired, so I know it'll get even better) shows fireforming groups on the top, with once fired brass being the two bottom groups. I've found that using Varget while fireforming forms the cases a little more evenly, but Reloader 15 is my go to once fireformed.
Jim
6 Dasher - Kiff Reamer .269neck,.104FB
Bat M Right Bolt, Left Port, Right Eject
Kreiger 28' 1.250' Straight tube 1-8'twist
Jewell Trigger - Bat Trigger Guard
SG&Y F-Class Stock
Nightforce NXS 12x42 CH-3, Bat Rings
Special thanks to Howard Pitts at Pitts Precision for chambering another perfect chamber. A huge thanks to my shooting buddy and friend, Matt Owens of ARKCO Customs for helping me pillar bed the stock, and the use of his equipment. His gun is next, mine was the test subject for us, as neither one of us had ever pillar bedded a rifle. The result shown on the target show that we got it right!
Matt built the pillars out of alumi in one of his CNC machines. Then we squared it up on the end mill..This was the hard part..we spent several hours getting it perfect, making sure that the stock was perfectly square before drilling on the holes for the pillars. After we finished this, next was trying to decide whether to screw the pillars on, and then bed it all at once, or whether to Devcon the pillars in first, then bed the action...So we, screwed the pillars to the action, applied the devcon onto the pillars, place the action with pillars installed into the stock and let it setup. The next day, we unscrewed the action screws, and the action came right out. The pillars were now perfectly square to the action and stock. I don't know if we where right, but this being our first time, we decided we'd be less likely of ending up with a glued in action if we installed the pillars first, then bedded the action. At this point we were very careful of not over tighening the action screws, just getting them snug, as I didn't want to induce any stress into the bedding. The end results came out very nice, and the action popped right out with use of Kwiki shoe polish as a release agent. After we cleaned everything up, next came sanding, final inletting for the bolt handle, action port and prepping the stock. The stock came in a basic dark gray and I wanted something that I couldn't lose on the firing line! The color turned out better than I hoped. I shot a base coat of white, then the Lemon Ice, then clear. The paint is PPG Lemon Ice Yellow, with PPG Clear.
Just wanted to share our experience, and our first build. Special thanks to those contributors who share they knowledge on this site. Without this site, I'd never had the nerve to go forward, and build my own gun...Now, the next time, Matt and I are going to tackle the chambering job as well...
The target,winds were 12-15 and gusting when these groups were fired, so I know it'll get even better) shows fireforming groups on the top, with once fired brass being the two bottom groups. I've found that using Varget while fireforming forms the cases a little more evenly, but Reloader 15 is my go to once fireformed.
Jim
Attachments
-
 DSC05437.JPG71.8 KB · Views: 183
 -
 DSC05438.JPG55.4 KB · Views: 146
 -
 DSC05440.JPG69.4 KB · Views: 157
 -
 DSC05441.JPG80.7 KB · Views: 190
 -
 DSC05445.JPG45.4 KB · Views: 343
 -
 3.JPG51.6 KB · Views: 138
 -
 5.JPG55.3 KB · Views: 122
 -
 6.JPG53.5 KB · Views: 114
 -
 7.JPG58.6 KB · Views: 95
 -
 8.JPG59.3 KB · Views: 106
 -
 9.JPG42.9 KB · Views: 124
 -
 10.JPG44.6 KB · Views: 104
 -
 11.JPG41.9 KB · Views: 100
 -
 12.JPG23 KB · Views: 98
 -
 13.JPG57.5 KB · Views: 135
 -
 14.JPG49.1 KB · Views: 89
 -
 15.JPG55.9 KB · Views: 129
 -
 16.JPG61.6 KB · Views: 98
 -
 17.JPG63.6 KB · Views: 106
 -
 18.JPG53 KB · Views: 128
 -
 DSC05438.JPG55.4 KB · Views: 123
 .....
.....