• This Forum is for adults 18 years of age or over. By continuing to use this Forum you are confirming that you are 18 or older. No content shall be viewed by any person under 18 in California.

Need adjustment info for Brown & Sharpe Digit Mike

Lucky Shooter

Gold $$ Contributor
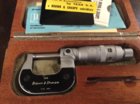
Anybody have a source of information for adjusting and calibrating this tool.

Details: Digit Mike 1-2" 599-20-10-1

Zero when closing on a 1" gage block reads .023X.

The spindle lock is loose and misaligned.

Would appreciate any help.

A. Weldy
 
Do you have a picture of the mic? I have one with the paperwork.
 

Attachments

  • D443745C-E624-4BB9-B36F-5D8FA8429A41.jpeg
    D443745C-E624-4BB9-B36F-5D8FA8429A41.jpeg
    283 KB · Views: 82
Thank you Chris but we're dealing with two different models.I also have a 200 like yours and the instruction sheer is still with it.

I prefer the 200,201 series over the Digit Mike series but both models are fine pieces of work. I hope yo get lucky and find a 201
for 1-2" work.

In the meanwhile I'll continue to look for instructions on the Digit Mike.

Thanks again Chris.

A. Weldy
 
You might try a Google search. There are a sites that offer instruction sheets/manuals.
 
This is a cut and paste from the web site mentioned at the end, best I can tell this micrometer was made for Brown & Sharpe by Tesamaster, hope this helps.

Zero Setting the Display

  • Carefully clean the exposed areas of the spindle well as the measuring faces.
  • Except for the 0-25 mm (0-1") model, it will be necessary to use a gage block or micrometer setting standard.
  • The micrometer and the gage block or standard must be at the same temperature. Allow them to acclimatize and stabilize for several hours if necessary.
  • Close the measuring faces using the spindle's friction sleeve.
  • For small deviations you can rotate the barrel slightly by using the setting key (supplied). There is a small hole near the front of the barrel for this purpose.
  • For larger deviations, unscrew the end cap, loosen the lock screw using the 2 mm Allen wrench (supplied) and adjust the thimble into the proper position. Reassemble the micrometer.
  • Repeat the measurements as necessary until the display reads correctly.
  • End user maintenance is not recommended and, if necessary, the micrometer should be returned to a repair shop such as Long Island Indicator Service.
 
these instructions are good but will add loosen screw slightly then tap lightly to unseat taper turn thimble and retighten...
 
What Ulrich says. You need to unseat the taper turn thimble to make the calibration work!
 
Looking at the picture there is a spana wrench. on the mic barrel should be
a small hole you use spana wrench to adjust to zero
 
I got lucky----the sleeve on the barrel was way out of position for normal operation.
Putting the sleeve in a more normal position, with the spanner wrench, also put
the ZERO mark very close.

A little tweaking with the spanner finished the zero adjustment using a 1" gage block.
A 2" gage block also measured correctly.

I was not successful in removing the end cap and don't wan't to risk any damage
to such a fine tool. I'll deal with the end cap if and when I have to.

Thank all of you for your replies.

A. Weldy
 

Upgrades & Donations

This Forum's expenses are primarily paid by member contributions. You can upgrade your Forum membership in seconds. Gold and Silver members get unlimited FREE classifieds for one year. Gold members can upload custom avatars.


Click Upgrade Membership Button ABOVE to get Gold or Silver Status.

You can also donate any amount, large or small, with the button below. Include your Forum Name in the PayPal Notes field.


To DONATE by CHECK, or make a recurring donation, CLICK HERE to learn how.

Forum statistics

Threads
165,565
Messages
2,198,538
Members
78,984
Latest member
Deon
Back
Top