• This Forum is for adults 18 years of age or over. By continuing to use this Forum you are confirming that you are 18 or older. No content shall be viewed by any person under 18 in California.

I'm still confused... The Life of a Shoulder

Dimner

I do believe in Captain Crunch.
I have been trying to research this, but I cannot find any conclusion I'm satisfied with. So just down the the nitty gritty.

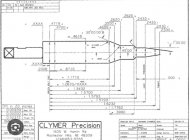
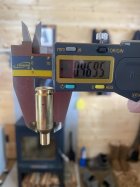
I have noticed, that when I fireform virgin brass. the first firing I get close to or on the max shoulder. Let's say I get 2.032 on my first firing. and my 2nd firing I get to my max of 2.0345". I verify this is my max via the method of rechambering this brass with a stripped bolt. Then I work with my FL sizing die to bump back the shoulder to the point where the bolt easily closes. Let's call this 2.032".

Now, while I work on load tuning. I keep 2.032" in my notes as where I want to bump shoulders back. However, on the next round of firing, the shoulder doesn't go back to the max of 2.0345". And like a dummy, I do not notice the shoulder has not moved. I clean my brass, and I resize with the die locked into the previous settings. Afterwards, I'm expecting a shoulder of 2.032, but I'm really somewhere at 2.030". Then I shoot these, and this shoulder still doesn't go back to max. It now stays at 2.030"

Yes my loads are at 95% of max pressure and yes I anneal each time I prep brass.

What is going on here? Why doesn't the shoulder go back to max when I shoot the next round of loads?
 
By chance, did you check body diameters?

If and when you start a new piece of brass, inspect the diameter of the shoulder-body junction, and the 200 line. Then, fire the brass and track all of those fer several cycles. Don't bump the body at all if the bolt will close on the brass, just let it keep expanding while you size the neck only.

While you try your FL size die, you may notice the length of the case can sometimes increase before the shoulder actually gets "bumped".

This is because the body diameter material is being worked back down and moves the brass forward, but may yet get to the point where the die ( and similarly the chamber) has worked the whole body.
 
In no particular order:

1) always the same shell holder and press.
2) I use the lanolin lube method, so there is lube on the shoulder.
3) These are the Forster Benchrest FL resizing dies. They have that high 'ez out' expander button.

4) regarding:
Was the stripped bolt sizing die setting the result of sizing to eliminate(change) a hard to chamber case? Are you sizing/adjusting the die with the decapping/expander in place?
I was following what I thought was a standard process for determining shoulder bump settings. Strip the bolt, attempt to chamber your fire formed and unsized brass. It should not be able to be chambered without alot of bolt pressure. Set your sizing die to size this case without bumping the shoulder. Check the case again in the chamber. The process going forward is to keep bumping the shoulder back very slightly until you can drop the bolt handle without pressure. That is usually a 0.002 bump.

So with that, I am setting the die based on where the bolt will drop freely when chambering. I am also using the ez out expander ball of the die.

5) Body Specs
By chance, did you check body diameters?
No I did not! That's a great Idea. I will track that. I'm going to fireform some more virgin brass and track this as well. Should I size the virgin brass first? Also, should I just mic the diameter as close as I can get to the body/shoulder? I don't have a tool that can do this specific measurement.
 
Necks sized, uniformed on new brass, minimize lube on the shoulders when moving them(for consistency). Since you have some new brass(5 or 6), use a proud (+ 0.010 out from case head) spent primer and chamber using the stripped bolt. Than you will know how much growth to expect. And have a good idea when brass will need a full length sizing, with 0.001-0.0015 headspace correction.
 
It shouldn't need the body sized, but I always do the necks.

Either way, get familiar with the ammo and chamber specs, and learn to evaluate the coordination between your brass, dies, and chamber.
I guess, that coordination between the brass, dies and chamber is where I'm struggling. What's the most common way to evaluate it? If there is a bulletin or a thread with this, please let me know and I can find the info there. Also add into the mix that my shoulder 'comparator' is also not matching in datum.

So how does one determine where the die is contacting the shoulder?

This isn't a comp rifle, so I do not have a reamer print or a barrel stub.
 
What's the most common way to evaluate it?
Careful inspection of the virgin brass, the fired, brass, and the sized brass is how you proceed. A good set of micrometers and calipers is a good starting point, along with the shoulder datum gages you already seem to own.

As time goes on, you can also use a spread of expander pins or inspection pins to augment your capability to measure and evaluate necks.

Owning the Go-Gage makes it easier to use shoulder datum comparator tools and then reference or "zero" the tools to the Go-Gage so that from then on your measurements are all based on the delta to the gage.

You can then also use the tape trick to establish your chamber dimension to the shoulder datum and you have a pretty good idea of the bump.

Take the following on each step of your brass cycle:
Case overall length (you will manage this one with trimming)
Neck OD
Neck ID
(later on, verify diameter over loaded bullet).
Shoulder Datum length
Diameter at shoulder
Diameter at 200 line
Primer pocket depth
Primer pocket diameter

To understand your dies and chamber diameters, you will study the difference in the brass at each step of the cycle.

This is all much easier to demonstrate than it is to type out. I would show you in seconds, but I am a horrible writer so this is tough to describe.

So how does one determine where the die is contacting the shoulder?
You don't check it directly, it is indirectly studied by inspecting brass after it has been sized. Remember, the die is at least 0.125" short in order to accommodate a typical shell holder.

Diameters are as important as lengths, but they are nowhere near as "adjustable" when the brass, chamber, and dies don't coordinate. You can use incremental shell holders to space up a die to control shoulder datum length, or you can just screw it up or down, but there is not a quick way to deal with diameters without cutting or trying different dies.

I prefer to start rookies with the incremental shell holders to get a positive stop on the size stroke, or even cam-over when possible. As often as not, when there is drama it is due to diameter coordination. Datum length issues are easy to solve by getting the die adjusted to the correct length, but diameters after several pressure cycles can be a problem if the die doesn't match the chamber needs.

This isn't a comp rifle, so I do not have a reamer print or a barrel stub.
You can learn plenty about the actual chamber by a study of your brass, but go ahead and study the ammo and chamber specs anyway. You will want to learn how you sit with respect to standards. For example, is your headspace tight or loose, are your body diameters big or small, what is your neck diameter, etc., etc.

If this is a standard SAAMI or CIP design, you can get those specs on the web. If it is a popular Wildcat, you can still probably find the drawings. You didn't mention the design?

If any of this isn't clear, just take a single case to the range with your loading gear and cycle it by neck sizing only till the bolt gives you trouble to close. If the issues remain unclear and you still have drama, you may consider taking a chamber casting of your barrel or seeking help from a good gunsmith.

There are variations in chambers and dies that can cause issues. I would eliminate the low hanging fruit like taking the Go-gage and some tape to measure the datum length up front. If the steps here don't get you where you are going soon enough, then punt and get help since that would be a sign that you may need those diameters checked.

Hope that is helping rather than hurting. Tell us what cartridge, brass, and dies we are using and maybe someone who has the same can chime in?
 
I believe you are over thinking this issue, no insult intended, just trying to help.

First of all, most calipers can have a .001 error. The fourth decimal place is irrelevant since most calipers are not accurate / repeatable to .0001.

Also, the technique for measuring case head space with a caliper and bump gauge requires some experience and technique mastery to obtain consistent measurements. We are dealing with very small measurements. Inconsistent thumb pressure on the caliper slide and misalignment of the case in the bump gauge with the caliper jaw will all affect the measurement accuracy. In addition, even a slight amount of debris on the jaw will can produce a .001 error. If you are disassembling and re-assembling the bump gauge on the caliper each reloading cycle and do not align it the same way as the last time it also can induce differences. Add inserts to the mix and this is another source of error, the reason I like single piece bump gauges such as Whidden.

Back to basics, the only reason to size a case is so it will chamber in the rifle and hold the bullet. The goal is to accomplish this without over sizing (working the case).

Does 2.034 chamber in your rifle without resistance? If so, there is no need to bump the shoulder. I have often used zero bump with virgin cases for several reloads before I have to bump the shoulder. I believe the reason is that the F/L die sizes the radial dimension of the case and often this is enough.

Every reload cycle I check the fired case head space of the first 3 or 5 depending on the size of the batch then check the sized case head space. I never assume that the last die setting will be adequate for the next cycle. Sometimes you will have to make adjustments. Because I use Skip Shims under the die lock ring, I can easily make slight adjustments to the die setting without changing the lock ring. I am not pushing Skip Shims; the point is sometimes you have to make adjustments from one reloading cycle to another. The are other methods that work equally well, e.g. Whidden Click sizing die, Redding Competition Shell holders, etc. that will afford adjustments without changing the lock ring.

I don't anneal but since you do you should be obtaining more consistent case head spacing if your annealing is consistent. If I did anneal, I would opt for one of those induction annealing machines because they seem to offer a failsafe system for consistent annealing, but I know very little about annealing since I never used it 50+ years of reloading but I understand the value of it to produce more consistent case, if done properly. However, I still get 15 to 18 reloads without it.

Lubing consistency and dwell time in the die can also affect results.

The bottom line is this: as long as the case chambers in the rifle without resistance and you are not over sizing the case you are good to go. I wouldn't get hung up with the numbers as long as the aforementioned two criteria are being met.
 

K22 SAID​

Lubing consistency and dwell time in the die can also affect results.

I believe these two items account for many headaches with proper shoulder bump. For best results keep the lube away from the shoulders and apply the same amount of pressure on the press handle WITHOUT bumping at the bottom of the stroke handle and allow some equal dwell time in the die as mentioned above.
100% spot on Bill!….
Wayne
 
Careful inspection of the virgin brass, the fired, brass, and the sized brass is how you proceed. A good set of micrometers and calipers is a good starting point, along with the shoulder datum gages you already seem to own.

As time goes on, you can also use a spread of expander pins or inspection pins to augment your capability to measure and evaluate necks.

Owning the Go-Gage makes it easier to use shoulder datum comparator tools and then reference or "zero" the tools to the Go-Gage so that from then on your measurements are all based on the delta to the gage.

You can then also use the tape trick to establish your chamber dimension to the shoulder datum and you have a pretty good idea of the bump.

Take the following on each step of your brass cycle:
Case overall length (you will manage this one with trimming)
Neck OD
Neck ID
(later on, verify diameter over loaded bullet).
Shoulder Datum length
Diameter at shoulder
Diameter at 200 line
Primer pocket depth
Primer pocket diameter

To understand your dies and chamber diameters, you will study the difference in the brass at each step of the cycle.

This is all much easier to demonstrate than it is to type out. I would show you in seconds, but I am a horrible writer so this is tough to describe.


You don't check it directly, it is indirectly studied by inspecting brass after it has been sized. Remember, the die is at least 0.125" short in order to accommodate a typical shell holder.

Diameters are as important as lengths, but they are nowhere near as "adjustable" when the brass, chamber, and dies don't coordinate. You can use incremental shell holders to space up a die to control shoulder datum length, or you can just screw it up or down, but there is not a quick way to deal with diameters without cutting or trying different dies.

I prefer to start rookies with the incremental shell holders to get a positive stop on the size stroke, or even cam-over when possible. As often as not, when there is drama it is due to diameter coordination. Datum length issues are easy to solve by getting the die adjusted to the correct length, but diameters after several pressure cycles can be a problem if the die doesn't match the chamber needs.


You can learn plenty about the actual chamber by a study of your brass, but go ahead and study the ammo and chamber specs anyway. You will want to learn how you sit with respect to standards. For example, is your headspace tight or loose, are your body diameters big or small, what is your neck diameter, etc., etc.

If this is a standard SAAMI or CIP design, you can get those specs on the web. If it is a popular Wildcat, you can still probably find the drawings. You didn't mention the design?

If any of this isn't clear, just take a single case to the range with your loading gear and cycle it by neck sizing only till the bolt gives you trouble to close. If the issues remain unclear and you still have drama, you may consider taking a chamber casting of your barrel or seeking help from a good gunsmith.

There are variations in chambers and dies that can cause issues. I would eliminate the low hanging fruit like taking the Go-gage and some tape to measure the datum length up front. If the steps here don't get you where you are going soon enough, then punt and get help since that would be a sign that you may need those diameters checked.

Hope that is helping rather than hurting. Tell us what cartridge, brass, and dies we are using and maybe someone who has the same can chime in?
Thank you for this detailed information.

This will be my project for tomorrow and Sunday and I report back with the results.

I'm using a SAAMI spec 30-06 Douglas barrel, Forester benchrest dies and a a RCBS rockchucker.

And thank you in regards to the other posters as well. I feel pretty confident in my shoulder bump and annealing process. I'm getting very consistent results per batch of brass that I'm bumping. Again, where I am confused is why my shoulders are not forming back out to max after I have bumped them back 002 or 004. Why would they stop?

This phenomenon where the brass doesn't grow back to the full shoulder spec is happening in two of my 30-06, my 7x57 and my 7.7 arisaka. So something is still wonky. I'll start tomorrow with the 30-06 and take notes of all the data points on virgin, once fired, resized, and twice fired brass. I'll also dig out my 30-06 head space gauges.
 
Take one case and load and fire it 3 times without resizing the body, size only the neck. Measure from case head to mid shoulder after each firing. That should give maximum chamber dimension. Subtract 0.002” from that number and that should be what your cases should be bumped to.

And you only have to size the neck just enough to keep the projectile from falling out.
Best of luck.
 
Careful inspection of the virgin brass, the fired, brass, and the sized brass is how you proceed. A good set of micrometers and calipers is a good starting point, along with the shoulder datum gages you already seem to own.

As time goes on, you can also use a spread of expander pins or inspection pins to augment your capability to measure and evaluate necks.

Owning the Go-Gage makes it easier to use shoulder datum comparator tools and then reference or "zero" the tools to the Go-Gage so that from then on your measurements are all based on the delta to the gage.

You can then also use the tape trick to establish your chamber dimension to the shoulder datum and you have a pretty good idea of the bump.

Take the following on each step of your brass cycle:
Case overall length (you will manage this one with trimming)
Neck OD
Neck ID
(later on, verify diameter over loaded bullet).
Shoulder Datum length
Diameter at shoulder
Diameter at 200 line
Primer pocket depth
Primer pocket diameter

To understand your dies and chamber diameters, you will study the difference in the brass at each step of the cycle.

This is all much easier to demonstrate than it is to type out. I would show you in seconds, but I am a horrible writer so this is tough to describe.


You don't check it directly, it is indirectly studied by inspecting brass after it has been sized. Remember, the die is at least 0.125" short in order to accommodate a typical shell holder.

Diameters are as important as lengths, but they are nowhere near as "adjustable" when the brass, chamber, and dies don't coordinate. You can use incremental shell holders to space up a die to control shoulder datum length, or you can just screw it up or down, but there is not a quick way to deal with diameters without cutting or trying different dies.

I prefer to start rookies with the incremental shell holders to get a positive stop on the size stroke, or even cam-over when possible. As often as not, when there is drama it is due to diameter coordination. Datum length issues are easy to solve by getting the die adjusted to the correct length, but diameters after several pressure cycles can be a problem if the die doesn't match the chamber needs.


You can learn plenty about the actual chamber by a study of your brass, but go ahead and study the ammo and chamber specs anyway. You will want to learn how you sit with respect to standards. For example, is your headspace tight or loose, are your body diameters big or small, what is your neck diameter, etc., etc.

If this is a standard SAAMI or CIP design, you can get those specs on the web. If it is a popular Wildcat, you can still probably find the drawings. You didn't mention the design?

If any of this isn't clear, just take a single case to the range with your loading gear and cycle it by neck sizing only till the bolt gives you trouble to close. If the issues remain unclear and you still have drama, you may consider taking a chamber casting of your barrel or seeking help from a good gunsmith.

There are variations in chambers and dies that can cause issues. I would eliminate the low hanging fruit like taking the Go-gage and some tape to measure the datum length up front. If the steps here don't get you where you are going soon enough, then punt and get help since that would be a sign that you may need those diameters checked.

Hope that is helping rather than hurting. Tell us what cartridge, brass, and dies we are using and maybe someone who has the same can chime in?
I agree with all you have written, except this: "but I am a horrible writer so this is tough to describe."

Your response was extremely well written.
 
By chance, did you check body diameters?

If and when you start a new piece of brass, inspect the diameter of the shoulder-body junction, and the 200 line. Then, fire the brass and track all of those fer several cycles. Don't bump the body at all if the bolt will close on the brass, just let it keep expanding while you size the neck only.

While you try your FL size die, you may notice the length of the case can sometimes increase before the shoulder actually gets "bumped".

This is because the body diameter material is being worked back down and moves the brass forward, but may yet get to the point where the die ( and similarly the chamber) has worked the whole body.
I don't want to highjack this thread, but you mention in several of your posts, the "200 line". Could you please explain what that is?
 
Last edited:
I don't want to highjack this thread, but you mention in several of your posts, the "200 line". Could you please explain what that is?
The 200 line is a datum point of a chamber reamer .200 above the case head towards the case shoulder junction.
You’ll see it noted on the attached print, this area can be monitored s couple different ways. Micrometer is the best way although a simple caliper works just fine. Or within 5/10,000 so I figure that’s close enough for me.
 

Attachments

  • IMG_2468.jpeg
    IMG_2468.jpeg
    181.2 KB · Views: 39
  • IMG_1633.jpeg
    IMG_1633.jpeg
    65.7 KB · Views: 38
  • IMG_1634.jpeg
    IMG_1634.jpeg
    56.7 KB · Views: 39
Last edited:
Careful inspection of the virgin brass, the fired, brass, and the sized brass is how you proceed. A good set of micrometers and calipers is a good starting point, along with the shoulder datum gages you already seem to own.

As time goes on, you can also use a spread of expander pins or inspection pins to augment your capability to measure and evaluate necks.

Owning the Go-Gage makes it easier to use shoulder datum comparator tools and then reference or "zero" the tools to the Go-Gage so that from then on your measurements are all based on the delta to the gage.

You can then also use the tape trick to establish your chamber dimension to the shoulder datum and you have a pretty good idea of the bump.

Take the following on each step of your brass cycle:
Case overall length (you will manage this one with trimming)
Neck OD
Neck ID
(later on, verify diameter over loaded bullet).
Shoulder Datum length
Diameter at shoulder
Diameter at 200 line
Primer pocket depth
Primer pocket diameter

To understand your dies and chamber diameters, you will study the difference in the brass at each step of the cycle.

This is all much easier to demonstrate than it is to type out. I would show you in seconds, but I am a horrible writer so this is tough to describe.


You don't check it directly, it is indirectly studied by inspecting brass after it has been sized. Remember, the die is at least 0.125" short in order to accommodate a typical shell holder.

Diameters are as important as lengths, but they are nowhere near as "adjustable" when the brass, chamber, and dies don't coordinate. You can use incremental shell holders to space up a die to control shoulder datum length, or you can just screw it up or down, but there is not a quick way to deal with diameters without cutting or trying different dies.

I prefer to start rookies with the incremental shell holders to get a positive stop on the size stroke, or even cam-over when possible. As often as not, when there is drama it is due to diameter coordination. Datum length issues are easy to solve by getting the die adjusted to the correct length, but diameters after several pressure cycles can be a problem if the die doesn't match the chamber needs.


You can learn plenty about the actual chamber by a study of your brass, but go ahead and study the ammo and chamber specs anyway. You will want to learn how you sit with respect to standards. For example, is your headspace tight or loose, are your body diameters big or small, what is your neck diameter, etc., etc.

If this is a standard SAAMI or CIP design, you can get those specs on the web. If it is a popular Wildcat, you can still probably find the drawings. You didn't mention the design?

If any of this isn't clear, just take a single case to the range with your loading gear and cycle it by neck sizing only till the bolt gives you trouble to close. If the issues remain unclear and you still have drama, you may consider taking a chamber casting of your barrel or seeking help from a good gunsmith.

There are variations in chambers and dies that can cause issues. I would eliminate the low hanging fruit like taking the Go-gage and some tape to measure the datum length up front. If the steps here don't get you where you are going soon enough, then punt and get help since that would be a sign that you may need those diameters checked.

Hope that is helping rather than hurting. Tell us what cartridge, brass, and dies we are using and maybe someone who has the same can chime in?
Interesting stuff. Skimming thru it I would agree with everything you said. A lot to read. I don't want to spend my life reading post. My simple take is that when you size the body the case the wall cannot change thickness. You can only get longer. The metal always has to go somewhere when you change the shape. It doesn't really matter to me but I always wondered where the metal moved to when you bump the shoulder. Do you move the corner where the body and shoulder meet? Does the shoulder just become a little concave and you’re really not moving the entire shoulder? It doesn't really matter because what we are doing works fine.

When the factory does the massive forming from a brass disc to a case what do they lube with?
 
Last edited:
To add to post above. It isn't always exactly the 0.200 line, but near there. Near where the die stops sizing. The widest point in this area...
And to add to the two above posts that I agree with for the most part you can use caliper’s as there better than a Stanley tape measure but not by much!… you really need a micrometer for these precise measurements, when I am checking for pressure signs below the .200 line I want to see no more than .0005 expansion and that’s hard to repeatedly do with a vernier caliper.
Wayne
 

Upgrades & Donations

This Forum's expenses are primarily paid by member contributions. You can upgrade your Forum membership in seconds. Gold and Silver members get unlimited FREE classifieds for one year. Gold members can upload custom avatars.


Click Upgrade Membership Button ABOVE to get Gold or Silver Status.

You can also donate any amount, large or small, with the button below. Include your Forum Name in the PayPal Notes field.


To DONATE by CHECK, or make a recurring donation, CLICK HERE to learn how.

Forum statistics

Threads
166,282
Messages
2,215,492
Members
79,508
Latest member
Jsm4425
Back
Top