• This Forum is for adults 18 years of age or over. By continuing to use this Forum you are confirming that you are 18 or older. No content shall be viewed by any person under 18 in California.

How to measure reamer depth when cutting chamber 223 to 223ai

haeffnkr

Silver $$ Contributor
Hi,
Newby GS question, please and thanks!
I plan to chamber my 223 to 223ai.

What is the easiest way on a lathe, to measure how deep I am cutting the new chamber?
I was thinking find out the difference been shoulder to base lengths on the cartridges plus another .08 to get into new steel.
I would add the difference of the shoulders plus .08 and note the length.
Push the reamer in the tail stock till it hit inside the old chamber, then turn the tail stock till the reamer cut into the chamber shoulder length plus .08 ??

Then cut the shoulder back to get it to the correct new chamber length and use the gages to get the new chamber to the correct length?
 
thanks for that suggestion... I want to use existing tools and not buy more.

My question is really about how far to insert the reamer? How do I measure it?
 
Is the .08 just an arbitrary number you chose?

I'd want to make sure the old neck/throat cleaned up so that's the minimum I'd run the reamer in.
 
Is the .08 just an arbitrary number you chose?

I'd want to make sure the old neck/throat cleaned up so that's the minimum I'd run the reamer in.
.062 is one thread off a Tikka so I was going a bit longer and yes it should remove all the old chamber throat.
 
Put your headspace gauge in and use a depth mic to measure to the shoulder of the tenon. You need to measure your action in a padded vice with the stripped bolt inserted. You measure from the face of the action to the boltface to find your headspace number, If it has a recoil lug you place that on the face and take your headspace measurement.
 
This is from the Manson Reamers website:


How Ackley Improved Chambers are Headspaced​


“Ackley Improved” versions of standard calibers have been popular for many years. Increased velocity, reduced brass stretch and the desire for something unique are all reasons for customers requesting these chamberings.
Headspacing improved versions of rimmed or belted cases presents little difficulty because headspace is controlled by the rim or belt—in the same manner a standard chamber would be headspaced, using standard headspace gages. Setting correct headspace of improved rimless chambers, however, is more involved because the cartridge is not held by the same contact points as in a standard chamber. Further complicating the headspace issue is the requirement of being able—safely– to fire a factory round in an improved chamber, with the result being a properly fireformed improved case.
Rimless, shouldered cartridges are normally located within a chamber by the breech face—which contacts the base of the cartridge, and the shoulder of the chamber—which contacts the cartridge’s shoulder along its entire length. When fireforming a standard cartridge in an improved chamber, the base of the cartridge contacts the breech face in the usual manner, but the front of the case is contacted only at the neck/shoulder junction and not along the entire length of the shoulder.
Because the cartridge must be held securely during fireforming, the dimension between the breech face and the neck/shoulder junction becomes critical. P.O.Ackley, who popularized improved calibers, recommended that this dimension be reduced by .004”/.006” from the standard minimum for a particular caliber. Reducing this dimension compensates for cartridge tolerances and ensures that fireforming can be done safely.
The above means that rifles being converted to an improved version of their original chambering must have their barrels set back by at least .004”/.006” to allow for safe fireforming of brass. In practice, it’s often best to set the barrel back one full turn—this allows plenty of material to work with when re-cutting the chamber and will result in any barrel markings being in the same place.
Gaging the improved chamber is done per normal practice, with the exception that a lighter touch should be used. Ackley recommended that headspace gages—having the same shoulder angle as the original, but .004”/.006” shorter than minimum—be used to headspace improved chambers. This means that the gage will contact the neck/shoulder junction with only line contact—making a “light touch” necessary for this operation.
We make our headspace gages for improved chambers according to Ackley’s recommendations. Our improved “GO” gage is .004”/.006” shorter than the standard GO gage, and has the same shoulder angle. The standard GO gage should be used as a “NO GO” in an improved chamber.
It has been suggested that headspace gages for improved chambers should be made with the same shoulder angle as the chamber—thereby making them easier to use because of contact along the entire shoulder. Gages made in this manner are caliber-specific; that is, they may be used for gaging only the caliber and specific neck size for which they were designed—they can’t be used with improved versions of any other bore size.
Gages made according to Ackley’s guidelines may be used to headspace any caliber based upon the original case. For instance, 30-06 Improved gages— made the way we make them—may be used to headspace all ’06-based chambers from 22-06 Imp. through 35 Whelen Imp., or larger.
In Summary: When “improving” a standard chamber, the barrel must be set back so that fireforming may be done safely and proper chamber length achieved. Headspace gages—made with the shoulder angle of the original chamber, but .004”/.006” shorter than standard—are used to check the headspace dimension. A “light touch” should be used when checking headspace of improved chambers.
“Improved” calibers work well when done properly and can offer real performance benefits when compared to factory cartridges. Once the principles of gaging these chambers is understood, cutting improved chambers is no more complex than cutting standard chambers. Please contact us if you have any questions about the principles or processes described in these instructions—it’s better to ask a question than to ruin a job.
If you’re interested in reading further on this subject, we recommend, Handbook for Shooters and Reloaders, Vols I and II, by P.O. Ackley.

https://mansonreamers.com/how-ackley-improved-chambers-are-headspaced/

:)
 
Manson failed to mention that Ackley's drawings for the 30/06 AI, and every reamer made to those specs, are incorrect (by around .030" IIRC). Chambering as instructed (which IS the right way to do it) results in a chamber with an OAL .030 too long. This means nothing so far as AI chambering in general is concerned. Nosler shows the 30/06 AI with HS too short.
For your 223, you can set back one full turn and chamber as usual; measuring from the gauge to the shoulder. Alternatively, you can look at the chamber drawings, note the difference in the length of the body to the corner of the shoulder, and chamber that much deeper (Measure to the front of the neck, from the face of the barrel with your depth mike) plus about 10 thou. Check with the headspace gauge (GO minus .004) and face the shoulder back to establish the correct headspace. Then face off the breech end for proper bolt clearance. WH
 
Set it back 1 turn it more of it needs it needs it to clean up a used throat and set a sized case for .003-.004” crush at the shoulder.
 
Manson failed to mention that Ackley's drawings for the 30/06 AI, and every reamer made to those specs, are incorrect (by around .030" IIRC). Chambering as instructed (which IS the right way to do it) results in a chamber with an OAL .030 too long. This means nothing so far as AI chambering in general is concerned. Nosler shows the 30/06 AI with HS too short.

The Manson synopsis is not meant to be a definitive answer to all things Ackley Improved. It, like many short answers, is meant to be bite-sized for brief consumption and general information. The definitive texts are reserved for books such as the Ackley book suggested by Manson at the end of the article. Leave it to someone to point out the one exception (supposedly) as a condemnation. Everyone makes a mistake every now and then.

;)
 
Put your headspace gauge in and use a depth mic to measure to the shoulder of the tenon. You need to measure your action in a padded vice with the stripped bolt inserted. You measure from the face of the action to the boltface to find your headspace number, If it has a recoil lug you place that on the face and take your headspace measurement.
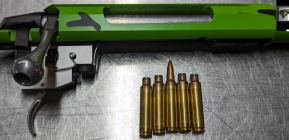
This is about what I did .... after I screwed up and pushed the reamer in too far initially. Thanks for for the tips. I checked the space between shoulder and no/go gage and the the space between bolt face and action front. Subtracted the difference, cut off the shoulder the amount plus 1 thou and BAM ... on the money and per the gages.
 

Attachments

  • Screenshot 2023-08-12 10.44.49 PM.png
    Screenshot 2023-08-12 10.44.49 PM.png
    2.1 MB · Views: 19
The Manson synopsis is not meant to be a definitive answer to all things Ackley Improved. It, like many short answers, is meant to be bite-sized for brief consumption and general information. The definitive texts are reserved for books such as the Ackley book suggested by Manson at the end of the article. Leave it to someone to point out the one exception (supposedly) as a condemnation. Everyone makes a mistake every now and then.

;)
Not a condemnation; just an observation. The 30/06AI gauge was mentioned in the text. I pointed out the error in dimensions in the P.O.Ackley drawing (for the 30/06 AI) only as a matter of interest, with no criticism intended. WH
 
I won’t get into the too long or too short, or the way to do it.
“AI” and “Mauser” just to name a couple have become a generic term for the most part.
If you want a true Ackley job, study and wrap your head around it if you want it done as the old man did. Sooo many misconceptions of the original.
Other wise it is just an improved of some sort.
 

Upgrades & Donations

This Forum's expenses are primarily paid by member contributions. You can upgrade your Forum membership in seconds. Gold and Silver members get unlimited FREE classifieds for one year. Gold members can upload custom avatars.


Click Upgrade Membership Button ABOVE to get Gold or Silver Status.

You can also donate any amount, large or small, with the button below. Include your Forum Name in the PayPal Notes field.


To DONATE by CHECK, or make a recurring donation, CLICK HERE to learn how.

Forum statistics

Threads
166,253
Messages
2,215,014
Members
79,496
Latest member
Bie
Back
Top