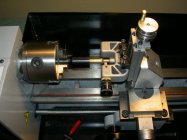
Piddling around the garage, I used the lathe to make a steel mandrel that is about .223" in diameter for its last quarter inch or so. I left a shoulder of about .235" for the case neck to stop against, but small enough so the tool bit would not hit it when turning. I pressed a 223 Remington case (Winchester) on the end and up against the mandrel shoulder. The case was a tight fit, but could do it by hand. I put a dead center into the tail stock, applied a drop of oil and adjusted it to lightly press into the primer pocket. I ground a hardened steel tool bit to cut from left to right, and tried to grind it to touch the shoulder just the right amount and at the right time. I am still working on that, as grinding the tool to fit the contour of the neck/shoulder area is trial and error.
The case did not slip on the mandrel, and after taking .002" or so off (per side), I twisted the case off, and measured neck thickness on the Redding Case Neck Concentricity Gauge. This tool measures neck wall thickness. I was a bit disappointed that I still got a variance of about .0005", but a lot better than the .002" I started with. I expect part of the error (if not all) was that I made the mandrel, removed it from the lathe (a big no-no) and put it back in the chuck. It never is in the same place. I checked runout on the mandrel and it was about .0005" (surprisingly good).
Instead of making a new mandrel, leaving it in the chuck and turning brass, I'll just mount the 4 jaw chuck and get it dead center. I've gotten pretty good at setting up stock dead center in the 4 jaw. There may be some flaws in my approach and I can think of some already, but at least I am learning.
I know none of this is going to help me in my AR and factory bolt gun, but it was fun to do and hopefully can use it with a custom chambered rifle in the future.
Phil
Is it a given, or exact science that primer holes are exactly in the center of the base and or case body? Just curious. Barlow
No, not necessarily.
They should not be used as a reference point for turning.
California Hunter Education Instructor
Interesting idea, Phil. I tried the same thing a few weeks back and, although it worked fairly well, I was disappointed. I found that the tolerances between the case neck and the mandrel were inconsistent, case to case, by +/- .0005 and that some wanted to slip on the mandrel. Applying more pressure to hold them against the mandrel's top shoulder risked deforming the mouth of the case or the primer pocket. I considered creating an attachment with a recess for the tail stock to hold the case firmly but abandoned that approach in favor of a new idea.
When I've got the new idea working (it's not quite as simple as my first try) I'll post it. It'll have weaknesses I'm sure and maybe you and the others can help work those out.
Don't worry about the primer pocked not being precisely centered. As long as your mandrel is centered on the tail stock, that's your reference point for trimming. If the primer pocket is a bit off center the case neck should still slide straight onto the mandrel and remain true during your trimming run. Your tail stock support just keeps the case from running away from the mandrel. Try trimming down the eraser from a lead pencil and stuffing it into the primer pocket. Use a live center to hold the light pressure needed on bottom of the case. That might help improve any alignment flaws.
Why not pick up a K&M neck turner? Simple to use, accurate, consistent and very efficient.
I live in new york state,how unfortunate !
Gold $$ Contributor
If you can run an emergency collet in your lathe,bore it to the exact size of the base diameter about a 1/4" into it and stop.After you get that done ,take any neck turner and run the lathe at about 50 rpms and use your neck turner to trim the diameter.When we insert the case into the emrgency collet we bring the tail stock close and run the center into the neck lightly to just center the cartridge case and tighten the collet.Pull tailstock away for hand clearance and away we go.Does a wonderful job and saves your hands.
Lapua40X said:
Interesting idea, Phil. I tried the same thing a few weeks back and, although it worked fairly well, I was disappointed. I found that the tolerances between the case neck and the mandrel were inconsistent, case to case, by +/- .0005 and that some wanted to slip on the mandrel. Applying more pressure to hold them against the mandrel's top shoulder risked deforming the mouth of the case or the primer pocket. I considered creating an attachment with a recess for the tail stock to hold the case firmly but abandoned that approach in favor of a new idea.
When I've got the new idea working (it's not quite as simple as my first try) I'll post it. It'll have weaknesses I'm sure and maybe you and the others can help work those out.
Don't worry about the primer pocked not being precisely centered. As long as your mandrel is centered on the tail stock, that's your reference point for trimming. If the primer pocket is a bit off center the case neck should still slide straight onto the mandrel and remain true during your trimming run. Your tail stock support just keeps the case from running away from the mandrel. Try trimming down the eraser from a lead pencil and stuffing it into the primer pocket. Use a live center to hold the light pressure needed on bottom of the case. That might help improve any alignment flaws.
You’re right, internal case neck diameter does vary and found some cases to small to even fit over the mandrel and others too loose, resulting in the case spinning. Like you, I found that additional pressure on the case neck against the mandrel shoulder really did not help minimize any case slippage. This could be avoided by sizing down all necks so that all will require a press fit on the mandrel. More work though.
After thinking about it, I am less concerned about off center primer pockets than I am crooked necks. A slightly crooked neck is going to result in the case head wobbling about. If the case head is forced to stay in line with the mandrel, then there is a bending force at the neck and mandrel. The 21st Century Shooting Lathe addresses this with a floating case head support (your eraser) but also a floating cutter head assembly.
I am interested in your ideas on how to make this work. Some other ideas.
http://riflemansjournal.blogspot.com/2010/08/equipment-neck-turning-collet-for-lathe.html
http://www.benchrest.com/jackie/
Phil
California Hunter Education Instructor
Phil3 said:
...
I am interested in your ideas on how to make this work. Some other ideas.
...
Phil
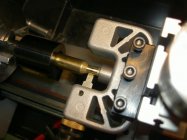
My new RCBS outside case neck trimmer worked just fine, but was tiring to use - especially on the wrist. I ordered the appropriate Forster Original collet (PN CT2001), the collect screw handle with collect screw (CT1010-11) and collect housing (CT1010-013). I cut off the handle and trued the body of the collet handle/screw, then mounted the assembly in the lathe chuck. Using the milling attachment for my lathe, I mounted the RCBS cutter in its jaws and centered it on a case. Pretty simple considering the lathe's adjustments are linear and synchronized. I found it difficult to get the case to hold tight enough in the collect using only hand tightening (small outside radius, big hands) so I made a short handle to fit into the pre-drilled holes intended for mounting the collect housing on the Forster trimmer stand.
I admit that investing in the RCBS case trimmer and the additional Forster parts ran the cost high enough that I probably could have just purchased one of those hand crank models but I enjoy my lathe and this project was a lot of fun.
-
PICT4466.JPG
51.6 KB
· Views: 62
-

PICT4468.JPG
50.4 KB
· Views: 49
-
PICT4469.JPG
48.8 KB
· Views: 52
-

PICT4471.JPG
63.2 KB
· Views: 52
You guys are trying to re-invent whats already been worked out in neck turning.
Expand neck to fit a lubed turning mandrel(Relatively loose).
Turn the case with anything relatively slow, while holding a cutter in hand.
BAZINGA!
California Hunter Education Instructor
mikecr said:
You guys are trying to re-invent whats already been worked out in neck turning.
Expand neck to fit a lubed turning mandrel(Relatively loose).
Turn the case with anything relatively slow, while holding a cutter in hand.
BAZINGA!
You're absolutely right, Mike. But it's really not about the practicality of the product. It's about the challenge and fun of the experience.
Lapua40X said:
mikecr said:
You guys are trying to re-invent whats already been worked out in neck turning.
Expand neck to fit a lubed turning mandrel(Relatively loose).
Turn the case with anything relatively slow, while holding a cutter in hand.
BAZINGA!
It's about the challenge and fun of the experience.
Exactly. As I wrote in the title of the thread, "
GOOFING AROUND w/Neck Turning". And who knows, maybe something useful will come from it.
Phil
mikecr said:
You guys are trying to re-invent whats already been worked out in neck turning.
Expand neck to fit a lubed turning mandrel(Relatively loose).
Turn the case with anything relatively slow, while holding a cutter in hand.
BAZINGA!
+1
K&M all the way. Turner, mandrels and expand iron. They all work so well together, concentricity and neck thickness can be held to .0001" or better.
If I had a metal lathe, I'd be experimenting with many things too! Someday I'll have one...
Looks like fun to me! Makes me want to go out and buy a lathe! ;D
ridgeway said:
mikecr said:
You guys are trying to re-invent whats already been worked out in neck turning.
Expand neck to fit a lubed turning mandrel(Relatively loose).
Turn the case with anything relatively slow, while holding a cutter in hand.
BAZINGA!
+1
K&M all the way. Turner, mandrels and expand iron. They all work so well together, concentricity and neck thickness can be held to .0001" or better.
If I had a metal lathe, I'd be experimenting with many things too! Someday I'll have one...
K&M with an 18V Dewalt drill. Then you have Bazinga.
ridgeway said:
If I had a metal lathe, I'd be experimenting with many things too! Someday I'll have one...
I am always looking for something to make on my lathe (1946 Soutbend 9", 54" bed). I need to make a bolt vise for an AR-10, since I can't find anyone who makes one. The vise allows easy disassembly and removal of the spring loaded ejector. Sinclair has one for the AR-15 (http://www.sinclairintl.com/gun-parts-tools-accessories/firearm-tools/ar-15-tools/sinclair-ar-15-bolt-vise-prod34719.aspx), but never seen one for the AR-10. No problem, with a lathe and a mill, I'll make one. I find I end making more tools than parts.
")
Lathes are definitely neat to have, I think you would have a lot of fun.
Phil
Phil3 said:
ridgeway said:
If I had a metal lathe, I'd be experimenting with many things too! Someday I'll have one...
I am always looking for something to make on my lathe (1946 Soutbend 9", 54" bed). I need to make a bolt vise for an AR-10, since I can't find anyone who makes one. The vise allows easy disassembly and removal of the spring loaded ejector. Sinclair has one for the AR-15 (http://www.sinclairintl.com/gun-parts-tools-accessories/firearm-tools/ar-15-tools/sinclair-ar-15-bolt-vise-prod34719.aspx), but never seen one for the AR-10. No problem, with a lathe and a mill, I'll make one. I find I end making more tools than parts.
Lathes are definitely neat to have, I think you would have a lot of fun.
Phil
Right on!


