Follow along with the video below to see how to install our site as a web app on your home screen.
Note: This feature may not be available in some browsers.
This Forum is for adults 18 years of age or over. By continuing to use this Forum you are confirming that you are 18 or older. No content shall be viewed by any person under 18 in California.
I am brand new to reloading and am setting up my new Forster Co-Ax press. A couple questions for those who have this press.
1) The press has a "floating" die feature, meaning the die can float laterally aligning itself as needed. There is an Allen screw to tighten against a spring and a detent ball to hold the die in place, but not too tight, so it can float. I presume this is tightened enough so the die does not fall out of the press, but not so tight I can not move it by hand?
2) The primer seater assembly is a threaded spring loaded device with a receptacle for a primer. One assembly for large primer, another for small. Is this supposed to be threaded in all the way? The spring loaded portion can also be threaded in and out. How far in and out is that supposed to be? I intend on using a hand primer, but for now, will use this, and want it setup properly.
I welcome any other tips setting up or using this press.
As far as the detent to hold the die in, I have never touched it. It has worked fine how it came from the factory. And I haven't primed on it, i use a lee auto prime, so I can't help on the priming side of it. You'll love it though, last press you will buy!
I too have never used the die retention screw/detent. I love the press, you will too. It makes incredible ammo. As for the primer feature, I switched to a hand primer from RCBS as I didn't like handling all the primers individually with bare ahnds and hated wearing rubber gloves.
I may be too careful about primers, but I remember a story about the AMU team's ammo crew and they wore rubber gloves while handling components that contacted powder and primers. If they thought it was important, so do I.
Scott
Phil, your assumption about the detent ball is correct. If it needs to be adjusted, which most don't, just tighten it enough so the die snaps in yet still moves slightly. The priming portion of the press is adjustable also, by turning the spring loaded seater up you can control, depth of primer. You want to set it up so the primer snugs up against the bottom of the primer pocket without crushing the primer.
Nice Press! Like the other posts say, I used the primer function once when I first got the press and never again. As for the floating plates I never had to adjust them but would adjust them just tight enough to allow free sliding. I do how ever spray my press with dry moly on all the bare steel parts. This keeps the dreaded rust at bay. Make sure you get the short handle!
I have collected a lot of presses over the years. The Co-Ax is the best press I have ever owned, by far. You can load ammo on it as straight as can be loaded with custom in-line dies.
Congrats on your decision. You are starting out at the top of the line, and you will cherish this press for the rest of your life.
Buy some extra springs for the jaws. Sooner or later one is going to go flying when you’re hurrying to switch jaw sizes. It’s easier to switch jaws if you take the die out and put a fired case or pencil under the loading table to keep the table from going all the way down.
Occasionally I’ll lightly lube the jaws at their contact points on both sides, work them some before wiping up any excess, and use the short end of the allen wrench to equally tighten down the 2 screws. Always check to see that they are opening and closing uniformly. If you get a stuck case you can pry them open while all the way up to snap them back onto the case.
Now and then you’ll need to lube the pivot points and the 2 ram rods. I use FP10. Work the press up and down and wipe away the excess. I keep a cut off pants leg that’s sprayed with silicon to keep the press covered while not in use. Polyester would probably work better since it doesn’t absorb moisture.
Buy a lot of extra die rings for other brand dies that you’ll be using. Midway puts them on sale now and then. Try to get ones with all phillips or standard head screws. It’ll be one less thing you’ll need to have laying around. I like to have the screw dead center facing me with the screw head to the left. You can put a mark on the die threads where the ring is split to act as a set point for adjusting headspace.
Is anyone using the optional shellholder plate? Wonder how it’d work with the shellholder sets that’d give different headspacing?
Thanks for the tips, it does help. However, I have concerns over something I noticed while first operating press. The case when raised up toward the die is quite misaligned with the die decapping pin (sticking out the bottom of the die about 1/8"). The pin is in the left one third of the case. I know the jaws float to align with the die, but it is so misaligned, that the 223 Remington case, will sometimes catch on the neck sizing ball I think (Redding FL die) and sometimes tries to crush the edge of the case. If the case slips into the die past the decapping pin, the top part of the case moves noticeably to the left (when facing the die). Normal?
Buy a lot of extra die rings for other brand dies that you’ll be using. Midway puts them on sale now and then. Try to get ones with all phillips or standard head screws. It’ll be one less thing you’ll need to have laying around. I like to have the screw dead center facing me with the screw head to the left. You can put a mark on the die threads where the ring is split to act as a set point for adjusting headspace.
Bill,
I believe that the Sinclair Lock Ring is the best available. It is stainless steel, accurately machined, fits the Co-Ax perfectly and locks positively with a 7/64 hex key.
Phil3 said:
Thanks for the tips, it does help. However, I have concerns over something I noticed while first operating press. The case when raised up toward the die is quite misaligned with the die decapping pin (sticking out the bottom of the die about 1/8"). The pin is in the left one third of the case. I know the jaws float to align with the die, but it is so misaligned, that the 223 Remington case, will sometimes catch on the neck sizing ball I think (Redding FL die) and sometimes tries to crush the edge of the case. If the case slips into the die past the decapping pin, the top part of the case moves noticeably to the left (when facing the die). Normal?
- Phil
No, not normal. I do not use dies with expander balls but the case should sit squarely on the shell plate and rise directly into the die. The die ring might cause misalignment, check it. If you have a little extrusion on the primer, it can cause the case to cock slightly, although the case should be centered over the primer ejection hole. The decapping pin stem can also be off if it is a little loose.
FWIW, try to move away from using dies with expander balls. Either use dies (neck or FL) with bushings or have a standard die honed to match your brass. Expander balls cause more problems than they are worth.
Phil3, under the jaws in the front of the press, there is a sloted screw that adjusts the amount of grip by the jaws, take a small screw driver and with the jaws raised slightly adjust the screw until the case aligns straight and you should be good to go.
To what screw do you refer? The latest (B3) model Co-Ax does not include a screw in that location nor is it in the parts list. Part number 028271-044 is the large, conically pointed screw that opens the jaws when the stage is lowered.
sleepygator, on my Co-Ax it's right in front of where the primer tube screws into the press frame. The primer drop tube can be removed and the press jaws raised slightly to make the adjustment easier.
Well, I obviously have the tapped hole in the stage and the clearance hole in the frame, but Forster must have decided not to include the screw. Maybe accountants run the company.
You may be correct, my press is very old but still works like the day I bought it. That's not cool that they removed the screw, as it allows you to center the case up by controlling the amount of jaw pressure on the case head. Sometimes saving a buck, ain't what it's cracked up to be.
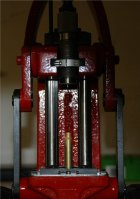
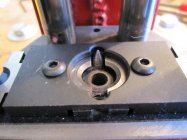
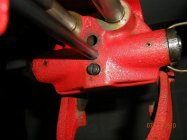
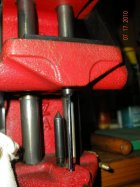
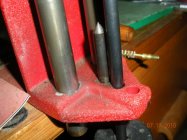
I have no screw either on my new press. I have attached pics of the case alignment issue I have been referring to.
When the jaws close around the case, the case tilts to the right. It may or may not have been straight just sitting there, and perhaps the jaws clamping the case straighten it up. Regardless, the case does not line up well with the die, as shown.
I called Forster. They said to snip a coil of a jaw spring to cause the jaws to move the left. I will order more springs before doing that.
You can nudge the case slightly so it lines up and it does stay there, but having to do that on most rounds is annoying. I tried various brass, new and once fired, with no difference. The jaws ARE slightly to the right in a resting position when closed with no case and not held open by the tapered screw. A snipped coil on the spring would likely fix that, but am surprised it is this way for a brand new press.
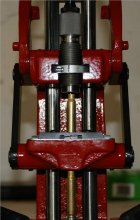
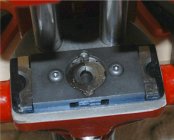
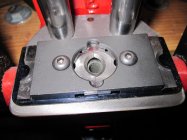
The first pic is with jaws not clamping the case. You can see the gap in the jaws and the case behind it. The next pic is with jaws closed and stage slightly raised. Notice how has case has now moved slightly to right at top. The third pic clearly shows the misalignment. The last pic is hard to see, but the jaws are not quite centered over the primer hole.
Very good, Ron. I believe you are correct. Note that mine are not perfectly aligned but appear the same size. Also note that my jaws have an "S" engraved on opposing, outside corners to indicate the small jaw side.
The jaws were not matched with one large and one small. In my last photo, you can barely make out the "S" at the back of the left jaw, and even harder to see, is the "S" at the front of the right side jaw.
I took it all apart, cleaned, and tried it with a .308 case using the bigger side of the jaws. Works perfect. I turned the jaws around for the 223 Remington, and still misaligned.
I had been unable to swap the jaws side to side because for some reason, the tapered screw would not push the jaws apart when the jaws were swapped left to right. I just thought the jaws only fit one way. For whatever reason, upon this most recent reassembly, the jaws WOULD open with the jaws flipped side to side. Now, it is much better aligned. It is sometimes off a bit, in one direction or the other, and sometimes dead on center with the decapping pin, but nothing near as bad as it once was.
I think the jaws would not operate before when flipped side to side because of some burr or roughness on the beveled jaw edges the tapered screw acts on. Upon inspection, the jaw bevels are not cut exactly straight, making for smaller beveled edges on one side of the jaws vs the other. It is apparent the smaller beveled jaw edges were reluctant to work with the tapered screw, until now.
Looks like I am good to go. Now, to learn about resizing cases and FL die adjustment in the press for an AR15, and then a 6mmBR bolt rifle.
This Forum's expenses are primarily paid by member contributions. You can upgrade your Forum membership in seconds. Gold and Silver members get unlimited FREE classifieds for one year. Gold members can upload custom avatars.
This site uses cookies to help personalise content, tailor your experience and to keep you logged in if you register.
By continuing to use this site, you are consenting to our use of cookies.


")