Follow along with the video below to see how to install our site as a web app on your home screen.
Note: This feature may not be available in some browsers.
This Forum is for adults 18 years of age or over. By continuing to use this Forum you are confirming that you are 18 or older. No content shall be viewed by any person under 18 in California.
I have found my chambering methods to be ever evolving. I’m always tweaking them, attempting to get the best final product possible.
When I first started chambering I just used a piloted finish reamer for the entire chamber and was satisfied with my results. I have slowly transitioned into preboring the chambers to save time on chambering and wear on the reamer
Recently, I have been boring a hole just under shoulder diameter to a 1.25” depth. (about as far as the bushing can still enter the bore)
Then I chamber the barrel to final depth.
I have been thinking that if I was to prebore to the shoulder depth, the reamer should find center in the bored hole. In theory I believe I could just remove the pilot and the reamer would continue straight on the hole that was bored?
Is anyone cutting chambers this way. I’m always interested hearing what works for others.
it depends on how your holding your reamer, I've found if the pilot has not entered the bore before the shoulder makes contact it will chatter severely
A non-piloted reamer is nothing but a 6 flute boring bar where you are playing Russian roulet with which flute is cutting if it isn't chattering as Gary mentioned. Get a roughing reamer or a JGS piloted core drill. A through bore coolant system will speed up your chambering more than drilling and boring ever will. I generally get 20 some chambers from a reamer when using it to cut the complete chamber.
How true do you want your chambers to be with the throat?
I used to have a complete write up on BENCHREST.com on pre boring and reaming to where the camber would run dead true with the first thing that the bullet “sees” when it is released from the case mouth. It was part of my write up on how to chamber barrels in a lathe with a long headstock.The pictures all got deleted.
A couple years ago, I wanted to try a 30PPC to shoot cast bullets. I already had a .332" neck reamer and the appropriate throater, and several 6PPC reamers. The barrel set through the headstock and indicated in, reaching into the barrel where the throat will be. Standard procedure. Drilled 1" deep, then bored the hole to .010" small of the shoulder. Pushing the reamer with a dead center, I loaded it with Rigid sulfur cutting oil and eased it in, about 75 RPMs. Once in and cutting, I turned the speed up and continued to ream the chamber to headspace. Double check indication, the neck reamer was piloted, fit the bushing and reamed the neck, then reamed the throat to where I wanted it. Cleaned it all, then put the indicator back in to the throat, still good, then backed up to neck, about .0002, back to shoulder, still good, back to base, good. All I had to do was break the shoulder at the neck/shoulder with some lapping compound, and it worked well, still shoot it!
For me, I've found that prebore followed by a rougher (which I have for a few more commonly used chamberings, not all) with a properly-sized snug pilot has resulted in the least chamber runout/concentric throats. I know some say "no pilot"- tried it once for the hell of it- chatter right off the bat and I went back to the pilot and got it cleaned up before it got out of hand.
The thing about drilling/pre-bore is that you cannot completely true the drilled hole by boring.
The end of the hole cut by the drill bit- the 135 or 118 degree section cannot be bored true and I try to make sure I have good engagement of the reamer body in the trued hole so the reamer isn't influenced when it hits this section.
With perfect alignment (not easily achieved, which is why we use floating holders) and the reamer rigidly held in a tailstock collet, no pilot would seem feasible to me- but without absolute rigidity I'd expect chatter.
How true do you want your chambers to be with the throat? Are you just doing barrels for yourself?
I used to have a complete write up on BENCHREST.com on pre boring and reaming to where the camber would run dead true with the first thing that the bullet “sees” when it is released from the case mouth. It was part of my write up on how to chamber barrels in a lathe with a long headstock.The pictures all got deleted.
For me, I've found that prebore followed by a rougher (which I have for a few more commonly used chamberings, not all) with a properly-sized snug pilot has resulted in the least chamber runout/concentric throats. I know some say "no pilot"- tried it once for the hell of it- chatter right off the bat and I went back to the pilot and got it cleaned up before it got out of hand.
The thing about drilling/pre-bore is that you cannot completely true the drilled hole by boring.
The end of the hole cut by the drill bit- the 135 or 118 degree section cannot be bored true and I try to make sure I have good engagement of the reamer body in the trued hole so the reamer isn't influenced when it hits this section.
With perfect alignment (not easily achieved, which is why we use floating holders) and the reamer rigidly held in a tailstock collet, no pilot would seem feasible to me- but without absolute rigidity I'd expect chatter.
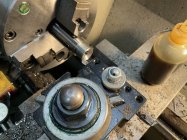
You drill the hole small enough to single point rough bore the chamber on the same taper as the case. I have a mark on the degree indicator my lathe’s compound that gives me the correct taper. It’s about 5/8 of a degree off straight.
I rough bore mine to within about .005 of final size. All the reamer does is give the final shape, depth, and finishe for the chamber.
I'll first start off by saying I'm a total rookie gunsmith compared to a lot of you on here. I am a machinist by trade though, so I know my way around the equipment, I'm just trying to learn all the tricks of the trade as far as the gunsmithing stuff goes.
The first chamber I ever cut was a 22-250 for a Remington 700. I ran the piloted reamer from start to finish and it turned out great. I use a long indicator and dial the bore true right at the throat. I checked the runout after every cut along the way to see if anything was moving before moving on to the next step. All was good and that chamber ran without hardly a wiggle to the long stem interapid indicator.
After that I started reading about preboring and thought I would try it on my next chamber job. Rifle was going to be a 300 Norma Imp. With that one I did like Jackie said and set the compound to the same angle as my reamer body angle. I did that by just running the compound back and forth along the reamer with an indicator adjusting until I had it running the same angle. I drilled a hole a little smaller than the shoulder diameter and a little short of chamber depth and then proceeded to bore the tapered hole with a small carbide boring bar feeding it in with the compound. Of course being this was only my second chamber job I was a little nervous about it because if I screwed it up I really couldn't punch it out to anything bigger since it was already big Lapua sized cartridge. I kept boring a little at a time using a empty shell as I went to check for depth. When I got close I cleaned out all the chips and squirted some cutting oil in the bore and on the reamer and pushed it in with a pilot I had tried in the bore before I started. I ran the reamer in and out cutting, cleaning and checking many times so I didn't have a nice Proof Carbon Fiber barrel as a paper weight to remind me of my screw up. Everything when great and I nailed the headspace without going to far and having to take a cut on the shoulder to get there.
I cleaned everything up and put the indicator in the bore to check the grooves and lands hoping nothing has moved during the whole process. Everyhthing was good, less than .0005 runout. Backed it out to the throat and gave the chuck a spin. Needle didn't move and for a second I thought maybe it wasn't touching. I touched the dial with my finger and it was making contact so I was happy. I ran the indicator on the rest of the chamber and it was running dead true the whole way out. This was my personal long range elk rifle and it shoots extremely well and since then this has been the way I've been chambering my barrels. I feel setting the compound up to the taper of the reamer and boring the tapered hole can only leave the reamer one place to go and that's running true to what ever you bored it.
I have found my chambering methods to be ever evolving. I’m always tweaking them, attempting to get the best final product possible.
When I first started chambering I just used a piloted finish reamer for the entire chamber and was satisfied with my results. I have slowly transitioned into preboring the chambers to save time on chambering and wear on the reamer
Recently, I have been boring a hole just under shoulder diameter to a 1.25” depth. (about as far as the bushing can still enter the bore)
Then I chamber the barrel to final depth.
I have been thinking that if I was to prebore to the shoulder depth, the reamer should find center in the bored hole. In theory I believe I could just remove the pilot and the reamer would continue straight on the hole that was bored?
Is anyone cutting chambers this way. I’m always interested hearing what works for others.
As a machinist, I believe the absolute worst way to establish a round, truly straight hole in anything is with a reamer. Murphy’s law is always hovering around readers. So I minimize the reamer’s involvement in the process as much as possible. As I stated before, all I use the reamer for is to establish final dimensions and finish.
To me, chambering barrels is nothing more than another machining job. You know going in what the requirements are. Setting up the barrel so it is in a stress free setup and trued the way you want it is the first order of business. You want the chamber to be truly straight with first thing the bullet “sees” upon ignition. You want a finish in the chamber that is conducive with ease of extraction but gives the case the proper grip on the chamber walls to avoid tight bolt lift.
the threads and barrel shoulder should run true and square with the chamber. If you are doing barrels for yourself, you should be able to hold the tolerances to such a degree to where you can use the same brass in any of your rifles chambered in that round.
if your cases out of your different barrels are not the same, you need to anylize your setup.
lastly, the finished chamber should be the exact size of the reamer. You should be able to remove the pilot, and the reamer should fit snug in the chamber when pushed in by hand with zero shake. I leave the finish exactly the way the reamer cuts it.
Needless to say, to do this type of work, attention to detail is paramount. As any good machinist will tell you, one of the most important aspects of machine shop practice is to have a thorough knowledge of WHY you do things a certain way as well as the knowledge of how to do it.
Most cases have minimal taper (grand scheme) so a co-axial hole that might be .005 over final at the web but .025 at the shoulder doesn’t change anything about the hole following except how much of the reamer shoulder is cutting? The body to shoulder junction on every reamer is the point of maximum wear regardless of .005 or .025 left for the reamer.
Most cases have minimal taper (grand scheme) so a co-axial hole that might be .005 over final at the web but .025 at the shoulder doesn’t change anything about the hole following except how much of the reamer shoulder is cutting? The body to shoulder corner on ever reamer is the point of maximum wear regardless.
Why? to remove all variables. I want everything that the reamer body encounters to be single point cut.
It’s really not that difficult. The easiest way to set your compound and mark it is to chuck a loaded round up by the neck and true the body up. Then, with a last word indicator, set your compound to where the needle reads zero as you run the compound back and forth.
I have done it about all ways now. I started with the reamer the whole way, then moved to using a piloted core drill, now I dial in the throat & the muzzle and drill to the shoulder and bore undersized, Then use a finish reamer. This has given me the best results. The core drill produced rifles that were 1/2moa shooter but when I started looking at the throats I could clearly see I was cutting them a little off. One or two lands would have a longer “tail” then the others. Now they are completely even
I have done it about all ways now. I started with the reamer the whole way, then moved to using a piloted core drill, now I dial in the throat & the muzzle and drill to the shoulder and bore undersized, Then use a finish reamer. This has given me the best results. The core drill produced rifles that were 1/2moa shooter but when I started looking at the throats I could clearly see I was cutting them a little off. One or two lands would have a longer “tail” then the others. Now they are completely even
Before everyone throws their hat into indicating the lands, ask yourself this. Looking at a cross section of a typical 4 groove barrel, what percentage of the bullet will ride on the tops of the lands, or ride the grooves? The bullet will conform to the barrel interior, the majority of which are grooves. The lands twist it, but the bullet is influenced by the grooves. If you pay real close attention while turning a barrel, you will see all kinds of "differences" from one groove/land to another, in some barrels. It's my belief, since we are dealing with the breach end, that lapping can/may create some of this. I believe Tony's book says he wants his barrels indicated on grooves, not lands. Been a while since I read it, but this has been known long before his book.
This Forum's expenses are primarily paid by member contributions. You can upgrade your Forum membership in seconds. Gold and Silver members get unlimited FREE classifieds for one year. Gold members can upload custom avatars.