• This Forum is for adults 18 years of age or over. By continuing to use this Forum you are confirming that you are 18 or older. No content shall be viewed by any person under 18 in California.

Carbide Cutters for Sinclair Neck Turners

ronemus

Gold $$ Contributor
I've been looking for carbide replacement cutters for my Sinclair neck turners with little success. I found PMA Tools 23 & 40 degree cutters, but I'm looking for angles in between those. 21st Century makes a range of angles, but their cutters don't fit Sinclair tools. I've Googled, but that's all I've come up with. Does anybody know of others?
 
I have a carbide 40 degree cutter, and that works well for .284. I'd like carbide cutters better suited to .223 and .338 Lapua. Steel cutters require frequent adjustment when I'm doing large batches and I'd prefer carbide so I don't have to sharpen. I have 3 Sinclair tools and will dedicate one to each caliber. I don't have a good setup to reset the angle on PMA cutters, so I'm looking for alternatives.
 
I've been looking for carbide replacement cutters for my Sinclair neck turners with little success. I found PMA Tools 23 & 40 degree cutters, but I'm looking for angles in between those. 21st Century makes a range of angles, but their cutters don't fit Sinclair tools. I've Googled, but that's all I've come up with. Does anybody know of others?
No need to get a bunch of angles in between, just make sure to use a cutter with a greater angle that your neck angle. This will assure you don’t cut excess material on the shoulder when you touch off on it. I use a 40 deg cutter for all necks between 30-38 deg, and I use the 30 deg cutter for all shoulder angles less than 30 deg.
Dave
 
The 40 degree cutter creates a stress riser when used on brass with a small shoulder angle; I've had case necks separate, which is a PITA to clear in a semi-auto. So far my only choices are 23 and 40 degrees, and 23 is too shallow to be of any use.
 
The 40 degree cutter creates a stress riser when used on brass with a small shoulder angle; I've had case necks separate
On what neck angle cases did that occur? The steeper angle should create much less of a stress riser provided you aren't cutting away too much on the shoulder.
 
Order the 23 degree and then get a diamond knife sharpening stone. You can then hand hone the cutter angle to your desired needs. It takes about 15 minutes and some checking along the way. I think my diamond sharpener is 600 or 800 and it makes short work of it.

I know the separation issue you are talking about, and the stress riser. I have since started putting a radius in all my cutters. I have done quite a bit of testing, case splitting, and analysis of my process through the last few years.

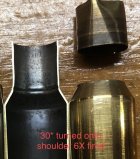
This is a case turned with a 30 degree cutter, turned to kiss the shoulder. Stress riser is right at the neck shoulder junction.

IMG_6651.jpeg


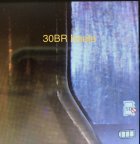
This is a modified cutter with a radius hand honed into it. Picture was taken off of a digital microscope

IMG_6652.jpeg
 
Order the 23 degree and then get a diamond knife sharpening stone. You can then hand hone the cutter angle to your desired needs. It takes about 15 minutes and some checking along the way. I think my diamond sharpener is 600 or 800 and it makes short work of it.

I know the separation issue you are talking about, and the stress riser. I have since started putting a radius in all my cutters. I have done quite a bit of testing, case splitting, and analysis of my process through the last few years.

This is a case turned with a 30 degree cutter, turned to kiss the shoulder. Stress riser is right at the neck shoulder junction.

View attachment 1572474


This is a modified cutter with a radius hand honed into it. Picture was taken off of a digital microscope

View attachment 1572475
Top left cross-section. I don't understand the appearance of the internal defect. It looks like a groove. Doesn't look like the cutter cut too far into the shoulder reducing the wall thickness. Where did this stress riser theory come from? Stress risers should be eliminated by annealing. I have trouble relating stress to this kind of failure. Sounds like your the only one with this kind of problem. Looks like the neck is getting stretched forward leaving a reduced thicknness area? Is the neck getting longer after firing by the width of what looks like a groove? I did failure analysis for many years. I worked mostly with steel. I think of stress risers being related to fatique failure or stress corrosion.
 
The stress comes from having a sharp corner from a 30 degree cutter at the neck shoulder junction. When the brass is fired it blows out the fit the chamber. Well if you look at the reamer prints you will see that point is actually a radius. So the point at the neck shoulder junction turns into a radius, causing a mirror image to transfer to the inside. That’s where the ditch, groove, trough comes from or starts.

Also there was no excessive brass flow noted, cases were measured and trimmed after every firing. Cases are also annealed using an AMP Mark II every time.

Case failure from previous pictures started after the 6th firing.

Hopefully this makes sense
Is there any reason to cut lightly into the shoulder like everyone recommends? Do you have to cut lightly into the shoulder to remove a tiny part of the donut that basically forms on the inside? As long as the cases chamber easily with the no light cut into the shoulder would the problem go away? I think I'm thinking of internal stress in the brass and your refering to the pressure pushing it outward. The terminology doesn't matter you understand what's going on.

If you don't cut into the shoulder it doesn't matter what the cutter angle or radius is.
 
Last edited:
Your thinking is correct, you don’t have to cut into the shoulder. As long as the brass will chamber, and yes doughnuts will form. But again if the bullet base is not seated there it’s a moot point for some.

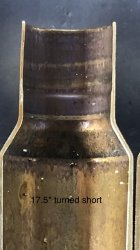
Here’s brass turned 2/3 down the neck with a 17 degree cutter. Basically it was turned farther down the neck than were the bushing sizes. Notice the reverse image where the turning stopped on the outside is now the reverse on the inside.

Note DO NOT try this with a bullet that seats deeper than the turned length. This will cause extreme pressure and could lead to damage or injury.


IMG_5950.jpeg
 
I use Alexander Arms/Lapua 6.5 Grendel brass to form 6 RAT brass for a custom barreled AR15 & a couple of bolt rifles built on both CZ527 & Howa Mini actions. I've never had any issues with brass over the past dozen years, but then I don't neck turn. Then a month or so ago, while shooting the AR15 RAT in preparation for a DMR rifle match, I had a couple of cases separate at the neck/shoulder junction as in Keefe 300's posted photo. These were loaded in once-fired, fire-formed brass that had been sitting loaded in cartridge boxes for several years. Never seen anything like it before in any of my RAT chambered rifles, and was at a loss to explain what could've caused it. Since I don't need to neck turn this brass to fit chambers cut with my RAT reamer, I'm still mystified as to what caused it. Since I'm not comfortable shooting that box of ammo, I guess I might as well pull the bullets on a couple of loaded rounds, dump the powder, de-prime, and section them to see if there's anything obvious that's causing this.

I'm not sure whether I'd ever annealed this brass before this happened - it's been awhile since it happened, and I'll need to examine that box of ammo again to see if it's been annealed.

The bullets may have cold-welded to the necks sufficiently to pull them loose when fired, then the start of the leade stripped them from the bullet. If you still have the unfired rounds, inspection could tell whether cold-welding is present.
 
I use a digital angle device to set the deck on the grinder and then grind the desired angle. Slightly greater than the shoulder angle results in the best blend.
 
Your thinking is correct, you don’t have to cut into the shoulder. As long as the brass will chamber, and yes doughnuts will form. But again if the bullet base is not seated there it’s a moot point for some.

Here’s brass turned 2/3 down the neck with a 17 degree cutter. Basically it was turned farther down the neck than were the bushing sizes. Notice the reverse image where the turning stopped on the outside is now the reverse on the inside.

Note DO NOT try this with a bullet that seats deeper than the turned length. This will cause extreme pressure and could lead to damage or injury.


View attachment 1576920
Not sure if i'm wording this correctly. Looking at your cross-sectioned piece of brass, if you picture the neck turning cutting blade coming a lot farther into the shoulder it would completly remove the neck from the shoulder. I want my brass as thick as possible at this location. Next time I turn I'm going to back off and not come close to the shoulder.
 

Upgrades & Donations

This Forum's expenses are primarily paid by member contributions. You can upgrade your Forum membership in seconds. Gold and Silver members get unlimited FREE classifieds for one year. Gold members can upload custom avatars.


Click Upgrade Membership Button ABOVE to get Gold or Silver Status.

You can also donate any amount, large or small, with the button below. Include your Forum Name in the PayPal Notes field.


To DONATE by CHECK, or make a recurring donation, CLICK HERE to learn how.

Forum statistics

Threads
165,466
Messages
2,196,377
Members
78,933
Latest member
Rod Martin
Back
Top