• This Forum is for adults 18 years of age or over. By continuing to use this Forum you are confirming that you are 18 or older. No content shall be viewed by any person under 18 in California.

Bolt bushing and filling the ejector

Grimstod

Machinist, Designer, and Shooter.
An unusual bolt bushing project that I thought I would share info on for posterity. This bolt needed to be bushed and a bolt lift kit installed. It is a Savage 12 in 6BR. It's a single feed rifle so there is no need for the ejector. I cut a rod about .001 undersized and then the last .1in of it was oversized so that when it was pressed in it would hold. The pin was made long enough to reach the bottom of the ejector plunger hole. You can see the pin being turned to size and about to be parted off. IMG_2195.JPG
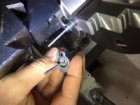
Next up I cut it flush to the face then pressed in the bolt bushing for the firing pin. Then went through the typical process of bushing it.
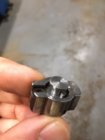
IMG_2196.JPG

I had two firing pins to choose from. One was brand new and the other was the original to the rifle. The new one was very crooked so it was set aside. Seams like about 90% of Savage firing pins are crooked. You can see here to that the two springs are not the same length. This is typical of Savage springs and components. They very a lot it seams and no two are the same even if both are brand new. I chose the shorter one as a lot of spring force will not be needed anymore now that the firing pin tip is smaller.
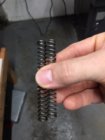
IMG_2203.JPG

Finished product. Still some slight depression from the beveled edge of the ejector plunger hole but there is now more support for the case head. The bolt head was also trued up during this process.
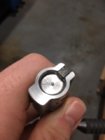
IMG_2206.JPG
 
There's a live thread elsewhere on the forum about Savages and one thing everybody agrees on is that no two actions are the same in their behaviours re certain functions! I read somewhere a while back that Savage contracts production out for most of these these bolt components only polishing and then assembling them in its factory. On the basis of the three model 12 PTAs I ran together a few years ago, I could well believe that the firing pins and bolt heads came from various suppliers. Primer appearance / behaviour under chamber pressure varied considerably. Two 223 size bolt-face heads saw one produce large doughnut shaped ring extrusions but didn't blank SR primers on hot loads, the other produced the traditional small sharp edge crater and if pressures got too high would blank the cup blowing a cylindrical brass plug into the firing pin aperture in the bolt-face where it usually lodged on the pin tip making it easy to eject by decocking the bolt. The third action in nominal 0.473" face dia. has a floor that is visibly concave and this shows up on the fired primer cup face! I do get one benefit out Savage's rather large tolerances - this bolt head sees Lapua and Norma 6.5X55mm case-heads fit very neatly despite their being 0.008 - 0.0010" over the nominal 473. A friend who is a gunsmith who specialized in Savage 12 PTA builds some years back told me that every one he'd examined in this size would accept a Lapua 6.5X55.

(Actually another friend did find a downside to this latitude - he had a rogue 6.5X55 case mixed in with his 6.5-284 brass and it got as far as being loaded and fired in a factory Savage 12 F-Class rifle. The shot was a wild flier and the case separated. No real surprise there, but no gas escape and no damage to the chamber or action - but then again maybe he just got lucky and that could have been a disastrous mistake for somebody else.)

They DO work well though IME.

PS that looks a nice job there.
 
That's great looking work . Thanks for sharing,your quality pics helps get a good visual on the process,pretty cool.
Thank you. Just using a humble iPhone 6s. I miss my iPhone 3G that thing could take super close up shots.
 
Sent my bolt to Grimstod for the bolt lift kit. He had already bushed the firing pin for me. Am very pleased. His work is always top notch and his turn around time is amazing. Mailed the bot to him last Wednesday. He received it Friday. I got it back yesterday! I highly recommend him if you need any work done.
 

Upgrades & Donations

This Forum's expenses are primarily paid by member contributions. You can upgrade your Forum membership in seconds. Gold and Silver members get unlimited FREE classifieds for one year. Gold members can upload custom avatars.


Click Upgrade Membership Button ABOVE to get Gold or Silver Status.

You can also donate any amount, large or small, with the button below. Include your Forum Name in the PayPal Notes field.


To DONATE by CHECK, or make a recurring donation, CLICK HERE to learn how.

Forum statistics

Threads
166,244
Messages
2,214,716
Members
79,488
Latest member
Andrew Martin
Back
Top