• This Forum is for adults 18 years of age or over. By continuing to use this Forum you are confirming that you are 18 or older. No content shall be viewed by any person under 18 in California.

Bedding - behind, around, or capturing the recoil lug

Didn’t want to bugger up anyone else’s thread.

I’ve seen bedding only behind the lug, rear and sides (presumably to prevent rotation), and full capturing the lug so it couldn’t move forward.

While the recoil impulse is clearly rearward, if the goal is to eliminate any/all shifting relative to the stock/chassis...

Should you embed the lug 360 degrees if/when possible? Too hard to remove normally?
 
Last edited:
The question is why (or why not)?

My understanding is that bedding under the front/rear screws, or anywhere in between helps distribute the screw point load across a broad surface to prevent any action warping, static or dynamic under recoil. This seems is pretty intuitive.

Beyond that, its less clear to me what the actual goal of bedding (some or all) of the lug really is meant to improve.
 
Recoil lug bedding is designed to prevent compression of the wood stock over time. The bedded back surface will prevent the receiver from moving backward under recoil which will cause vertical errors on the target. The sides are bedded for the same reason but they prevent the receiver from moving laterally which creates horizontal errors on the target. Most accuracy smiths bed the sides and the back, there is no real need to bed the bottom or the front. If you do bed the bottom and the front then just ensure that there is ample clearance between the lug and those surfaces.
 
Recoil lug bedding is designed to prevent compression of the wood stock over time. The bedded back surface will prevent the receiver from moving backward under recoil which will cause vertical errors on the target. The sides are bedded for the same reason but they prevent the receiver from moving laterally which creates horizontal errors on the target. Most accuracy smiths bed the sides and the back, there is no real need to bed the bottom or the front. If you do bed the bottom and the front then just ensure that there is ample clearance between the lug and those surfaces.
I generally bed full contact, then after it sets up, pull the barreled action and mill .010-.015 off of the bottom of the lug and deburr all the edges of the lug. IMHO, the idea is that full contact is best but being tight, the lug can shave bedding off when you put it into the stock. I mill some from the bottom of the lug to prevent any potential "shavings" from holding the lug off of the bottom of the bedded mortise.
 
Last edited:
Front clearance on the lug is simply to make it easier to slightly "rock" it out of the stock.
Otherwise you'd need to pull straight up (and I've seen jigs to do this).

As long as the action is correctly seated before tightening the action screws (bump the butt of the stock on the ground/bench to make sure the lug is in contact with the bedding surface), small amount of clearance forward of the lug is not detrimental.
 
If you bed the rear of the lug, that implies it either wasn't full contact or was shifting "back". If it can shift "back", that implies that it has -already- shifted forward somehow.

Seems like bedding the front to prevent that movement is the "next" logical operation, but sounds like it its rarely done. Dusty or others?
 
Didn’t want to bugger up anyone else’s thread.

I’ve seen bedding only behind the lug, rear and sides (presumably to prevent rotation), and full capturing the lug so it couldn’t move forward.

While the recoil impulse is clearly rearward, if the goal is to eliminate any/all shifting relative to the stock/chassis...

Should you embed the lug 360 degrees if/when possible?

I do. But I use lugs with tapered sides, then place painters tape on the bottom and front of the lug to create space so it's easier to remove from the stock later on. The clearance on the bottom of the lug ensures full contact of the bedding to the receiver when the action screws are torqued down and the tape on the front of the lug gives it wiggle room to come free when removing it from the stock. Initial removal is tough due to the adhesive of the tape sticking to the lug, but once the action is removed initially after bedding and the tape is scraped off the bedding, it's much easier any other time it requires removal from the stock.

Dont tape the sides or rear of the lug. The rear needs full contact to avoid rearward movement under recoil and the sides need full contact to avoid twisting of the receiver from torque generated as the bullet goes down the barrel and side to side motion as the barrel steel flexes under recoil.

Edit: I just read that "rammac" stated pretty much the same thing. His comments are right on the money in my book.
 
Last edited:
I do. But I use lugs with tapered sides, then place painters tape on the bottom and front of the lug so it's easier to remove. The clearance on the bottom of the lug ensures full contact of the bedding to the receiver when the action screws are torqued down and the tape on the front of the lug gives it wiggle room to come free when removing it from the stock. Initial removal is tough due to the adhesive of the tape sticking to the lug, but once the action is removed initially after bedding and the tape is scraped off the bedding, it's much easier any other time it requires removal from the stock.

Dont tape the sides or rear of the lug. The rear needs full contact to avoid rearward movement under recoil and the sides need full contact to avoid twisting of the receiver from torque generated as the bullet goes down the barrel and side to side motion as the barrel steel flexes under recoil.

Not bedding the bottom of the lug makes a lot of sense to me so that it doesn't act as yet another fulcrum for things to try and pivot flex on. It would be easy enough to mill out/down if it looks like you were getting bottom contact from material gravity dripping down and around however.
 
Last edited:
Not bedding the bottom of the lug makes a lot of sense to me so that it doesn't act as yet another fulcrum for things to try and pivot flex on would be easy enough to mill out/down if it looks like you were getting bottom contact from material gravity dripping down and around however.

You can also grind off the bottom of the recoil lug to create clearance if you have stocks already bedded with full contact on the base of the lug.
 
Grinding some epoxy versus the lug on a integrated custom action sounds preferable.

Now is probably a good time to provide a bit more of the use case. I'm considering betting an AL chassis after looking at how little contact area there is between the vblock in the front and rear tang in the back.

Don't get me wrong, this is a great chassis and I love it, but the convenience of chassis mounting leaves an incredibly small amount of action contact area.

I never thought much about it until I did an experiment where i untorqued and retorqued the action screws anywhere from 45-85 in/lb and took a couple of shots. Guess what, the zero moved on it each and every time.
Was it a lot? No.... But it was easily measurable even as a .5 moa group shooter and was enough to me a little bit of pause on if its happening during live fire string, or if it could be contributing to a "random flier" that takes a .3 group to .5 might.

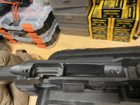
In my case the recoil lug has great contact and will require some grinding to give it enough material to hold/improve, however the chassis has a large gap around the sides, bottom, front of the lug (as you might expect).

Here is a picture to illustrate how shockingly little contact my borden action is making in a mdt acc chassis.

IMG_9236.JPG
 
Last edited:
Grinding some epoxy versus the tang on a custom action sounds preferable.

Now is probably a good time to provide a bit more of the use case. I'm considering betting an AL chassis after looking at how little contact area there is between the vblock in the front and rear tang in the back.

Don't get me wrong, this is a great chassis and I love it, but the convenience of chassis mounting leaves an incredibly small amount of action contact area.

I never thought much about it until I did an experiment where i untorqued and retorqued the action screws anywhere from 45-85 in/lb and took a couple of shots. Guess what, the zero moved on it each and every time.
Was it a lot? No.... But it was easily measurable even as a .5 moa group shooter and was enough to me a little bit of pause on if its happening during live fire string, or if it could be contributing to a "random flier" that takes a .3 group to .5 might.

In my case the recoil lug has great contact and will require some grinding to give it enough material to hold/improve, however the chassis has a large gap around the sides, bottom, front of the lug (as you might expect).

Here is a picture to illustrate how shockingly little contact my borden action is making in a mdt acc chassis.

View attachment 1160330
Thats typical of a v-block type setup. They are awful as far as contact goes. They are made to fit any and every action, but can be bedded easily if you decide you need it. Its not for everybody but since youre here id guess its right up your alley. You can fix this and we will help all you need
 
When you guys say the rear of the lug,towards the butt end correct?
Forward of lug towards muzzle?just want to clarify.
 
I have tested a couple rifles with and without the sides of the recoil lugs bedded.

When I first started bedding, I tried a couple rifles where I taped off the sides, front, and bottom for clearance on all those areas. Made it really easy to remove the barreled action from the stock. The rifles shot good, but were not what I would call extremely consistent with POI on target. I later went back and skim bedded the side walls of the lugs, but left the clearance on bottom and in front. In both instances, the accuracy and consistency of POI in the groups immediately improved on paper using the same exact loads.

It was enough evidence for me to never bed a rifle again with the sides of the lug not fully supported.
 

Upgrades & Donations

This Forum's expenses are primarily paid by member contributions. You can upgrade your Forum membership in seconds. Gold and Silver members get unlimited FREE classifieds for one year. Gold members can upload custom avatars.


Click Upgrade Membership Button ABOVE to get Gold or Silver Status.

You can also donate any amount, large or small, with the button below. Include your Forum Name in the PayPal Notes field.


To DONATE by CHECK, or make a recurring donation, CLICK HERE to learn how.

Forum statistics

Threads
164,744
Messages
2,183,474
Members
78,500
Latest member
robbsintexas
Back
Top