Jager
Gold $$ Contributor
We all have biases, and I’ll admit mine right up front: I’m a LabRadar fanboy. I was on the pre-order list for that device long before it began shipping. The unit I eventually received was early production. And it has seen yeoman duty ever since, with thousands upon thousands of rounds sent downrange in front of it.
The LabRadar transformed my handloading practices. It’s ease of setup meant I could use it whenever doing load development, when running a charge weight ladder. It allowed me to very quickly compare lots of powder whenever a new canister was opened. It let me easily verify performance of powder bought decades ago against the very same powder, bought recently. It let me put some numbers around the moisture content of powder. It let me assess how temperature sensitive, or not, a particular powder might be. And in spite of there being multiple ways of physically measuring the bullet-to-lands interface, the LabRadar allowed me to identify that point where the ogive begins kissing the lands in a far more nuanced fashion, because the stepwise decline in velocity in a marching-towards-the-lands seating depth test suddenly reverses. A bullet into the lands starts making more pressure.
Probably most important of all, in conjunction with QuickLoad the LabRadar began to shine a light into what previously had mostly been a black box: chamber pressure. Chamber pressure is the elephant in the room across the whole realm of handloading practices and procedures, of course, influencing both safety and performance. And now I no longer had to guess at it or speculate when it might bite me. I quickly abandoned the conventional practice of looking for various signs of cartridge case failure to tell me I was too hot.
(As an aside, I do NOT use a chronograph to tell me anything about how accurate a load might be. I don’t believe velocity “flat spots” are anything other than the statistical anomaly that comes with small sample sizes. Shoot more rounds and those little peculiarities quickly disappear.
It’s an easy thing to test. But, yeah, if that’s your thing, more power to you. What’s the saying in vogue nowadays? You do you.)
So, yeah. However we come to it, many of us have come to rely heavily upon chronographs. After using my LabRadar so extensively for all these years, I simply could not imagine doing load development without it. And that dismal thought – it wasn’t lost on me that the LabRadar was largely unobtanium these last couple of years – led me to think about “what if?”
And so comes the AndiScan A2. A doppler-based chrono out of the Czech Republic. A device that holds the tantalizing prospect of doing everything the LabRadar does… but in an unimaginably small form factor. When you open the box, its size makes you shake your head. The AndiScan is smaller than a pack of cigarettes.
https://www.sqi-andix.com/andiscan-micro-a2/
Here it is, mounted atop a cheap ($20) Amazon tabletop tripod on my portable shooting bench. The LabRadar, mounted to a full-size tripod, is positioned just in front of the bench, even with the muzzle.
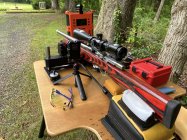
Comparison with the LabRadar – what many consider to be the premier chronograph available today to consumers - is inevitable.
Both are doppler-based devices, and share the compelling advantages of rapid setup at the firing line and of being positioned outside the line-of-fire. If someone ever puts a bullet through either of these they’ve got no business ever again holding a firearm.
For me, the countless hours behind the LabRadar have made it my truth. And so the first question that comes to mind is how close are the AndiScan numbers to those from the LabRadar?
The short answer: With the AndiScan at its default settings, and with the positioning of both chronos as shown in the picture, the AndiScan reported on average 14 fps slower than the LabRadar. That was across five different .30 BR loads.
A quick word about chronograph positioning… it makes a difference. Sometimes, a meaningful difference. And, at least in the case of these two doppler chronos, the internal menu configuration of each needs to correctly match their actual physical positioning.
A doppler chronograph positioned off to the side from the line-of-fire will not pick up the projectile the instant it exits the muzzle. It’s only when the bullet enters the chrono’s radar signal path, typically a few feet downrange, that that happens. The chrono then has to back-calculate from that several-feet-downrange number to present the true, accurate muzzle velocity. The math and the geometry to make that calculation are pretty straightforward, but in order to be accurate the actual physical offset and distance from the muzzle have to be known.
The LabRadar gives three “projectile offset” options: 6” if the muzzle is 1-6” from the side of the LabRadar; 12” if the muzzle is 7-12”; and 18” if the muzzle is 13-18”.
What the LabRadar manual fails to mention is that ultimate precision (not to mention session-to-session consistency) can only be achieved if the physical offset of the chrono is exactly in the middle of each of those three ranges. In other words, the OCD among us should physically place our LabRadars at exactly 3,” 9,” or 15” from the bore.
Unfortunately, the LabRadar does not have a setting for distance-from-muzzle. Its algorithm assumes the chronograph is even with the muzzle.
Happily, the AndiScan manual goes into some depth on this topic. And the unit’s Configuration Menu has settings for both side offset and distance-from-muzzle. And that leads to the second question: How to configure the AndiScan so it reports the same numbers as the LabRadar?
The good news is that both chronos consistently track each other. A slightly higher velocity on a shot in a series is reflected on both. Likewise, a dip. They each see exactly the same thing, just with that ~14 fps delta.
So it didn’t take long to plug in different configuration numbers on the AndiScan’s Configuration Menu (page C11) until they were squared up.
In my case, with the AndiScan positioned amidships, just forward of the chamber and half an inch from the rifle stock, the setting to achieve that was A=3; D=6 (the default config setting is A=0; D=0). After that, running a string produced this:
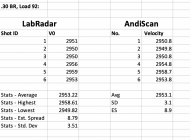
The first major hurdle for the AndiScan appears to have been cleared: It seems every bit as accurate and consistent as the LabRadar. It’s when you reach that point that you pick up the AndiScan and, turning it slowly in your hand, really marvel at its diminutive size. Its tiny form factor truly is a game changer.
Both chronos must be pointed exactly and precisely at the target downrange. For both, that effort at pointing can be deceiving. I was one of those who initially used my LabRadar with the optional tabletop mounting plate. That kind of free form bench positioning potentially introduces two sources of error… some amount of distance from the muzzle (typically, towards the shooter); and some degree of error in the pointing effort itself.
I’d get my bench set up, back away eight or ten feet, and sight down the “notch” at the top of the LabRadar’s plastic case. I was convinced that I was lined up accurately. And it worked pretty well. Most the time.
Alas, the sighting radius on that plastic notch in the LabRadar’s case is less than an inch long. Anyone who has spent much time shooting a snub nose revolver knows where I’m going here. In the case of a doppler chronograph, it results in periodic missed shots because the chrono, being canted off target by even a few degrees, has the bullet missing the radar signal path.
The answer, posted here a few years ago by @Keith Glasscock, was the combination of a cheap pic rail to mount in the LabRadar’s notch; and a cheap red dot sight to go on top of that.
https://www.amazon.com/gp/product/B0794Z2HL9/ref=ppx_yo_dt_b_search_asin_title?ie=UTF8&psc=1
https://www.ebay.com/itm/Labradar-Sight-Mount/192988171767?hash=item2ceefdcdf7:g:H0UAAOSwGxNgcx~~
That mod completely transformed my LabRadar. I’ve missed almost no shots since going to it. Turns out I wasn’t as good at eyeballing my chrono-to-target setup as I had thought.
Some chronograph manufacturers, including the AndiScan, encourage shooters to mount their unit directly to the rifle to eliminate the pointing problem. For me, that’s a non-starter. As important as chronograph data has become for me… it still remains a distant second to what is happening at the target downrange. I want nothing physically touching the gun and potentially altering harmonics and POI.
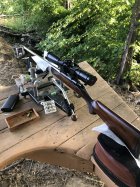
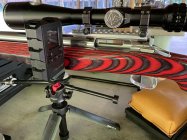
The good news is that its small size allows you to position the AndiScan very close to the rifle (in my case, about ½” away) and, because it is so close, the rifle itself becomes an effective pointing reference. I’ve missed no shots attributable to chrono positioning since receiving my unit.
Here’s a closeup of how I’ve been positioning the AndiScan:
Both the LabRadar and the AndiScan have internal batteries. And both designs suck for any kind of extended shooting. You’ll want an external battery pack with either.
Both include readouts of signal return strength, an important indicator of how good your setup is. The AndiScan’s is a bit more nuanced, but they both effectively do the same thing.
Speaking of signal strength, the very first thing that drew me to the AndiScan was its transmit output power: 11 dBm. That is a notable improvement over the LabRadar’s 4.84 dBm (U.S. version).
Transmit strength is only half the story, though. The other half is how well each unit receives its returning radar signal. The LabRadar claims 22 dBi of antenna gain. The AndiScan makes no reference to its antenna that I’m aware of, so assessing all around signal robustness is difficult. Both units operate in the 24 GHz band – radio frequencies with a very short bandwidth. So larger physical size, such as with LabRadar (or the recently introduced FX Airguns’ True Ballistic Chronograph), ought not be a particular advantage.
What I can say is that the LabRadar and the AndiScan both exhibit excellent send/receive qualities when pointed correctly.
The LabRadar has a maximum reportable velocity of 3900 fps. The AndiScan bumps that ceiling to 4295 fps. Really not a factor for most shooters. But if you have a .220 Swift, a .257 Weatherby Magnum, or one of the handful of exotic wildcats that reach those lofty heights, the AndiScan might be a benefit.
Chronographs are frequently used at public ranges where other shooters are present. With doppler-based chronos, that poses two challenges: potential radio frequency collision with other chronographs; and potential false triggers.
Both the LabRadar and the AndiScan are easily configured to operate on different frequencies within the 24 GHz band, which solves the first problem (and they come defaulted to different frequencies, so can be used alongside each other without change).
I’ve only ever used my LabRadar one time at a public range. It ran fine that day, but otherwise I can’t comment on its acoustic sensitivity/challenges in that kind of environment.
I’ve taken the AndiScan to two Benchrest matches. In both instances, it displayed remarkable acoustic sensitivity, clearly “triggering” on every shot up and down the line. Yet it has an armed feature called “Fast Response Mode” which does exactly what it says… quickly resets its processor so that it is ready to process your own shot. (The unit cannot capture a shot during the brief window during which the processor is resetting itself). Across those two matches, only a handful of shots failed to be captured.
The LabRadar has been criticized since its inception for its clumsy user interface, an even clumsier mobile app, and a Bluetooth implementation that frequently fails. All justifiable complaints, in my view. And Infinition Inc., the manufacturer of the LabRadar, has shown a surprising indifference to those complaints. Like having a difficult child, those of us who love the LabRadar do so in spite of those deficiencies.
One might think that the AndiScan, benefiting from a decade of technology advancement over the LabRadar, would be far ahead of its older competitor in terms of how the user interacts with it.
You’d be wrong. The AndiScan interface is every bit as clumsy as the LabRadar. Intuitive it is not. And so now we have to talk about where the AndiScan fails.
First, just like the somewhat questionable user interface of the LabRadar, the also somewhat questionable user interface of the AndiScan will be surmounted with familiarity. Something being clumsy doesn’t mean you can’t use it. It just means that you have a somewhat longer road to walk before you understand how to utilize its features. Owners of either chronograph will figure it out.
Rather than Bluetooth, the AndiScan implements its own internal WiFi network. On its face, that might sound like a wise choice, as WiFi typically exhibits greater range and robustness than Bluetooth.
Sadly, it’s not. It leads us to the single most profound weakness of the AndiScan: File management.
When I’m shooting, I always know approximately what velocity I should be seeing. Even when doing load development, with new-to-me components or a new-to-me caliber, I have an idea. A chronograph there on the bench acts much like the speedometer in our truck… it gives us a precise confirmation of what we already roughly know. It helps keep us out of trouble.
But the greater strength of a chronograph, to me, is when you get home and collect the data across many shots and are then able to make various comparisons and judgments. To do that, you have to first get the data off the chronograph and into a computer.
Both the LabRadar and the AndiScan write data to hard memory via CSV files. The LabRadar writes to an SD card; the AndiScan to a microSD card.
But whereas the LabRadar has its SD card slot right in the front of the unit, instantly accessible to the user, the AndiScan has its microSD card hidden away inside the battery compartment, behind four screws. It is not designed for regular access.
With the LabRadar, you simply remove its SD card and plug it into your computer. You then have instant access to all its files. You can list them, copy them, move them, and delete them… all in a few seconds.
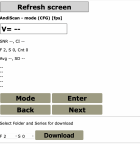
With the AndiScan, you first have to power on the chronograph, go into its Configuration Menu, and turn WiFi on (you don’t want to leave it on all the time because it takes additional power from the already too-small battery). Once that’s done, you turn to your computer, go into its WiFi settings, and select the AndiScan network. This will disconnect you from your normal internet WiFi connection and instead connect your computer to the AndiScan. Now you open up a browser window. Type in the address 192.168.4.1. Your browser will then show this screen:
With the LabRadar you can instantly see whatever folders it has created. It only takes a few seconds to select them, copy them, paste them to wherever on your computer you want to store them, and then to delete them off the SD card so it is ready for the next shooting session.
With the AndiScan, there’s no way to list them. You just have that “Select Folder and Series for download”with the Download button at the bottom of the screen. You have to already know what files exist (which means you have to keep notes with pen and paper while shooting); or else you have to simply keep incrementing the “F” (folder) and “S” (series) selections and then clicking the Download button until you get a “no file” error message. To say the whole operation is clumsy is an understatement. It’s Byzantine.
It doesn’t end there. Once you click the Download button, the files are now on your computer. But they are in your Downloads folder. You have to navigate over there, select them, copy them, and then paste them to wherever it is you want to store them.
To then delete those files from the AndiScan, so it is ready for the next shooting session, you have to navigate into the DAT (data) menu. That can be done either through the physical device itself or by toggling through the different Modes on the above screen until you get to DAT. Whichever you choose, you have to delete folders one-by-one. Again, you have to remember which one’s have data in them.
With all that done, you now have to go back into your computer’s WiFi settings and reconnect to your normal WiFi network.
The whole thing is an abortion. And it comes down to this: Web browsers were designed to navigate network addresses, URL’s. They were never designed to perform operating system level file operations. A good web designer can get around that with some clever behind-the-curtain wrangling.
Alas, the AndiScan implementation is not clever.
The irony in all this is that the AndiScan already has a USB port (USB-C). That’s how you charge the battery. And the USB spec provides for both power and data transfer. The smart play would have been to simply access the microSD card and its files via that USB port. You just have to shake your head that they didn’t do that.
One last thing. The AndiScan Folders and Series all begin with zero. Set up your LabRadar and Andiscan next to each other and the first string you shoot will get written as “SR0001” in the LabRadar; and as “F000/S000” in the AndiScan. As an old, unwashed C-programmer, starting a count from zero doesn’t bother me. But it’s not going to be the most intuitive thing for a lot of folks.
I wish I could say the bad news is over, but it’s not. It gets even worse.
The LabRadar automatically writes every shot it captures to its SD card.
In perhaps its most astonishing design failure, the AndiScan requires the user to explicitly toggle to the next series before the string just captured gets recorded. Turn off the device without doing that and that entire last series is gone. I lost an entire match worth of data – turning the device off between targets to conserve the limited battery – because I did not fully understand that little requirement.
The AndiScan does provide a kind of semi-backup: It automatically records the last 100 shots to internal memory, separate from the microSD card. It stores that data in a file called Fint, which can then be accessed through one of the DAT menu screens. But the Fint file cannot be downloaded via any mechanism I can find. And it has no labels to differentiate series or targets, so interpreting it has quick limitations. It’s better than nothing, but not by much.
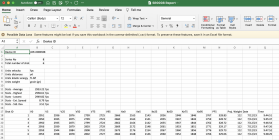
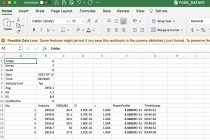
The CSV files themselves, once you manage to extract them, are fine. Here is what the two files look like, first from the LabRadar, followed by the AndiScan:
In sum, I’d have to say that the AndiScan is a remarkable, compelling product. Its tiny size truly does change things. Its use-me-anytime-anywhere ethos teases us with possible answers to questions such as how long does a barrel continue to speed up from a just cleaned, cold and wet state, to finally settled? Or as a match rolls towards midday, with the sun and the temperature climbing in lockstep, can monitoring our shot-to-shot velocity give us a clue if our tune starts to go sideways, before it shows up downrange at the target?
The AndiScan is very nearly a LabRadar killer. Almost. But its file management woes aren’t some little thing. They live at the very heart of how you use the device.
What is it that we say to the God of death?
“Not today.”
The LabRadar transformed my handloading practices. It’s ease of setup meant I could use it whenever doing load development, when running a charge weight ladder. It allowed me to very quickly compare lots of powder whenever a new canister was opened. It let me easily verify performance of powder bought decades ago against the very same powder, bought recently. It let me put some numbers around the moisture content of powder. It let me assess how temperature sensitive, or not, a particular powder might be. And in spite of there being multiple ways of physically measuring the bullet-to-lands interface, the LabRadar allowed me to identify that point where the ogive begins kissing the lands in a far more nuanced fashion, because the stepwise decline in velocity in a marching-towards-the-lands seating depth test suddenly reverses. A bullet into the lands starts making more pressure.
Probably most important of all, in conjunction with QuickLoad the LabRadar began to shine a light into what previously had mostly been a black box: chamber pressure. Chamber pressure is the elephant in the room across the whole realm of handloading practices and procedures, of course, influencing both safety and performance. And now I no longer had to guess at it or speculate when it might bite me. I quickly abandoned the conventional practice of looking for various signs of cartridge case failure to tell me I was too hot.
(As an aside, I do NOT use a chronograph to tell me anything about how accurate a load might be. I don’t believe velocity “flat spots” are anything other than the statistical anomaly that comes with small sample sizes. Shoot more rounds and those little peculiarities quickly disappear.
It’s an easy thing to test. But, yeah, if that’s your thing, more power to you. What’s the saying in vogue nowadays? You do you.)
So, yeah. However we come to it, many of us have come to rely heavily upon chronographs. After using my LabRadar so extensively for all these years, I simply could not imagine doing load development without it. And that dismal thought – it wasn’t lost on me that the LabRadar was largely unobtanium these last couple of years – led me to think about “what if?”
And so comes the AndiScan A2. A doppler-based chrono out of the Czech Republic. A device that holds the tantalizing prospect of doing everything the LabRadar does… but in an unimaginably small form factor. When you open the box, its size makes you shake your head. The AndiScan is smaller than a pack of cigarettes.
https://www.sqi-andix.com/andiscan-micro-a2/
Here it is, mounted atop a cheap ($20) Amazon tabletop tripod on my portable shooting bench. The LabRadar, mounted to a full-size tripod, is positioned just in front of the bench, even with the muzzle.

Comparison with the LabRadar – what many consider to be the premier chronograph available today to consumers - is inevitable.
Both are doppler-based devices, and share the compelling advantages of rapid setup at the firing line and of being positioned outside the line-of-fire. If someone ever puts a bullet through either of these they’ve got no business ever again holding a firearm.
For me, the countless hours behind the LabRadar have made it my truth. And so the first question that comes to mind is how close are the AndiScan numbers to those from the LabRadar?
The short answer: With the AndiScan at its default settings, and with the positioning of both chronos as shown in the picture, the AndiScan reported on average 14 fps slower than the LabRadar. That was across five different .30 BR loads.
A quick word about chronograph positioning… it makes a difference. Sometimes, a meaningful difference. And, at least in the case of these two doppler chronos, the internal menu configuration of each needs to correctly match their actual physical positioning.
A doppler chronograph positioned off to the side from the line-of-fire will not pick up the projectile the instant it exits the muzzle. It’s only when the bullet enters the chrono’s radar signal path, typically a few feet downrange, that that happens. The chrono then has to back-calculate from that several-feet-downrange number to present the true, accurate muzzle velocity. The math and the geometry to make that calculation are pretty straightforward, but in order to be accurate the actual physical offset and distance from the muzzle have to be known.
The LabRadar gives three “projectile offset” options: 6” if the muzzle is 1-6” from the side of the LabRadar; 12” if the muzzle is 7-12”; and 18” if the muzzle is 13-18”.
What the LabRadar manual fails to mention is that ultimate precision (not to mention session-to-session consistency) can only be achieved if the physical offset of the chrono is exactly in the middle of each of those three ranges. In other words, the OCD among us should physically place our LabRadars at exactly 3,” 9,” or 15” from the bore.
Unfortunately, the LabRadar does not have a setting for distance-from-muzzle. Its algorithm assumes the chronograph is even with the muzzle.
Happily, the AndiScan manual goes into some depth on this topic. And the unit’s Configuration Menu has settings for both side offset and distance-from-muzzle. And that leads to the second question: How to configure the AndiScan so it reports the same numbers as the LabRadar?
The good news is that both chronos consistently track each other. A slightly higher velocity on a shot in a series is reflected on both. Likewise, a dip. They each see exactly the same thing, just with that ~14 fps delta.
So it didn’t take long to plug in different configuration numbers on the AndiScan’s Configuration Menu (page C11) until they were squared up.
In my case, with the AndiScan positioned amidships, just forward of the chamber and half an inch from the rifle stock, the setting to achieve that was A=3; D=6 (the default config setting is A=0; D=0). After that, running a string produced this:

The first major hurdle for the AndiScan appears to have been cleared: It seems every bit as accurate and consistent as the LabRadar. It’s when you reach that point that you pick up the AndiScan and, turning it slowly in your hand, really marvel at its diminutive size. Its tiny form factor truly is a game changer.
Both chronos must be pointed exactly and precisely at the target downrange. For both, that effort at pointing can be deceiving. I was one of those who initially used my LabRadar with the optional tabletop mounting plate. That kind of free form bench positioning potentially introduces two sources of error… some amount of distance from the muzzle (typically, towards the shooter); and some degree of error in the pointing effort itself.
I’d get my bench set up, back away eight or ten feet, and sight down the “notch” at the top of the LabRadar’s plastic case. I was convinced that I was lined up accurately. And it worked pretty well. Most the time.
Alas, the sighting radius on that plastic notch in the LabRadar’s case is less than an inch long. Anyone who has spent much time shooting a snub nose revolver knows where I’m going here. In the case of a doppler chronograph, it results in periodic missed shots because the chrono, being canted off target by even a few degrees, has the bullet missing the radar signal path.
The answer, posted here a few years ago by @Keith Glasscock, was the combination of a cheap pic rail to mount in the LabRadar’s notch; and a cheap red dot sight to go on top of that.
https://www.amazon.com/gp/product/B0794Z2HL9/ref=ppx_yo_dt_b_search_asin_title?ie=UTF8&psc=1
https://www.ebay.com/itm/Labradar-Sight-Mount/192988171767?hash=item2ceefdcdf7:g:H0UAAOSwGxNgcx~~
That mod completely transformed my LabRadar. I’ve missed almost no shots since going to it. Turns out I wasn’t as good at eyeballing my chrono-to-target setup as I had thought.
Some chronograph manufacturers, including the AndiScan, encourage shooters to mount their unit directly to the rifle to eliminate the pointing problem. For me, that’s a non-starter. As important as chronograph data has become for me… it still remains a distant second to what is happening at the target downrange. I want nothing physically touching the gun and potentially altering harmonics and POI.
The good news is that its small size allows you to position the AndiScan very close to the rifle (in my case, about ½” away) and, because it is so close, the rifle itself becomes an effective pointing reference. I’ve missed no shots attributable to chrono positioning since receiving my unit.
Here’s a closeup of how I’ve been positioning the AndiScan:

Both the LabRadar and the AndiScan have internal batteries. And both designs suck for any kind of extended shooting. You’ll want an external battery pack with either.
Both include readouts of signal return strength, an important indicator of how good your setup is. The AndiScan’s is a bit more nuanced, but they both effectively do the same thing.
Speaking of signal strength, the very first thing that drew me to the AndiScan was its transmit output power: 11 dBm. That is a notable improvement over the LabRadar’s 4.84 dBm (U.S. version).
Transmit strength is only half the story, though. The other half is how well each unit receives its returning radar signal. The LabRadar claims 22 dBi of antenna gain. The AndiScan makes no reference to its antenna that I’m aware of, so assessing all around signal robustness is difficult. Both units operate in the 24 GHz band – radio frequencies with a very short bandwidth. So larger physical size, such as with LabRadar (or the recently introduced FX Airguns’ True Ballistic Chronograph), ought not be a particular advantage.
What I can say is that the LabRadar and the AndiScan both exhibit excellent send/receive qualities when pointed correctly.
The LabRadar has a maximum reportable velocity of 3900 fps. The AndiScan bumps that ceiling to 4295 fps. Really not a factor for most shooters. But if you have a .220 Swift, a .257 Weatherby Magnum, or one of the handful of exotic wildcats that reach those lofty heights, the AndiScan might be a benefit.
Chronographs are frequently used at public ranges where other shooters are present. With doppler-based chronos, that poses two challenges: potential radio frequency collision with other chronographs; and potential false triggers.
Both the LabRadar and the AndiScan are easily configured to operate on different frequencies within the 24 GHz band, which solves the first problem (and they come defaulted to different frequencies, so can be used alongside each other without change).
I’ve only ever used my LabRadar one time at a public range. It ran fine that day, but otherwise I can’t comment on its acoustic sensitivity/challenges in that kind of environment.
I’ve taken the AndiScan to two Benchrest matches. In both instances, it displayed remarkable acoustic sensitivity, clearly “triggering” on every shot up and down the line. Yet it has an armed feature called “Fast Response Mode” which does exactly what it says… quickly resets its processor so that it is ready to process your own shot. (The unit cannot capture a shot during the brief window during which the processor is resetting itself). Across those two matches, only a handful of shots failed to be captured.
The LabRadar has been criticized since its inception for its clumsy user interface, an even clumsier mobile app, and a Bluetooth implementation that frequently fails. All justifiable complaints, in my view. And Infinition Inc., the manufacturer of the LabRadar, has shown a surprising indifference to those complaints. Like having a difficult child, those of us who love the LabRadar do so in spite of those deficiencies.
One might think that the AndiScan, benefiting from a decade of technology advancement over the LabRadar, would be far ahead of its older competitor in terms of how the user interacts with it.
You’d be wrong. The AndiScan interface is every bit as clumsy as the LabRadar. Intuitive it is not. And so now we have to talk about where the AndiScan fails.
First, just like the somewhat questionable user interface of the LabRadar, the also somewhat questionable user interface of the AndiScan will be surmounted with familiarity. Something being clumsy doesn’t mean you can’t use it. It just means that you have a somewhat longer road to walk before you understand how to utilize its features. Owners of either chronograph will figure it out.
Rather than Bluetooth, the AndiScan implements its own internal WiFi network. On its face, that might sound like a wise choice, as WiFi typically exhibits greater range and robustness than Bluetooth.
Sadly, it’s not. It leads us to the single most profound weakness of the AndiScan: File management.
When I’m shooting, I always know approximately what velocity I should be seeing. Even when doing load development, with new-to-me components or a new-to-me caliber, I have an idea. A chronograph there on the bench acts much like the speedometer in our truck… it gives us a precise confirmation of what we already roughly know. It helps keep us out of trouble.
But the greater strength of a chronograph, to me, is when you get home and collect the data across many shots and are then able to make various comparisons and judgments. To do that, you have to first get the data off the chronograph and into a computer.
Both the LabRadar and the AndiScan write data to hard memory via CSV files. The LabRadar writes to an SD card; the AndiScan to a microSD card.
But whereas the LabRadar has its SD card slot right in the front of the unit, instantly accessible to the user, the AndiScan has its microSD card hidden away inside the battery compartment, behind four screws. It is not designed for regular access.
With the LabRadar, you simply remove its SD card and plug it into your computer. You then have instant access to all its files. You can list them, copy them, move them, and delete them… all in a few seconds.
With the AndiScan, you first have to power on the chronograph, go into its Configuration Menu, and turn WiFi on (you don’t want to leave it on all the time because it takes additional power from the already too-small battery). Once that’s done, you turn to your computer, go into its WiFi settings, and select the AndiScan network. This will disconnect you from your normal internet WiFi connection and instead connect your computer to the AndiScan. Now you open up a browser window. Type in the address 192.168.4.1. Your browser will then show this screen:

With the LabRadar you can instantly see whatever folders it has created. It only takes a few seconds to select them, copy them, paste them to wherever on your computer you want to store them, and then to delete them off the SD card so it is ready for the next shooting session.
With the AndiScan, there’s no way to list them. You just have that “Select Folder and Series for download”with the Download button at the bottom of the screen. You have to already know what files exist (which means you have to keep notes with pen and paper while shooting); or else you have to simply keep incrementing the “F” (folder) and “S” (series) selections and then clicking the Download button until you get a “no file” error message. To say the whole operation is clumsy is an understatement. It’s Byzantine.
It doesn’t end there. Once you click the Download button, the files are now on your computer. But they are in your Downloads folder. You have to navigate over there, select them, copy them, and then paste them to wherever it is you want to store them.
To then delete those files from the AndiScan, so it is ready for the next shooting session, you have to navigate into the DAT (data) menu. That can be done either through the physical device itself or by toggling through the different Modes on the above screen until you get to DAT. Whichever you choose, you have to delete folders one-by-one. Again, you have to remember which one’s have data in them.
With all that done, you now have to go back into your computer’s WiFi settings and reconnect to your normal WiFi network.
The whole thing is an abortion. And it comes down to this: Web browsers were designed to navigate network addresses, URL’s. They were never designed to perform operating system level file operations. A good web designer can get around that with some clever behind-the-curtain wrangling.
Alas, the AndiScan implementation is not clever.
The irony in all this is that the AndiScan already has a USB port (USB-C). That’s how you charge the battery. And the USB spec provides for both power and data transfer. The smart play would have been to simply access the microSD card and its files via that USB port. You just have to shake your head that they didn’t do that.
One last thing. The AndiScan Folders and Series all begin with zero. Set up your LabRadar and Andiscan next to each other and the first string you shoot will get written as “SR0001” in the LabRadar; and as “F000/S000” in the AndiScan. As an old, unwashed C-programmer, starting a count from zero doesn’t bother me. But it’s not going to be the most intuitive thing for a lot of folks.
I wish I could say the bad news is over, but it’s not. It gets even worse.
The LabRadar automatically writes every shot it captures to its SD card.
In perhaps its most astonishing design failure, the AndiScan requires the user to explicitly toggle to the next series before the string just captured gets recorded. Turn off the device without doing that and that entire last series is gone. I lost an entire match worth of data – turning the device off between targets to conserve the limited battery – because I did not fully understand that little requirement.
The AndiScan does provide a kind of semi-backup: It automatically records the last 100 shots to internal memory, separate from the microSD card. It stores that data in a file called Fint, which can then be accessed through one of the DAT menu screens. But the Fint file cannot be downloaded via any mechanism I can find. And it has no labels to differentiate series or targets, so interpreting it has quick limitations. It’s better than nothing, but not by much.
The CSV files themselves, once you manage to extract them, are fine. Here is what the two files look like, first from the LabRadar, followed by the AndiScan:


In sum, I’d have to say that the AndiScan is a remarkable, compelling product. Its tiny size truly does change things. Its use-me-anytime-anywhere ethos teases us with possible answers to questions such as how long does a barrel continue to speed up from a just cleaned, cold and wet state, to finally settled? Or as a match rolls towards midday, with the sun and the temperature climbing in lockstep, can monitoring our shot-to-shot velocity give us a clue if our tune starts to go sideways, before it shows up downrange at the target?
The AndiScan is very nearly a LabRadar killer. Almost. But its file management woes aren’t some little thing. They live at the very heart of how you use the device.
What is it that we say to the God of death?
“Not today.”


