Follow along with the video below to see how to install our site as a web app on your home screen.
Note: This feature may not be available in some browsers.
This Forum is for adults 18 years of age or over. By continuing to use this Forum you are confirming that you are 18 or older. No content shall be viewed by any person under 18 in California.
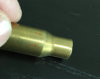
Hi. First post after introduction here. I'm very new to reloading but getting into it for my .308 and .223 rifles (later my 7mm Rem Mag). I'm encountering an issue with 2x fired (my rifle only) cases in my .308 and hoping I can get some advice. The rounds were neck sized only after the first firing (so now fire formed twice as it were). The brass is PPU and has been trimmed to length and chamfered/deburred, if that is relevant. I'm noticing that the cases are 'sticky' in chambering/extraction (unloaded, just the brass) and that there are faint lines scratched near the shoulder on extraction. The brass chambers but can be sticky on extraction. (The straight pull action of the Blaser doesn't allow particularly gentle bolt closure in the way a conventional bolt action might.) I would have thought a lack of headspace would mean the cases wouldn't chamber at all so was ruling out a requirement to bump the shoulders but maybe I am wrong. I've done my best to show the issue in the attached photo. Help appreciated!
Just make sure you get the proper tools to measure the base to shoulder and don't over size/bump the shoulder too far. (common mistake by new reloaders, esp if you follow the manufacturer instructions on setup of the die)
Full length size and bump the shoulder about .002 and you will be all better. Hornady makes an attachment for your calipers to measure the shoulder.
If you run high pressure loads your cases will get tight, and neck sizing alone will not provide effortless chambering. The solution is full-length sizing with a die suitably dimensioned for your chamber.
If you full length size your brass after every firing, and bump the shoulders back .002 or .003 if this a bolt gun your issues will go away. Neck sizing only, in my opinion is a bad idea because it causes the exact problems you are now experiencing. You will need to get some bump gauges with the proper inserts and calipers in order to set the head space when setting up your full length sizing die. Ray
You should full length resize your brass after every firing so that the shoulder is pushed back about .001"- .0015" only. Neck sizing is not the benefit it seems. If you only bump the shoulder that small amount your rifle will shoot just as well if not better.
If you are neck sizing with a conventional sizing die, screw it down 1/16 turn, size your brass and check to see if it just chambers easily. Repeat the 1/16 turn and check until it does. There are headspace tools available to give you actual numeric readouts to verify but the above will get you back on the range in any event.
Look at Sinclair/Browells as a start to find tools. Others will soon chime in with their recommendations I have not doubt!
Wow, ok. I had been led to believe that neck sized only fire-formed brass was the way to go for accuracy. Just so I understand clearly - I worry my novice understanding of terminology might mislead me - are you guys saying FL resize only so much that the shoulder is bumped? A complete resize of the brass would negate any fire-forming benefits. I have the Forster Datum Dial kit and a good set of callipers. I have the Redding bushing neck die set with body die. (I'm not ready to jump to custom dies engineered to my particular chamber.)
I had thought a shoulder bump only necessary when the case has expanded so that case head to shoulder length was too long and the case didn't chamber at all. Here the tight fit is not on the shoulder per se but at the body region near the shoulder although I agree setting everything back a little will help alleviate the tightness.
PS: I hope I am communicating in an understandable way!
Just make sure you get the proper tools to measure the base to shoulder and don't over size/bump the shoulder too far. (common mistake by new reloaders, esp if you follow the manufacturer instructions on setup of the die)
Full length size and bump the shoulder about .002 and you will be all better. Hornady makes an attachment for your calipers to measure the shoulder.
You didn't mention your load data. Sounds like you are near the upper limit. When you neck size, you still must full length size every few firings or they will be too long to chamber. Just makes life eaiser.
I believe the marks on your case is from extraction and not from being tight. You need to full length size every time. Only bumping the shoulder .001 to .002. You need a way to measure the fired case and sized case to see how much you are moving the shoulder. I like the Hornady headspace guage that fits on the calipers. There are different size inserts available to do various cartridges. Neck sizing for better accuracy is a myth. I can take new brass and shoot great groups at 1000 yards. Matt
^^^all of this^^^ Full length size every time and remove the expander ball. If your die is bumping too much, consider the Redding competition shellholder set.
Hi. I'm not at the load data point yet. To explain, I'm examining my pool of fired brass that was previously loaded for me by HPS Target Rifles Ltd in the UK (I just moved from London to Miami). I'm going through all the brass prep stages before doing my own incremental load testing etc. So I noticed this issue early on. I had thought a "too long to chamber" issue would manifest itself on the shoulder itself rather than on the body which is why I had initially timidly dismissed it. FWIW brass/primers did not show any signs of excessive pressure.
But sounds like I should focus on getting my body die up 'n running earlier than I thought I would.
As an aside, when I look at my pic the deburring job would seem 'rough'. I was told light pressure only. It is done enough?
Thanks for all the help. I'm sure this won't be my last question!
Just so I understand clearly - I worry my novice understanding of terminology might mislead me - are you guys saying FL resize only so much that the shoulder is bumped?
@TOBY Thanks. Yes, I had watched the videos after you provided your first link. I recognise that the ideal situation would be a custom chamber, die or both so they were perfectly in synch. But as noted above I'm not ready to jump to that level of ideality.
@hogpatrol I was wondering this but then I'd expect to see the marks on the cases immediately after firing/extraction. This I can't yet confirm as I have tumbled this brass already. I still have some of this ammo left (1x fired) and so will pay greater attention next time at the range.
I take on board also all the points about neck vs FL sizing above. I'm going to work on setting up my Redding body die to bump the shoulder 2 thou and see what happens then.
they should warn people before selling them a neck sizing die- "neck sizing went out of favor in the 50's once fl sizing was discovered. whoever told you neck sizing was the best method is wrong- use at your own risk" maybe this would curtail the problems new reloaders face and we see multiple times a week and stop a lot of the dust covered die boxes on the shelf.
Probably. How then are you guys managing neck tension? (Absent custom chamber/die combos.) I was planning to outside neck turn my brass to "trim the high side", then use the relevant bushing in a neck die to size the case necks, only FL sizing when needed. I guess now I end up in a 2-step sizing process. Body die to bump the shoulder without affecting the neck and then neck sizing with my neck bushing die.
Probably. How then are you guys managing neck tension? (Absent custom chamber/die combos.) I was planning to outside neck turn my brass to "trim the high side", then use the relevant bushing in a neck die to size the case necks, only FL sizing when needed. I guess now I end up in a 2-step sizing process. Body die to bump the shoulder without affecting the neck and then neck sizing with my neck bushing die.
Use a Redding type S or other FL sizing die that also utilizes bushings of different sizes. A separate step of neck sizing is not needed. In other words, do away with the neck sizing die.
Those would be circumferential and not longitudinal. IMHO those marks look like the brass is hitting a sharp machined surface inside the action of the gun, maybe at the ejection port, maybe where the barrel threads into the action.
Those would be circumferential and not longitudinal. IMHO those marks look like the brass is hitting a sharp machined surface inside the action of the gun, maybe at the ejection port, maybe where the barrel threads into the action.
Under certain conditions, sloppy tooling or whatever, stop the lathe, pull out the reamer and you can get small straight marks like that in the chamber which transfer to the brass. BTDT.
This Forum's expenses are primarily paid by member contributions. You can upgrade your Forum membership in seconds. Gold and Silver members get unlimited FREE classifieds for one year. Gold members can upload custom avatars.